Welcome to the tutorials section.
While a large portion of the site offers tips and info about various things that can help you save money, time, or enlighten you on things, this section is dedicated to learning new traits that can help you make money.
Learning/advancing through Excel, Are you proficient in excel, know just enough to get by, or have no knowledge of it at all but you want to learn? You are in the right place.
Excel spreadsheets are everywhere. You can use them around the home just as easily as at work for budgeting your own bills, keeping an index of things, or worksheets for various things. These walk-throughs can be found online anywhere from $20-$500 depending on where you go and it pays for itself considering the time it saves you in the long run and the money you can make from it by saving other’s time.
- Level 1- Beginner; Learn basic navigation, controls, tools, formatting, proofing, conditional rules, sorting, expanding, moving rows/columns, hidden comments and some basic formulas
- Level 2- Intermediate; Learn to create tables, charts, and conditional formulas & formatting
- Level 3- Advanced; Learn Pivot tables, drop down lists, and macros
Welcome to EEF Excel tutorial
This course is split in 3 levels; Beginner, Intermediate, Advanced. Each level will have 3-5 steps
If you are here, chances are you already know excel is a great tool to have, you just need a better understanding of it, so let’s dive right in.
Note: This course was made using Excel 2016, a lot of features can be used in older versions but some may only be accessed with 2016.
If you have any questions, comments, or suggestions along the way, please feel free to e-mail me at Ben@Eagleyeforum.com
GETTING STARTED
After this step you will be more comfortable with getting to know your keyboard shortcuts, understanding the main page and tab, and knowing the icons.
First, let’s go over shortcut buttons and function keys that make everything a little easier
| BASIC FUNCTION KEYS | |
| F1 | EXCEL HELP PANE |
| F2 | EDIT ACTIVE CELL |
| F3 | PASTE NAME (IF NAMES ARE DEFINED) |
| F4 | REPEATS LAST COMMAND |
| F5 | OPENS “GO TO” DIALOG BOX |
| F6 | SWITCH BETWEEN WORKSHEET, RIBBON, TASK PANE, AND ZOOM CONTROLS |
| F7 | CHECK SPELLING |
| F8 | EXTEND MODE |
| F9 | CALCULATE ALL WORKSHEETS |
| F10 | TURN KEY TIPS ON |
| F11 | CREATE CHART OF DATA IN RANGE ON NEW SHEET |
| F12 | SAVE AS BOX |
| BASIC CTRL AND ALT COMBO SHORTCUTS | |||
| CTRL + A | HIGHLIGHT EVERYTHING | CTRL + ` | COPY FORMULA FROM CELL INTO BAR |
| CTRL + O | OPEN WORKBOOK | CTRL + ‘ | COPY ABOVE CELL TO THIS CELL |
| CTRL+ W | CLOSE WORKBOOK | CTRL + SPACEBAR | SELECT ENTIRE COLUMN |
| CTRL+ N | NEW WORKBOOK | CTRL + F1 | SHOW/HIDE RIBBON |
| CTRL +S | SAVE WORKBOOK | CTRL + F2 | PRINT SETUP |
| CTRL + C | COPY HIGHLIGHTED TEXT/IMAGE | CTRL + F3 | NAME MANAGER |
| CTRL + V | PASTE/INDENT TEXT/IMAGE | CTRL + F4 | CLOSE WORKBOOK |
| CTRL + X | CUT HIGHLIGHTED TEXT/IMAGE | CTRL + F5 | COLLAPSE WINDOW TO SMALLER VERSION |
| CTRL + Z | UNDO PREVIOUS ACTION | CTRL + F6 | MOVE TO NEXT WORKBOOK |
| CTRL + Y | REDO PREVIOUS ACTION | CTRL + F7 | MOVE COMMAND (WHEN NOT MAXED, ARROWS MOVE) |
| CTRL + P | CTRL + F8 | SIZE COMMAND FOR BOOK | |
| CTRL + E | INVOKE FLASH FILL | CTRL + F9 | MINIMIZE WORKBOOK |
| CTRL + K | INSERT HYPERLINK | CTRL + F10 | EXPAND/RESTORE WINDOW |
| CTRL + L OR T | CREATE TABLE | CTRL + F11 | OPEN MACRO SHEET |
| CTRL + B OR 2 | BOLD FONT ON/OFF | CTRL + F12 | OPEN WORKBOOK |
| CTRL + U OR 4 | UNDERLINE FONT ON/OFF | ALT + H | HOME TAB |
| CTRL + I OR 3 | ITALIC FONT ON/OFF | ALT + N | INSERT TAB |
| CTRL + 9 | HIDE SELECTED ROWS | ALT + P | PAGE LAYOUT TAB |
| CTRL + 0 | HIDE SELECTED COLUMNS | ALT + M | FORMULAS TAB |
| CTRL + HOME | MOVE TO BEGINNING OF SHEET | ALT + A | DATA TAB |
| CTRL + END | MOVE TO LAST CELL WITH CONTENT | ALT + R | REVIEW TAB |
| CTRL + PAGE UP | MOVE TO NEXT SHEET | ALT + W | VIEW TAB |
| CTRL + PAGE DOWN | MOVE TO PREVIOUS SHEET | ALT + L | DEVELOPER TAB |
| CTRL + 1 | ALT + Y | HELP TAB | |
| CTRL + 5 | APPLY OR REMOVE STRIKETHROUGH FONT | ALT + B | ACROBAT TAB |
| CTRL + 6 | SWITCH BETWEEN HIDING OBJECTS | ALT + Q | TELL ME/SEARCH TAB |
| CTRL + 8 | SHOW/HIDE OUTLINE SYMBOLS | ALT + 1 | SAVE |
| CTRL + ~ | SHOW/HIDE VALUES AND FORMULAS | ALT + 2 | UNDO |
| CTRL + – | DELETE CELL(S) | ALT + 3 | REDO |
| CTRL + ; | TODAY’S DATE | ALT + ZS | SHARE |
While you need to hold “CTRL” with the character for those to work, the “ALT” command just needs to be pressed which will open up a list of characters over areas that can be pressed by key board to access;

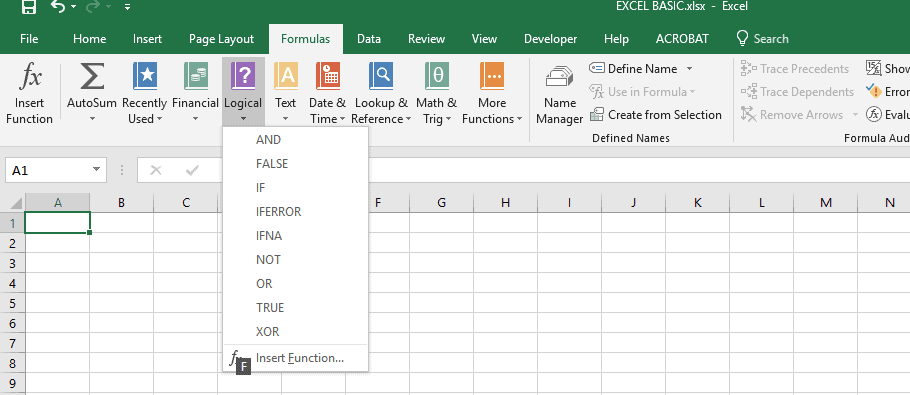
If I were to just press “M” after this, it would take me to the “Formulas” tab where everything is still highlighted with quick access;

Now, if I were to press “L”, it would drop down the list of functions instead of having to drag and click with a mouse
Now, let’s go over your workbooks once you open it;
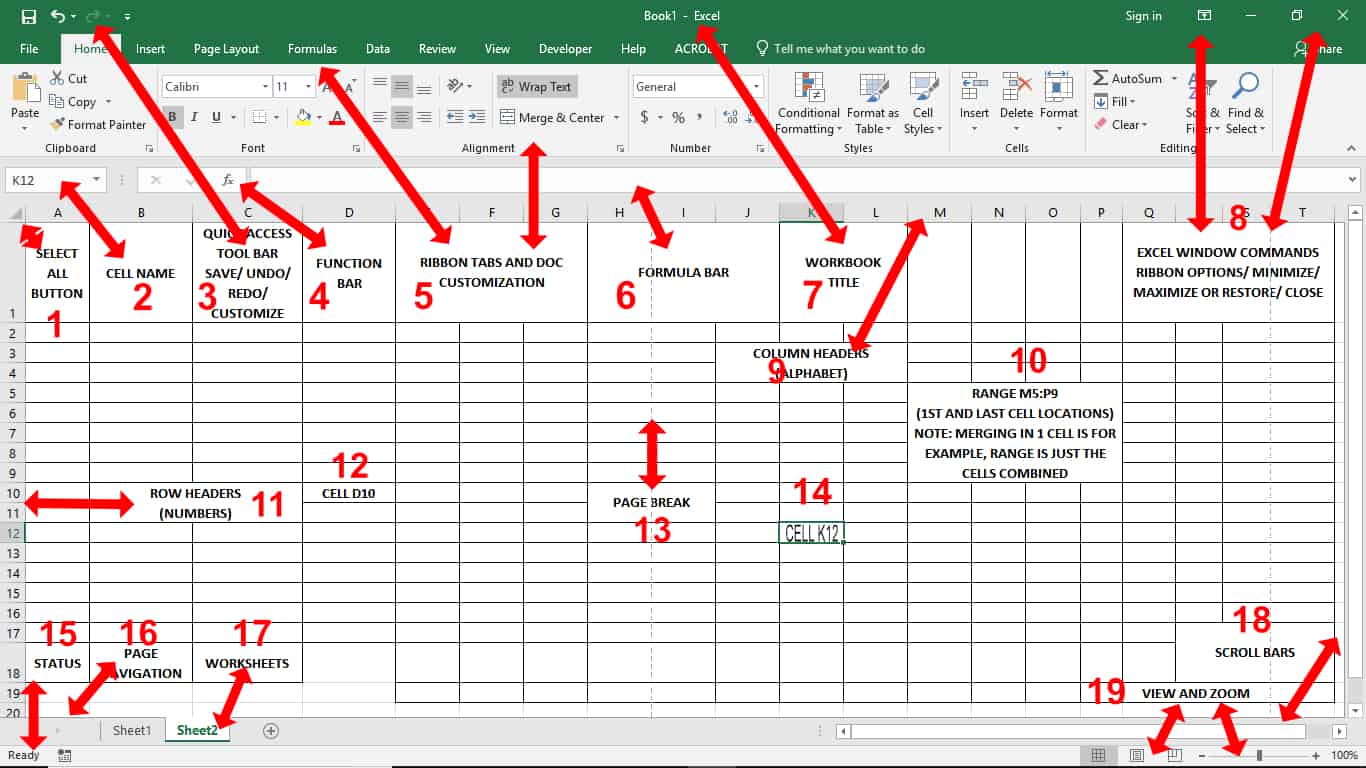
- Select all button; Highlights the whole page, even what you have not written on. Quick for setting everything the same font, size, positioning, etc.
- Cell name; the name of the cell you are on.
- Quick access toolbar; From left to right we have the save icon, undo arrow to change your last change (CTRL+Z), redo arrow (CTRL+Y), and customization.
- Function bar where you can look for types of formulas and input them
- Ribbon tabs and document customization bars; the tools to do the job
- Formula bar; what’s written in each cell can be seen here, formulas included
- workbooks title
- Excel window commands
- Column headers (A,B,C, etc.)
- Range: highlighting cells (like M5 to M9 in the example) is called a range
- Row headers (1,2,3,etc.)
- Cell D10
- Page break is where it will cut off if you print the sheet
- Cell K12
- Sheet status (ready, edit, saving, etc.)
- Page navigation to easily travel through your workbooks sheet
- Titles of worksheets in your book
- Scroll bars
- View and zoom controls
Note: In excel a quick navigation from cell to cell is your up, down, left, and right arrows, if at any point they don’t work, check your “scroll lock” button on your keyboard.
Speaking of navigation, besides your standard mouse arrow, here are other icons that you may see as you scroll over parts
![]()
BASIC FORMATTING AND RULES
After this step, you will be more comfortable with the HOME tab, as well as utilizing universal rules, basic format cells dialogue box and sorting, filtering, finding, and replacing content
Now let’s look at the “FILE” tab;

Once opened, you will notice it is on the info tab. Here you have options of protecting your workbooks with a password (which can also be done on the main page but we will get to that later), managing, inspecting, and even what you are willing to share online with the browser view options. To the right we have the property areas where you can edit the title, tags and categories and see the size and important dates and people regarding the file.
All the other tabs are pretty self-explanatory but options opens up tabs of basic procedures you want it to do universally;
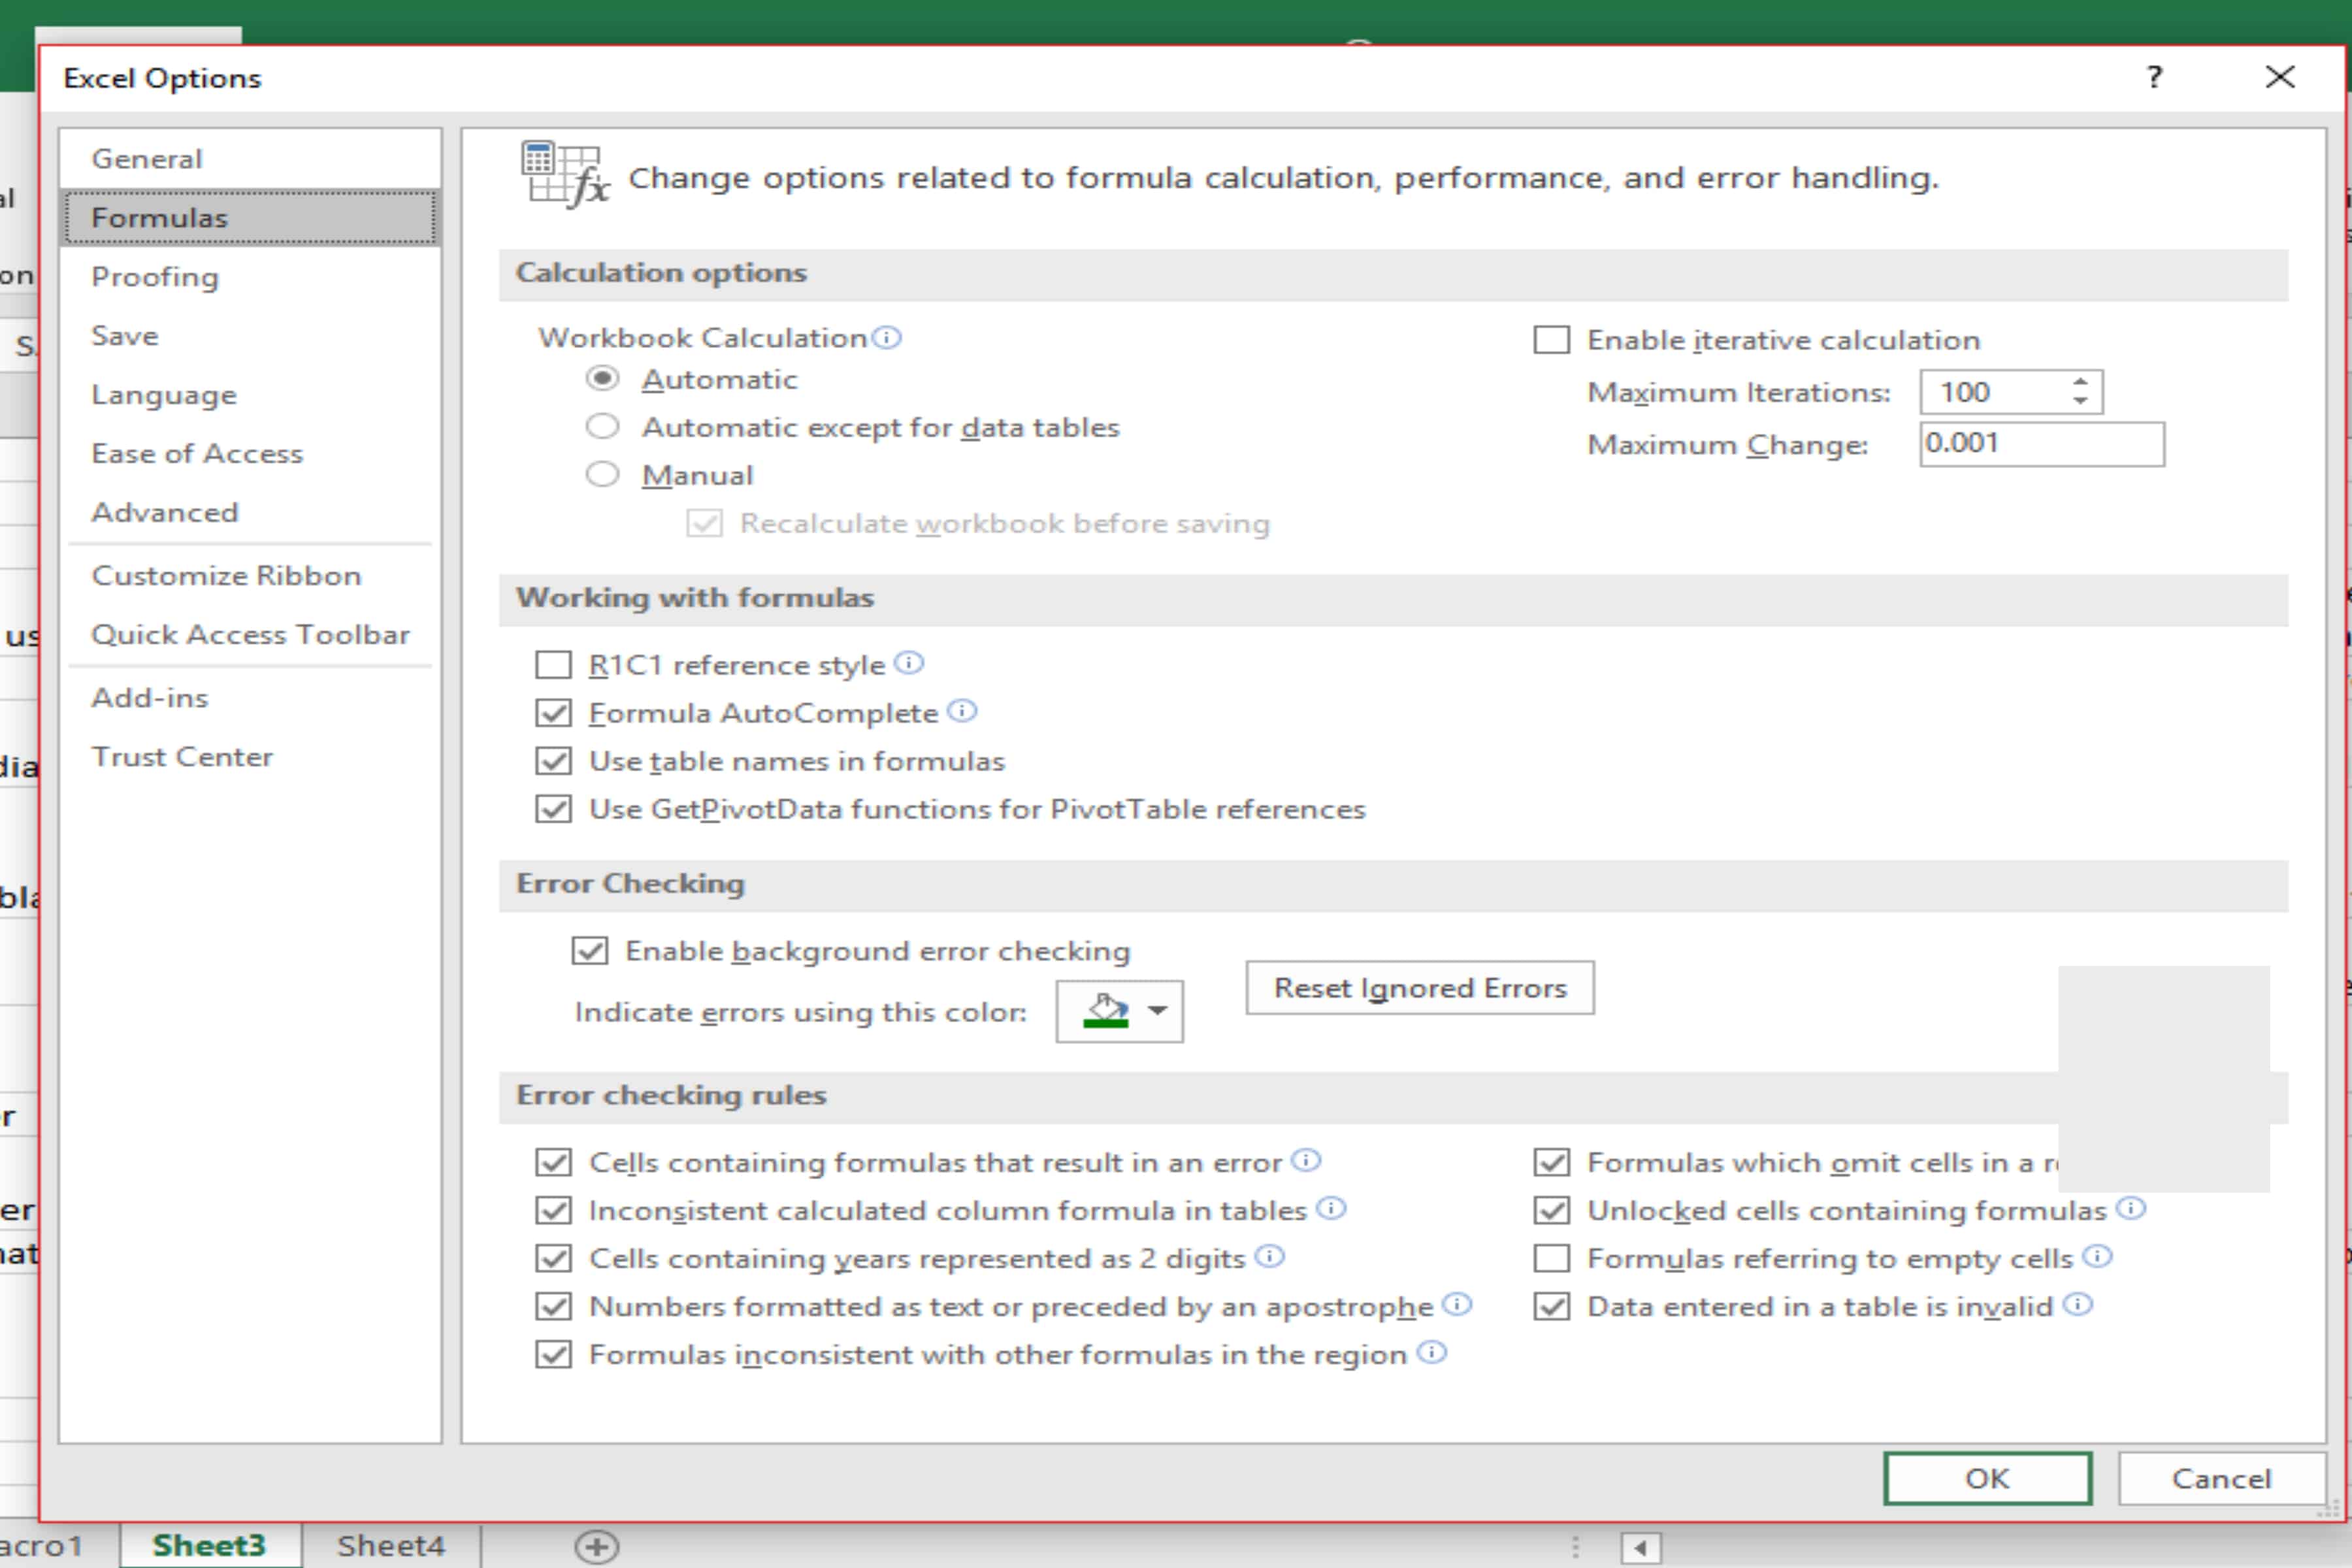
Back to our main page, if you right-click anywhere on the sheet and click “format cells” it opens a dialog box for the “HOME TAB” tools, some are also found on the ribbon and accessed via the “dialogue box”, also referred to as the “more” button;

First tab in the format cells menu is “NUMBER”
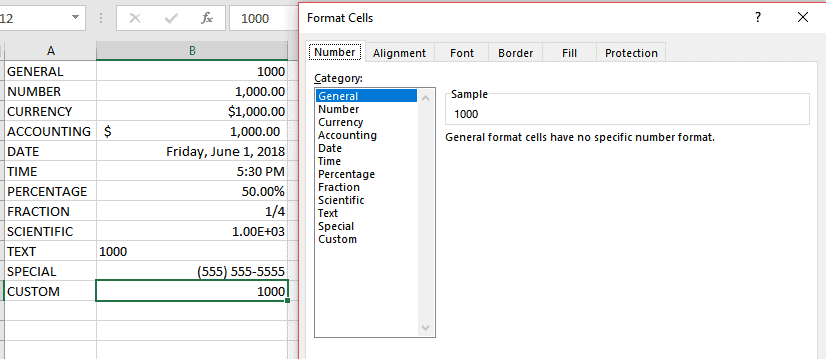
- General is the data as is
- Number gives you options of adding decimals and “,” when 1,000’s occur
- Currency adds the $ sign to numbers
- Accounting puts that dollar sign fixed to the beginning of the cell to give the number space.
- Date allows you to format how dates appear
- Time allows you to format how time appears
- Percentage converts your number to a percentile
- Fraction converts your number to a fraction
- Scientific helps with math formulas
- Text is data as is
- Special can be used for specific formatting on phone numbers, zip codes, and SSN where “-” are used
- Custom gives you a wide range of all the above and then some
Second is “ALIGNMENT”
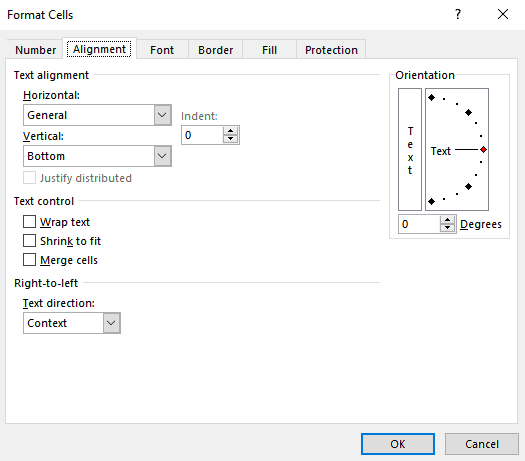 Here is pretty straight forward on how to align your text in reference to your cell as well as some text control;
- Wrap text will allow words to flow below, extending the row height instead of column width, if you want shorter column widths
- Shrink to fit does just that, shrinks your text to fit
- Merge cells allows you to merge highlighted cells where the 1st cell information takes over and deletes all the rest.
- Text direction is reading left-right or right-left
Third is “FONT”
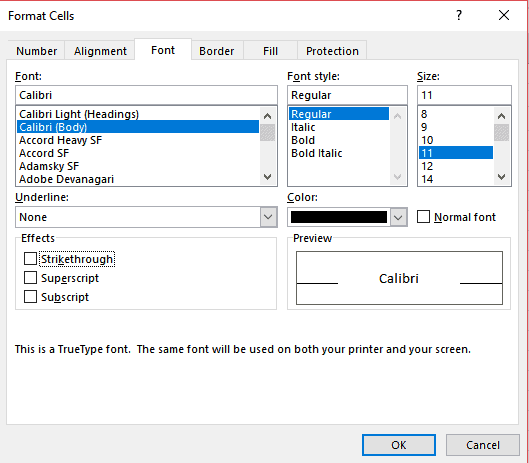 Font gives you a preview of your selections. You can range in type of font, style, size, color, and effects.
Use the Format Cells Dialog Box to Format Text
Home tab→Font→dialog box launcher.
In the Format Cells dialog box, ensure that the Font tab is selected and configure the desired font formatting and then select OK.
To change font from the main page, select the desired cell or range;
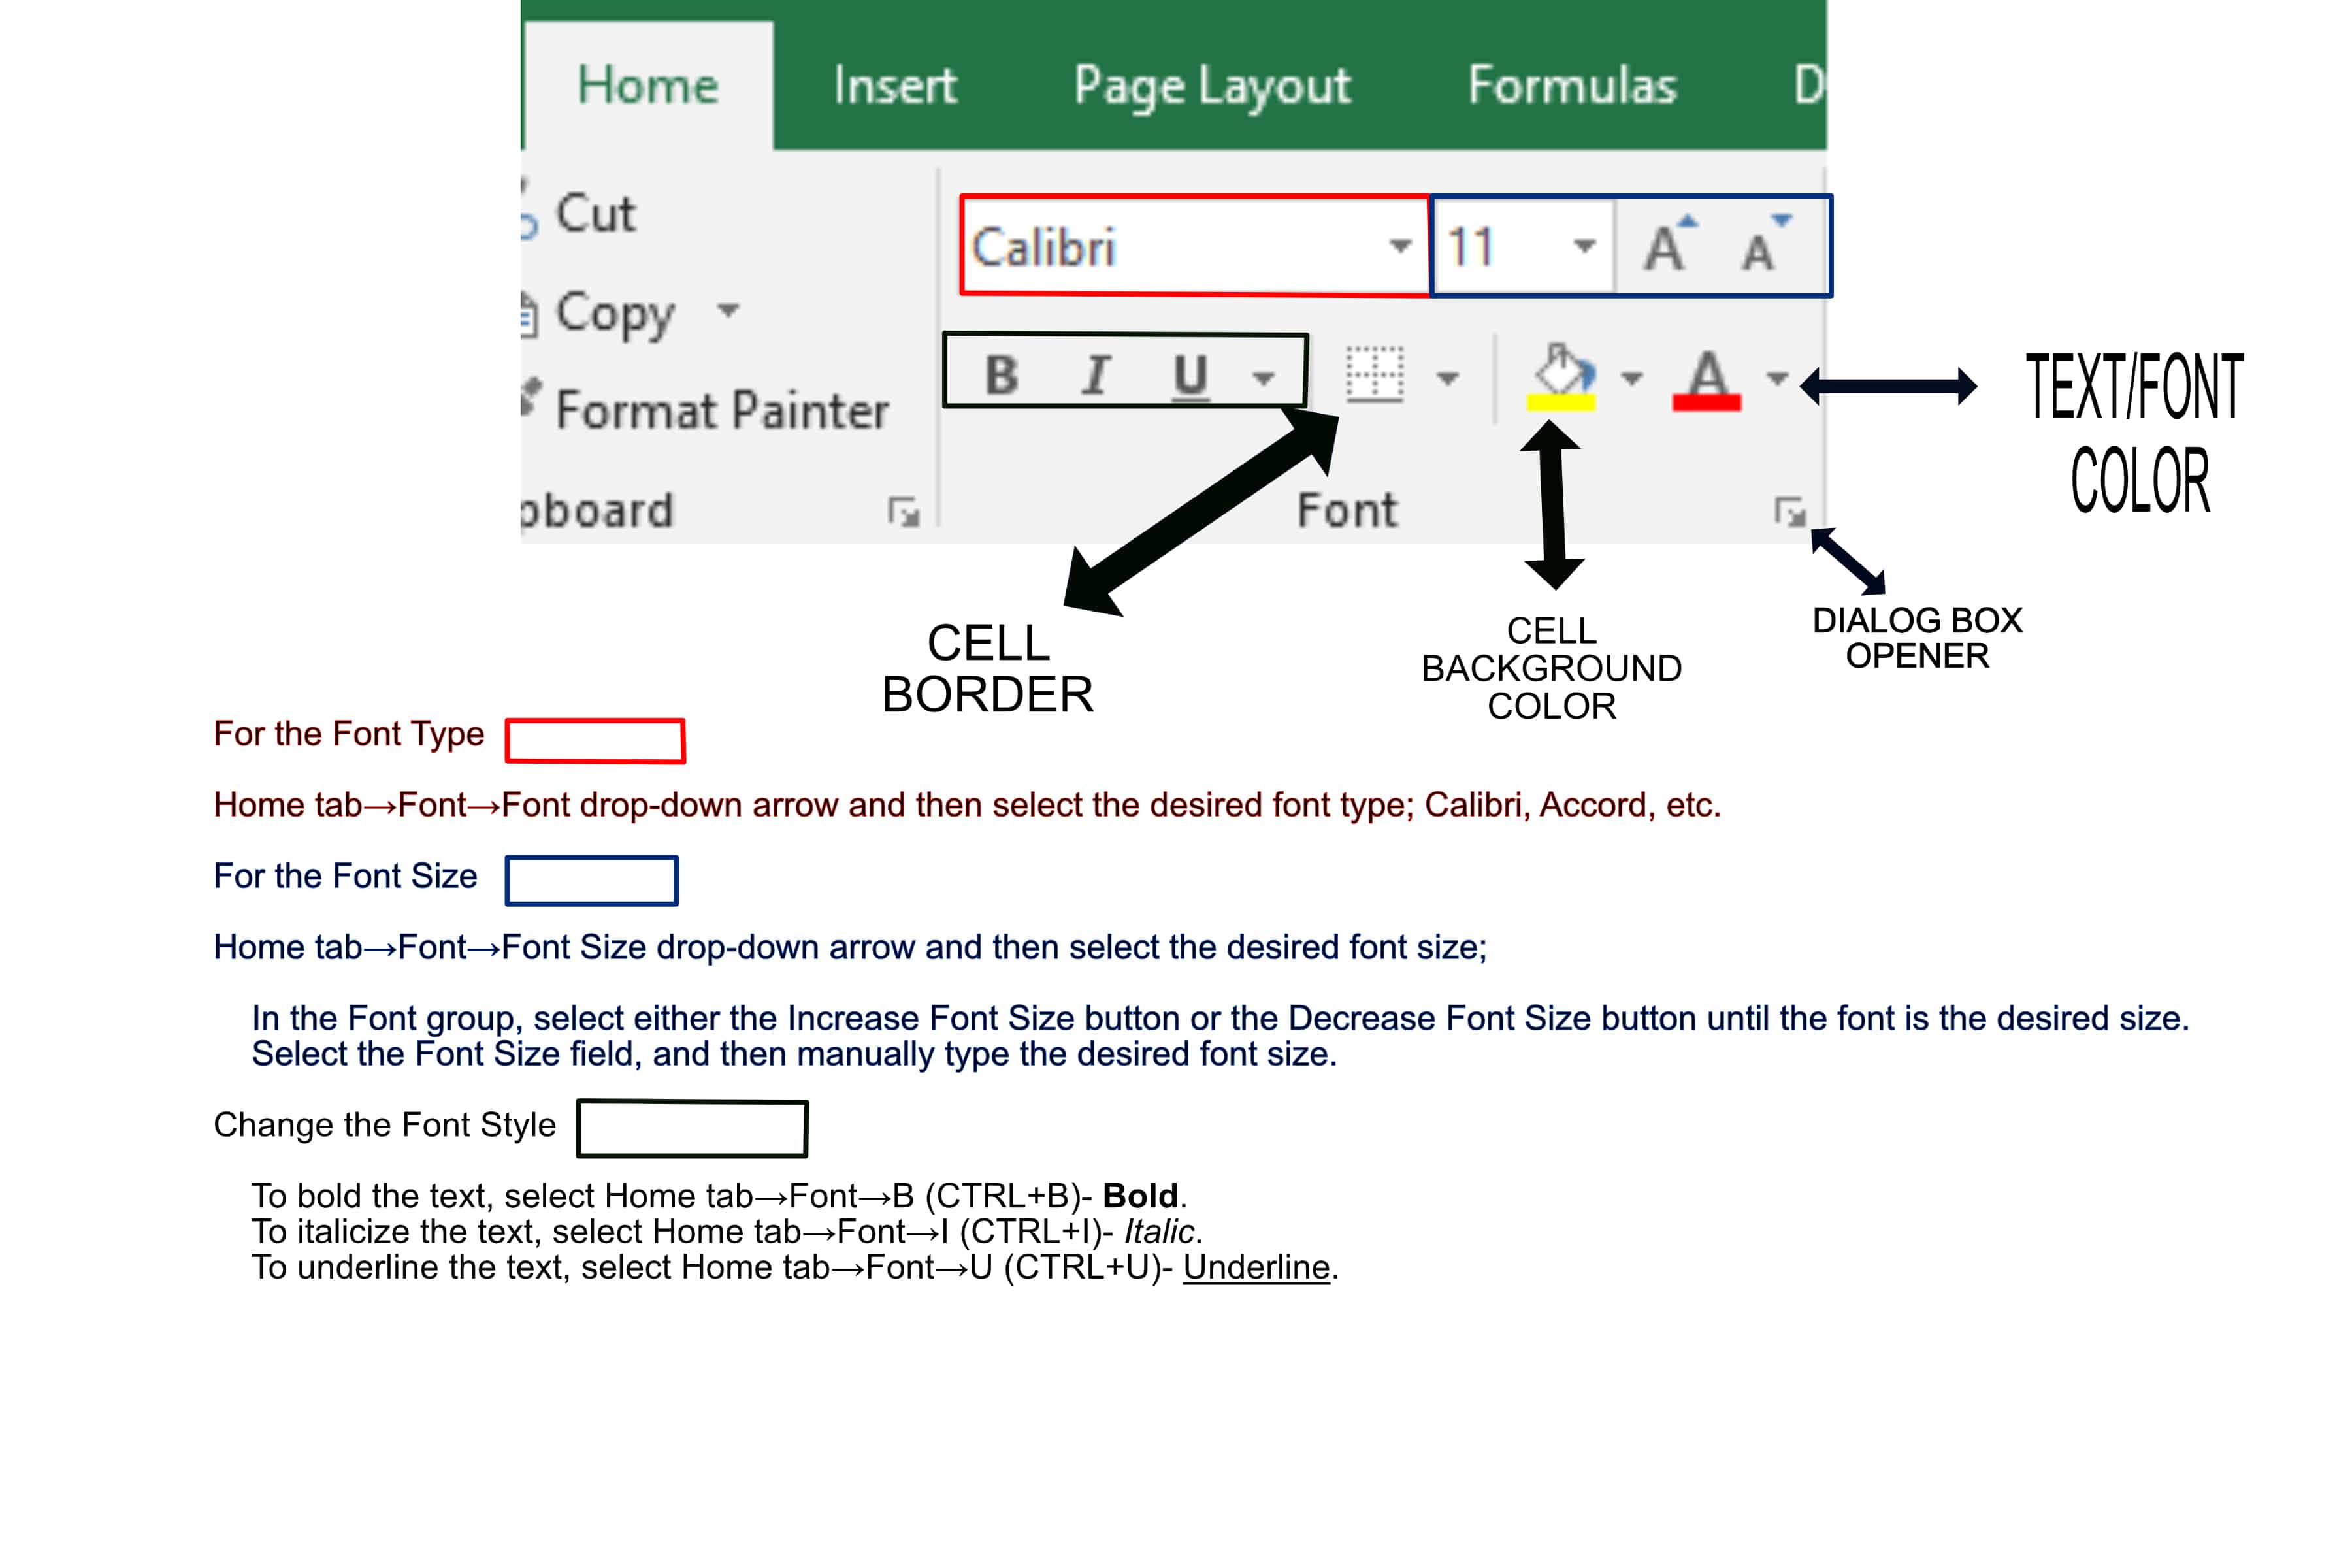
Fourth is “BORDER”
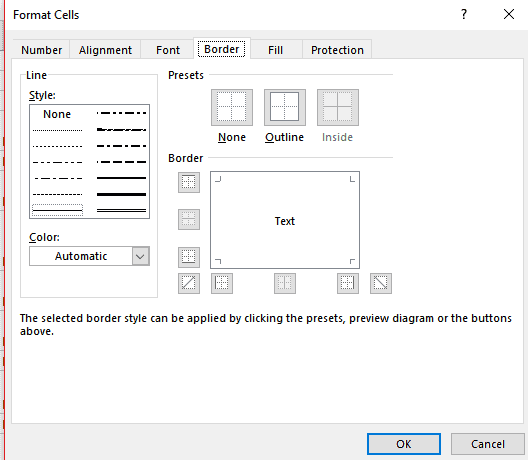 Border is where you can darken cell or range outlines to distinguish different areas, especially in printing. Leaving the sheet with a normal grid and printing it, shows no grid.
You have the options of style, presets, and color, and border;
- STYLE gives you dotted, straight, and a mix of both
- PRESETS allows you to fill the outline or inside cross as a whole of whichever style you chose.
- COLOR changes the border color
- BORDER allows you to just pick single walls, inside, outside , or diagonally
Fifth is “FILL”
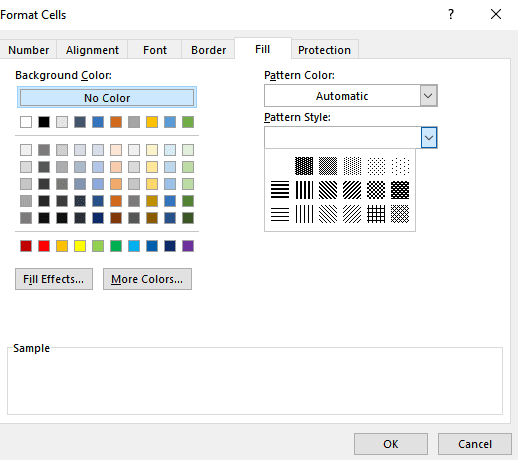
Last important one is “FILL” where you can color in the background of cells, add patterns, and add effects.
The protection tab is for protecting sheets and formulas, you will learn more about those later when its applicable.
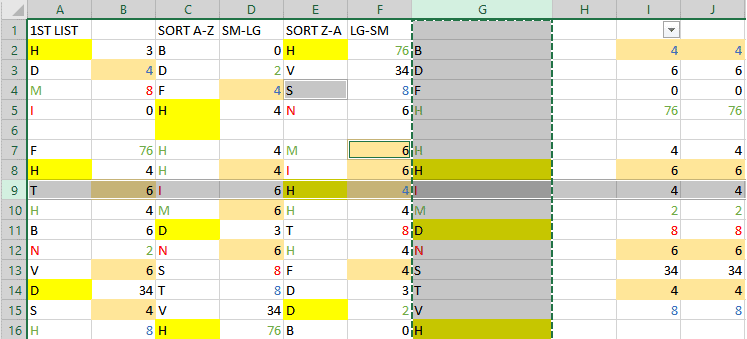
Here is a little breakdown of sorting, filtering, finding and replacing;
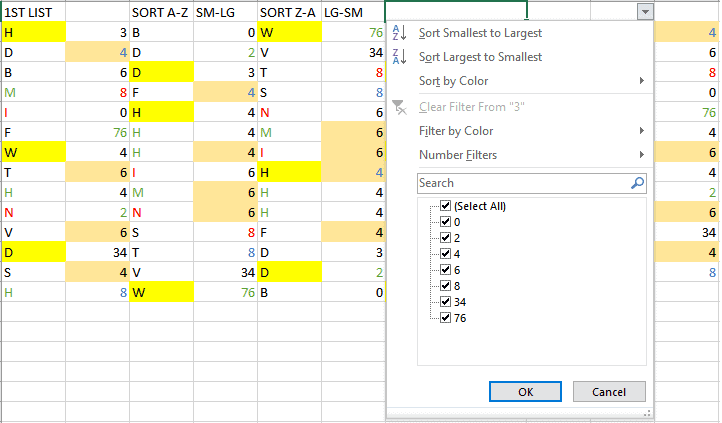
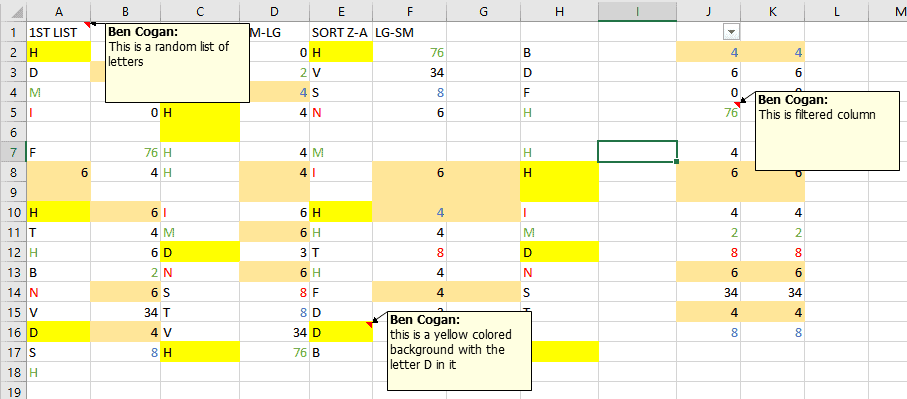
Notice that the 1st 2 columns are what I put in originally, the next 2 were highlighted and sorted by A-Z and small to large, the next 2 were highlighted and sorted Z-A and large to small. The last one is set on filter, it drops a list of the cells and you can uncheck them to hide them, but they will hide everything on their row.
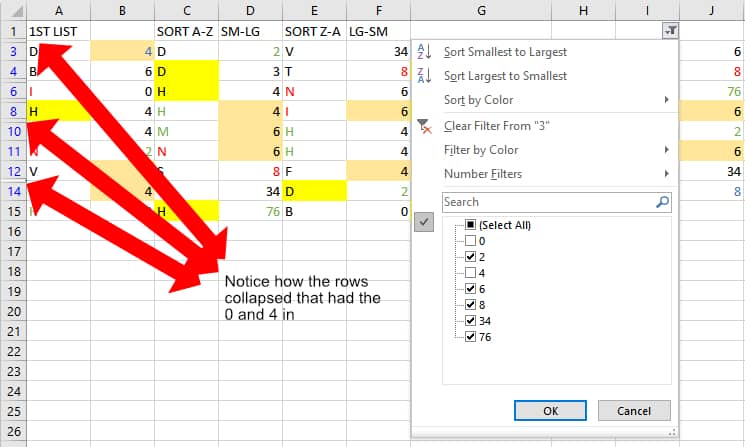
There is also a custom option where you can add levels for multiple sorts and set them in an order of which takes precedence first;
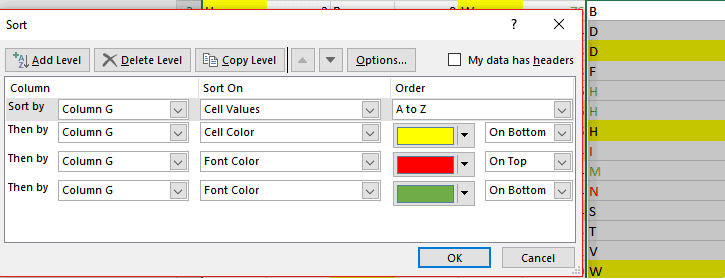
These are set by A-Z first, then if multiples are present, the yellow background types would sit on the bottom of that group, then red font sitting on top, followed by green font sitting on bottom.
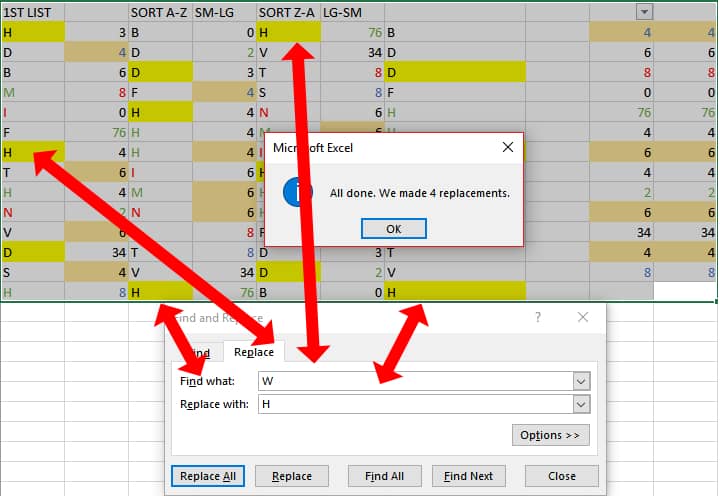
Now to find and replace characters;
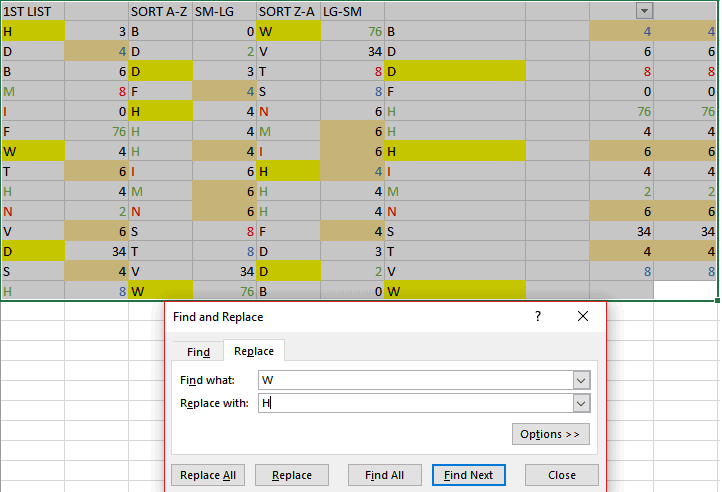
Once I hit replace all, I get all 4 W’s changing to H’s
PROOFREADING, ADJUSTING AND COMMENTS
After this section you will be more comfortable with the REVIEW tab, as well as;
- Moving cells, rows, and columns around
- the Proofing of your work
- Adding hidden comments to cells
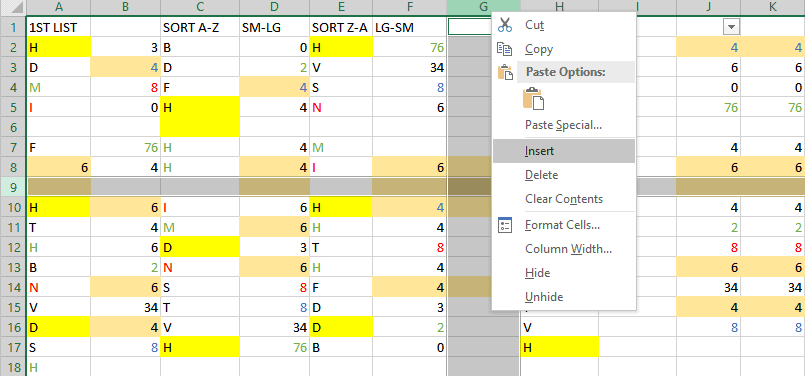
Depending on what you are doing, you may need to move things around at some point, you can do this by highlighting your cells, rows, and columns
Once you have the cell, row, or column highlighted, “right-click” on the mouse, click “cut”, then move over to the area you want it, right-click and “insert cut cells”. Wherever you drop your cell and row, it will take the number/letter of the row/column in front of it. When moving a cell, it will give you a message of whether you want to move the cell you are inserting into, to the left, right, up, or down.
You can move a groups of rows, columns, and even cells but you can’t mix them up or grab them at random spots, they have to be together.
You can also insert new columns and rows in between work
If you have a lot of text in your worksheet that you need to spell check, you can do so by hitting the “Review” tab

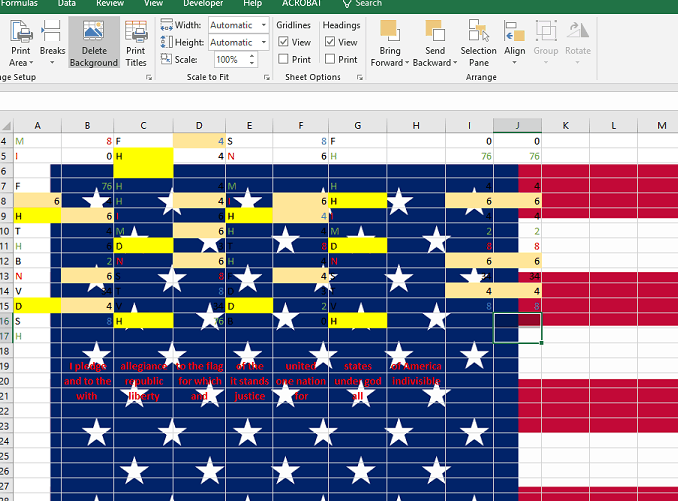
Here I put the pledge of allegiance on my excel sheet and added a bunch of typos, then hit the spell check located on the far-left of the ribbon where it hits on the 1st misspelled word and gives you alternatives;
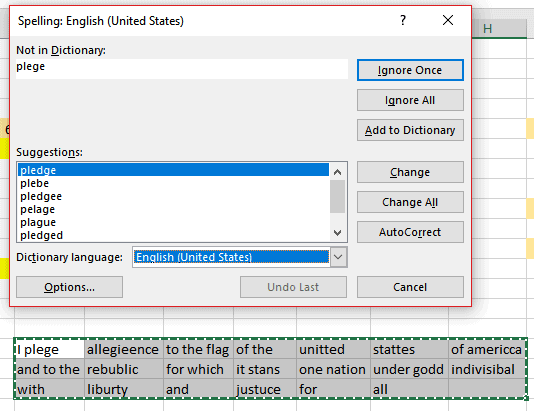
You are then given the options to ignore if you know the spelling is correct (like last names, company names, etc.), look and change each word, or just trust the spell check to change them all, I am going one by one and making a note here;
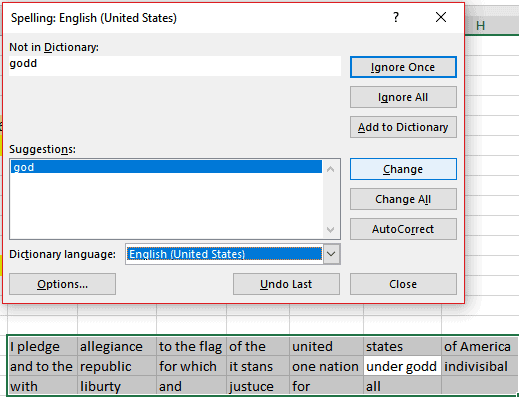
notice that it passed up “it stans” instead of stands, this is where it can get deceiving because although you meant stand, it recognizes “stans” as a plural of the word stan, which has a meaning in some, if not all, dictionaries.
Case in point: While spell check is a great tool, don’t expect it to fix all of your mess-ups
Now, just for giggles I jumped into the Page Layout tab and added a background to my sheet to go along with the pledge;
You can also add comments to cells, this helps especially for shared worksheets where you want to hide info about your sheet but still show others what you did;
Now for what Excel is best for;
BASIC FORMULAS
After this section, you will be more familiar with basic formulas from the “Formula” tab, such as;
- Basic math formulas (Add, subtract, multiplication, and division)
- Finding averages
- “COUNTIF” formulas
- Tip / commission calculator
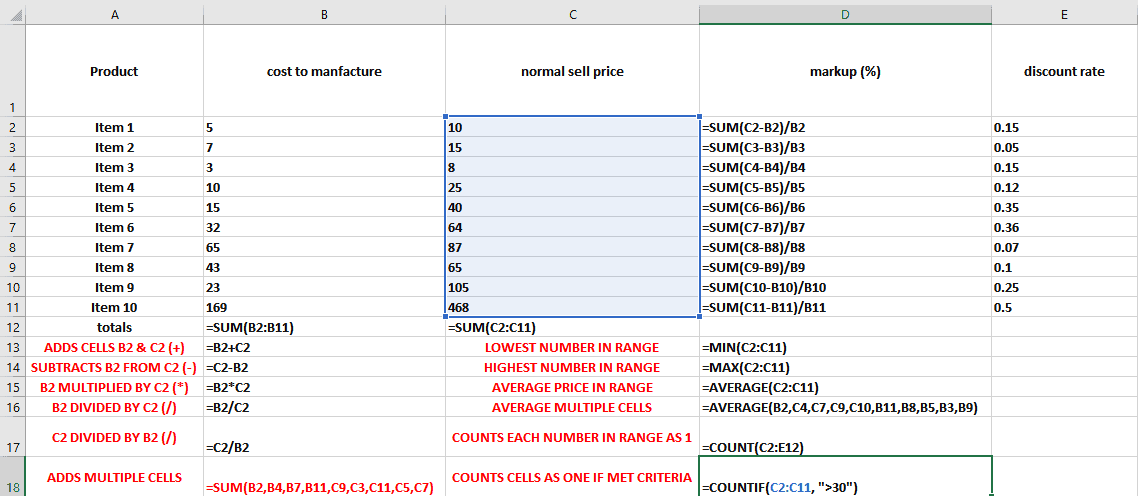
Here we have a simple spreadsheet loaded with basic formulas;

They were duplicated so that you can see them easier on this next image when the formula is shown (CTRL+~);
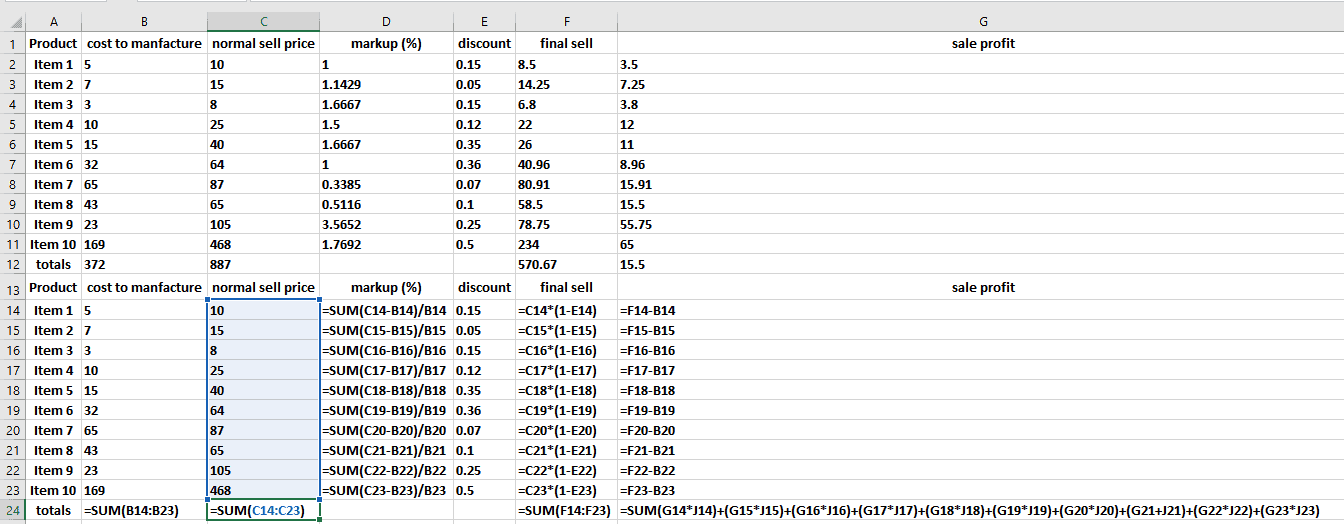
Note: When you are in “show formula” mode, you can click on the formula to see the cells affected as shown.
Here is a simpler sheet with descriptions of what it is being asked to do;
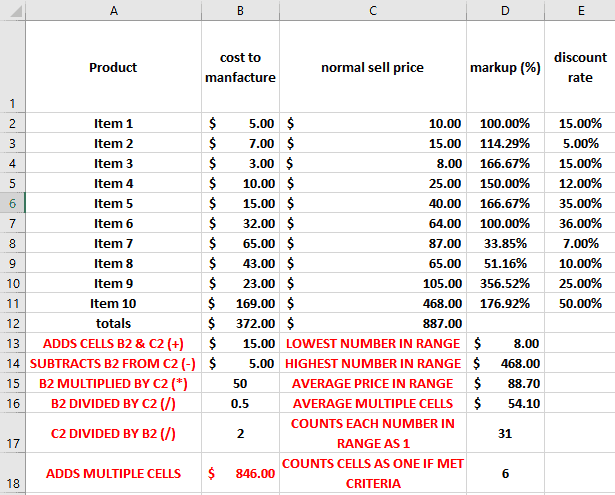
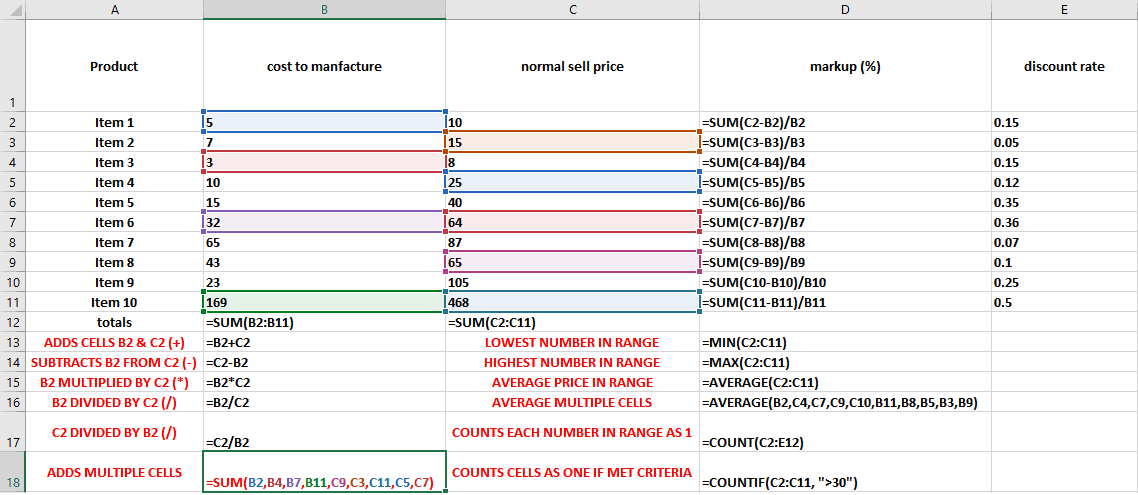
If you can’t guess which cells are affected, here are a few more with breakdowns of each type;
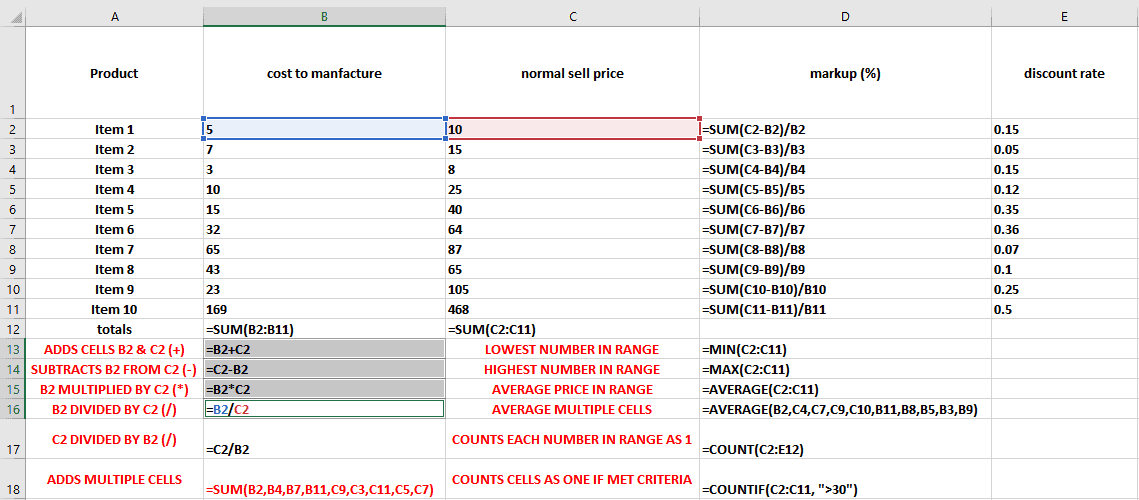
Notice B13-B17 are all playing off the same cells. The same is done here for finding the sum (C12), minimum number (D13), maximum number (D14), and average (D15);
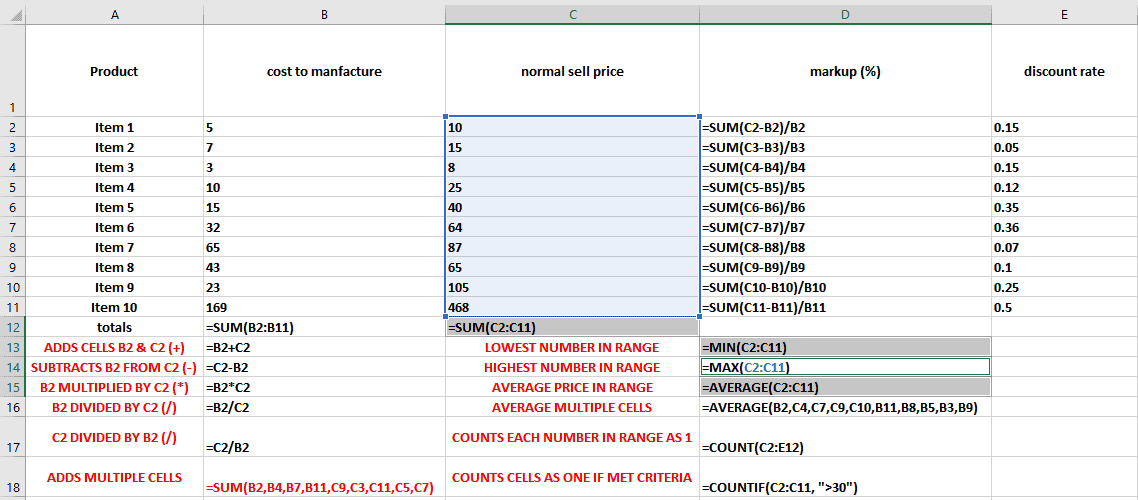
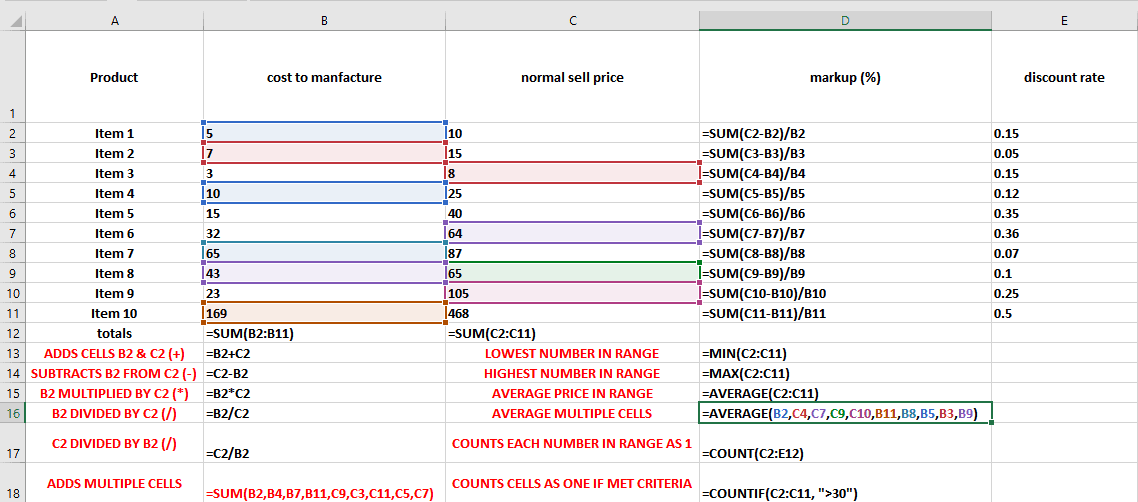
When looking for a sum or average, you do not need to stay in range or group, you can click your 1st cell, then hold “CTRL” and click on all the other cells you want in the equation
A couple other basic formulas that some people use often is “COUNT” and “COUNTIF” which as shown in descriptions, they count 1 for every cell shown if it shows content or meets criteria;
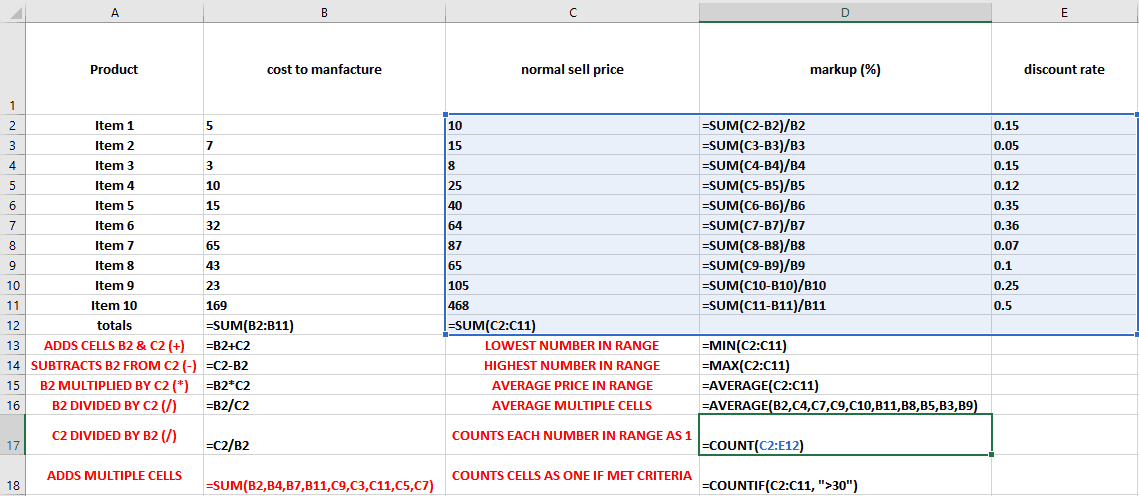
Notice the count only added 31 to D17, it did not add 1 for the two blank spaces.
I have directed “COUNTIF” to count only ones greater than 30, quotations are important here when giving a command, this could have been any number, or even cell. If you wanted to add greater/lesser than or equal to, you would need to form it like this; (“>=30”, “<=30). Equals (=) starts the equation so you can’t start a second one with it already in one which is why the “<>” come before the “=”, not after.
NOTE: When creating formulas, you can manually type them in the formula bar, go through the formula tab and follow prompts, and even just click cells after an “=” sign is added.
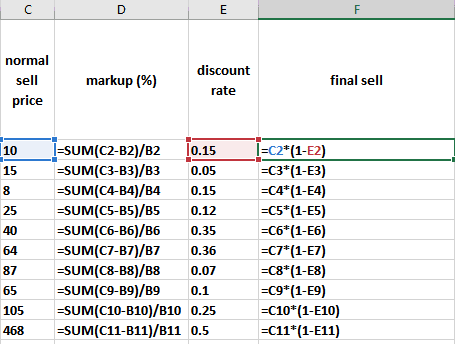
Now to get a little more complicated by throwing in percentages and fractions for calculating purposes, here is the full spreadsheet I made;
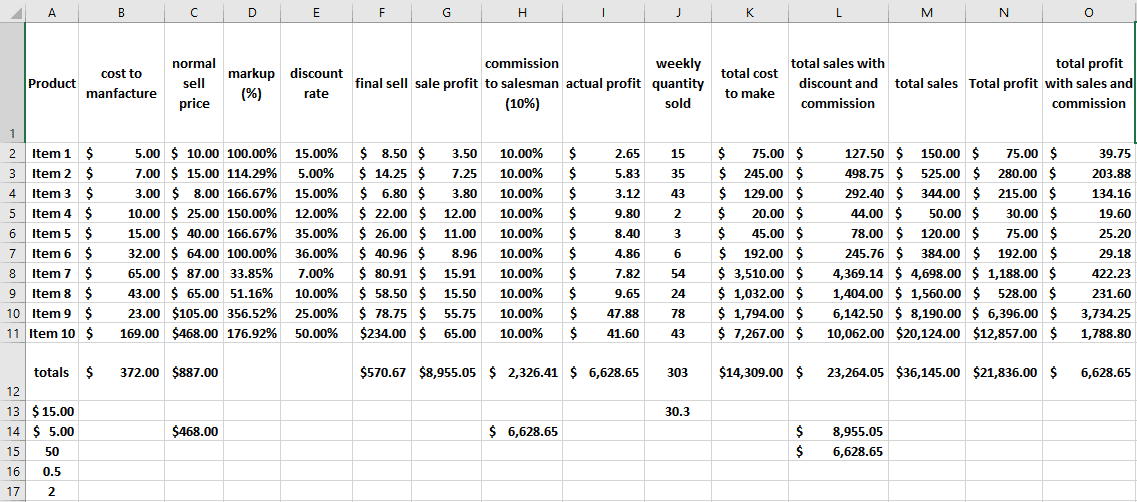
You have your “cost to make” and “normal sale price”, next to those it gives you the percentage of the markup and to calculate your discount you have;
To get what the profit would have been without a sales commission, you would have;
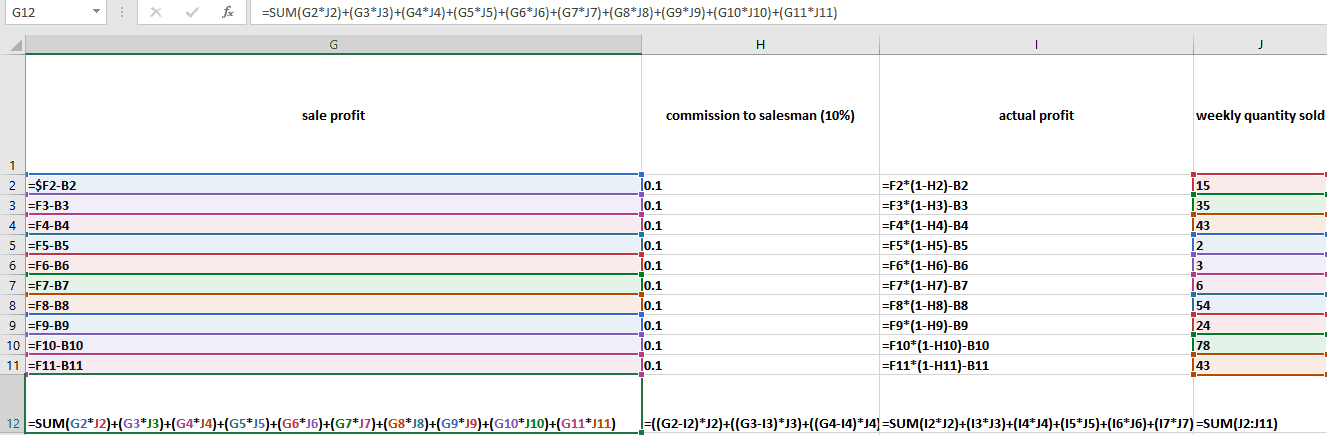
Now when you want to know how to calculate your salesman commission;
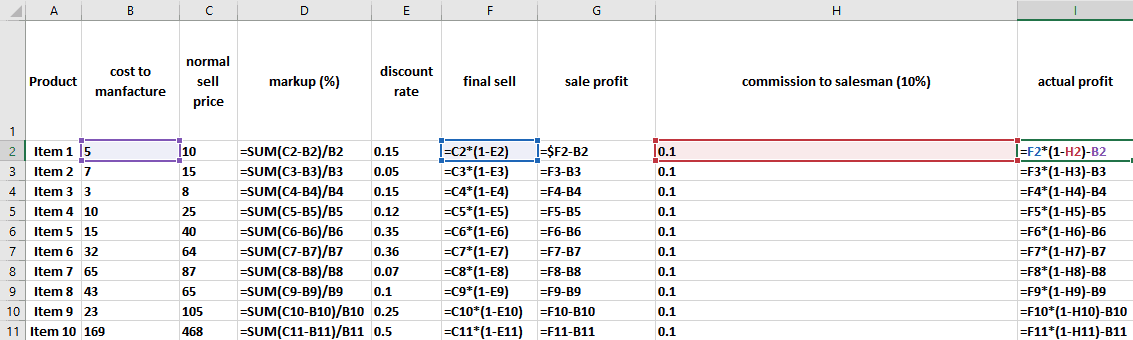
If you want to know how much your profit was after paying commission;
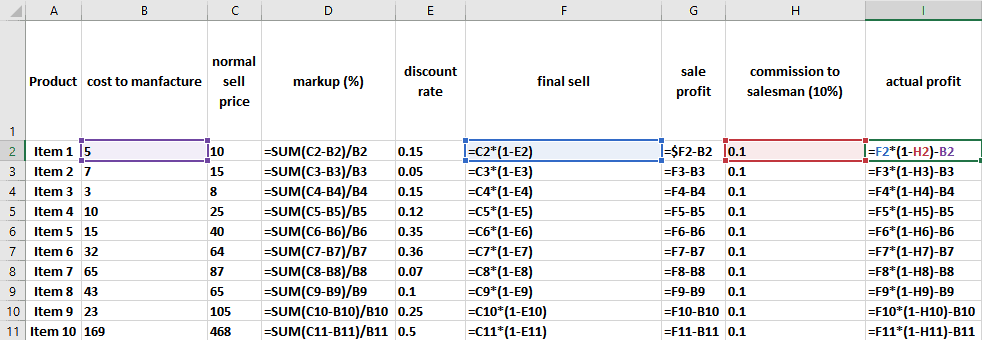
Here is if you want to find out how much your sales rep made overall;
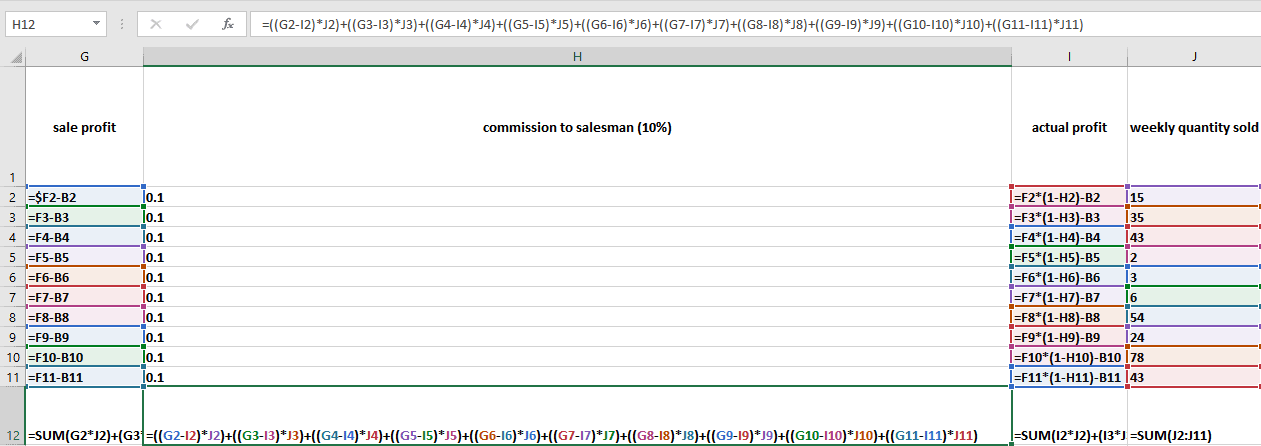
And your final profit after discount is applied and your commission is paid;
If you are looking for a tip calculator, the same types of formulas are applied, although in different order;
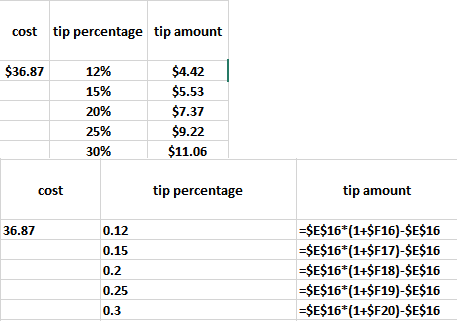
The “$” is referenced in the formula as an “absolute” command, it is used for quickly applying the same formula all the way down. The $ tells excel the cell stays the same. If you normally copy and past formulas, it goes in sequence as well, but this tells it to stay on the cell that has the value of $36.87 for E16 but count down on F16-20.
That does it for the basic course. By now you should be comfortable short-cutting and navigating around excel, understanding symbols, cleaning up your doc, organizing, expanding, formatting, and performing basic math equations. I hope this serves you well. Please let me know if you have any questions or suggestions about this page; Ben@Eagleyeforum.com
Next section we will cover more complicated conditional formulas, inserting tables and charts, flash filling, applying styles and themes, creating templates, working with functions, and querying data.
By now you should be pretty comfortable identifying key components of the User Interface and working with spreadsheets for basic formulating and formatting needs. Now lets dive a little deeper into tables, charts, conditional formulas & formatting, and if you have the 2013 or newer version; flash fill.
Flash fill
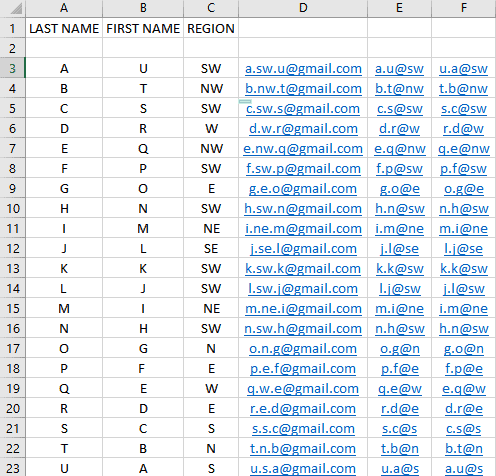
Flash fill is a great tool if you need to combine content from a few cells together separately for every row. You can find it on your quick format box or on the top right under editing. Here, you type in a couple of cells and it notices the pattern you are going for down the column and makes a suggestion, but the pattern box can mislead you, here I put letters of the alphabet as names, added region for where they are working and I want to get them all in an email list without typing in each one;
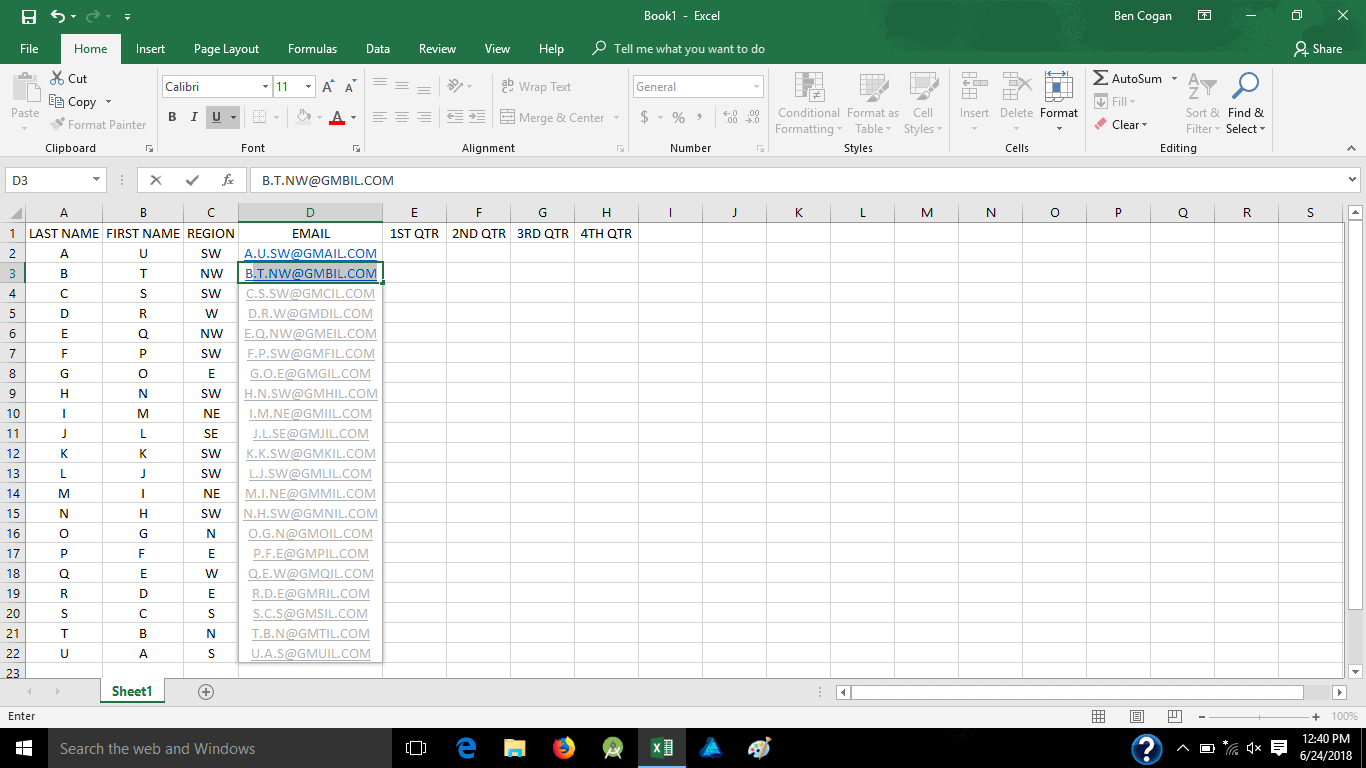
Notice how it picked up “Gmail” and counted the A in alphabetical order, that was while typing the second one so I manually punched it in too. If you accidentally hit the box and accept them all, you can easily press CTRL+Z to “undo” instead of deleting each one. Here is how it how it came out
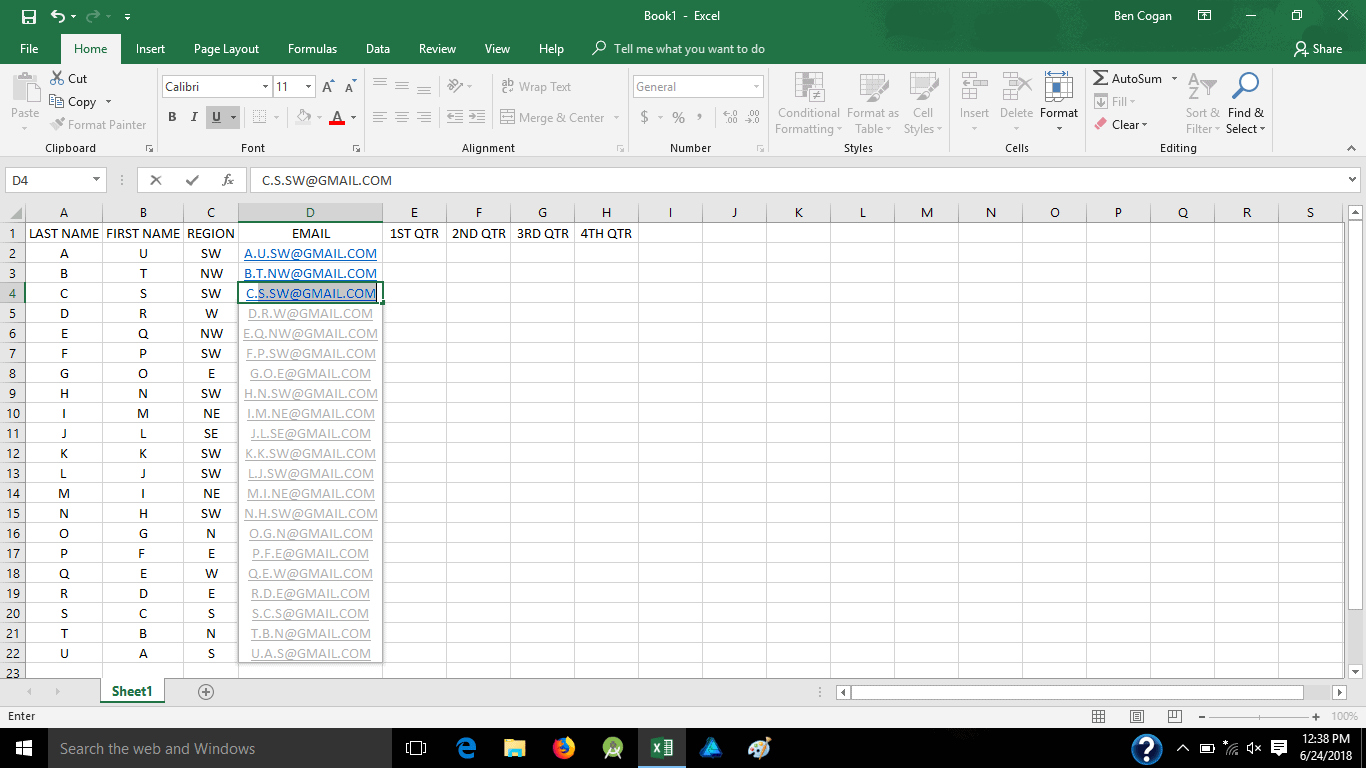
You just need to stay in line, if you try doing it a column away, it won’t come through, you would have to type each manually, but when you stay in line you can go out-of-order on the content and mix it up, like this;
That’s flash fill, simple tool that can go a long way if you have a huge list you need to combine. Instead of the past wasting an hour or so typing in each one, now you can get it done in seconds.
Conditional format/formulas & working with tables
Now let’s throw out some numbers and add some formulas, conditional formatting, and some rules;
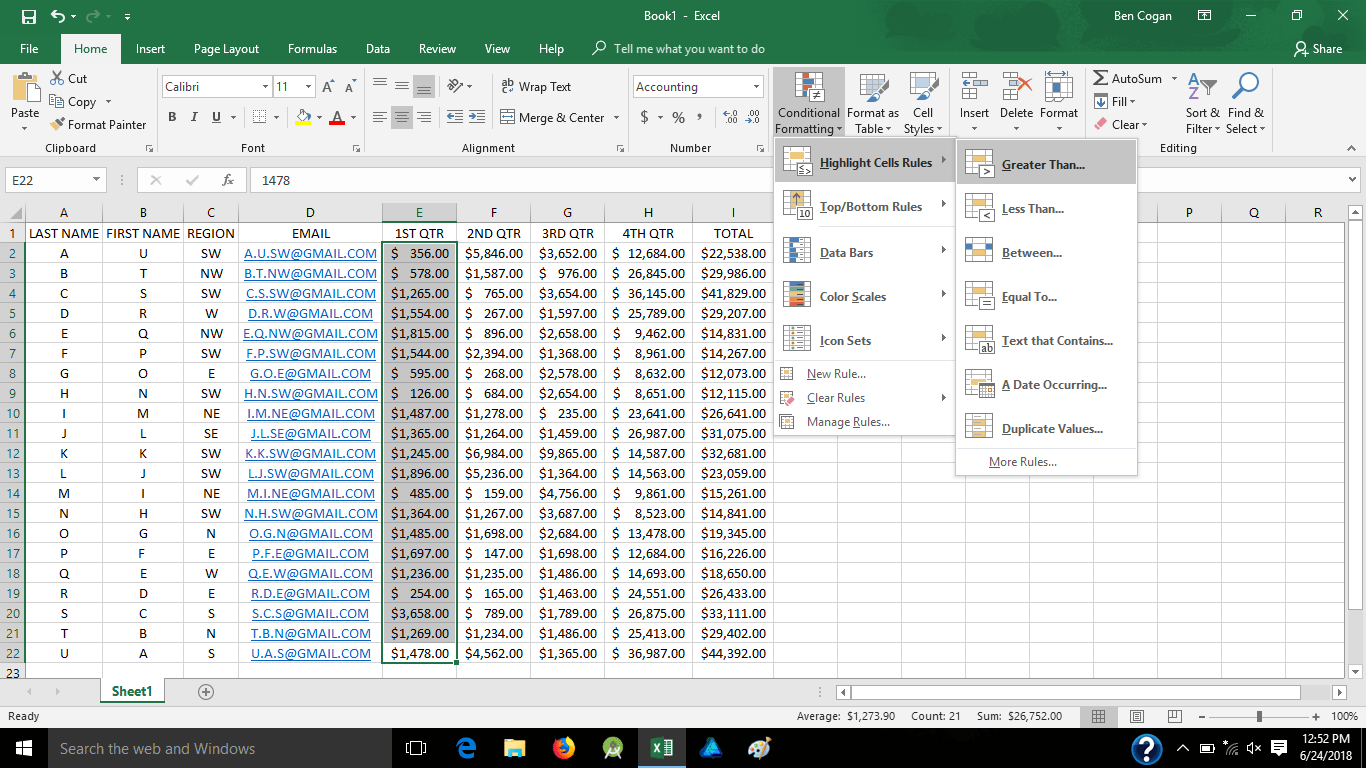
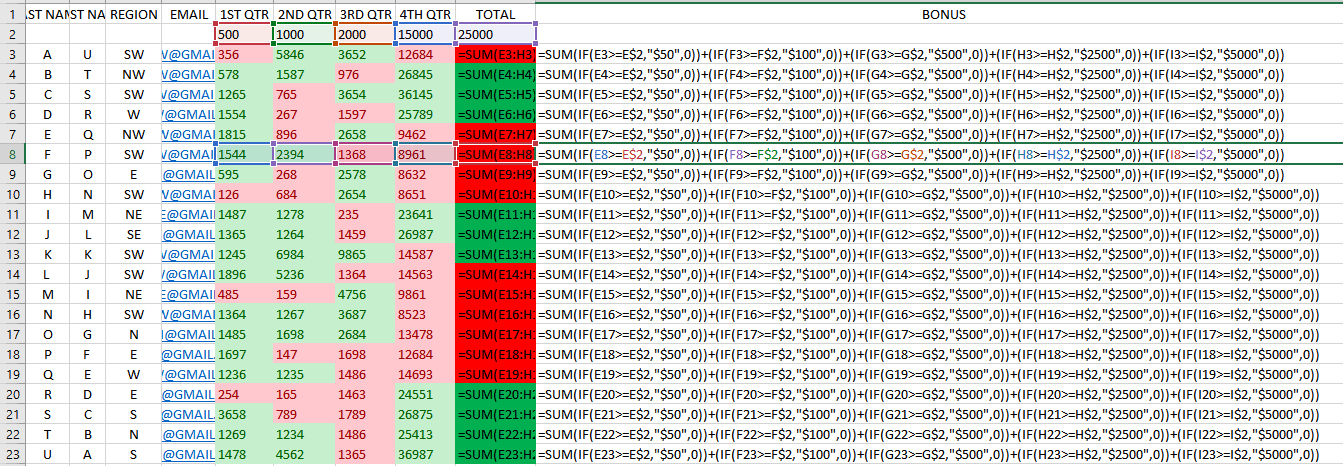
Picture this as a sales rep sheet providing their quarterly sales and annual totals, but it looks like a pain to differentiate cells, especially with a bigger list so lets set some formatting like inserting a new second row and adding monthly dollar figure goals, then I hid that row so it’s not distracting. Here we painted each cell green if it was over “$X” and red if it was under. Here were the values of each;
- 1st qtr greater than/less than $500
- 2nd qtr greater than/less than $1000
- 3rd qtr greater than/less than $2000
- 4th qtr greater than/less than $15000
- Total greater than/less than $25000
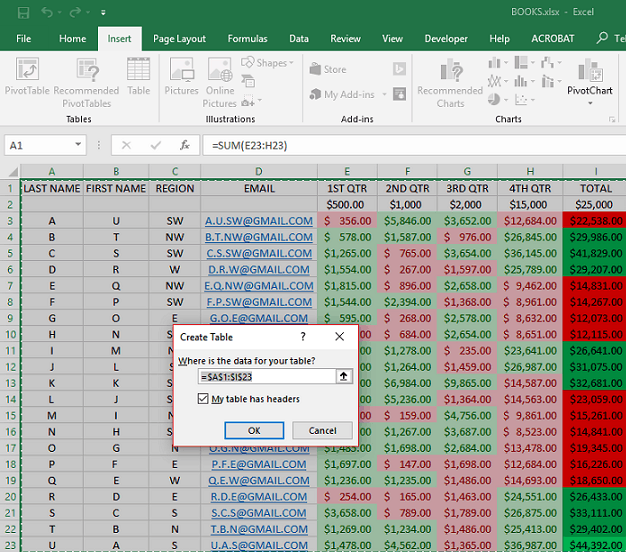
Let’s convert it to a table for easier sorting if necessary, here I also added a new 2nd row for sales rep bonuses. Highlight the whole area, insert table, confirm the data Excel picked as your data and go;
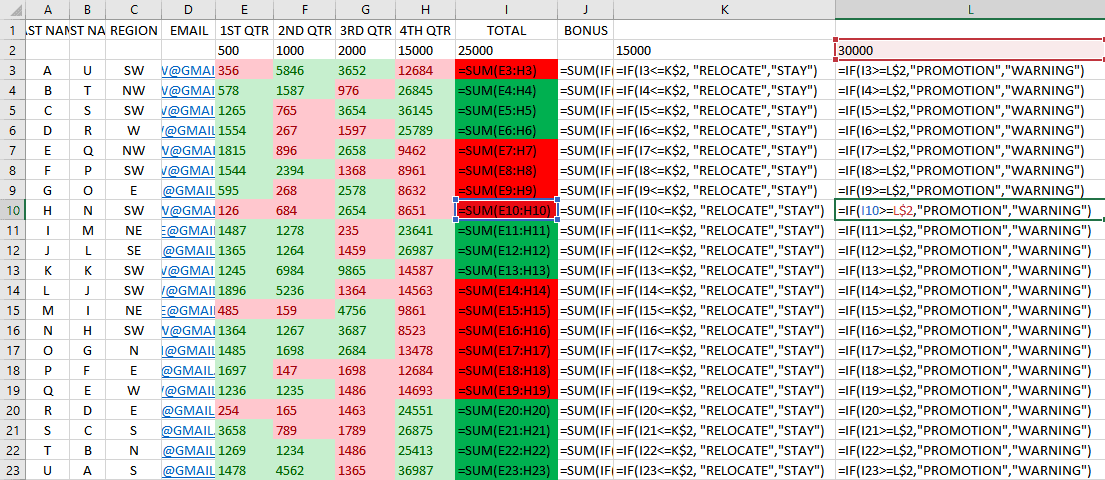
Now when in a table, there is a separate tools tab on the ribbon called “Design” when you go there you can change theme, style, and content of headers. You can see a chart on the upper right where you can change your table style. You can also see I added the bonus total, and some other conditional formulas for those sales reps.
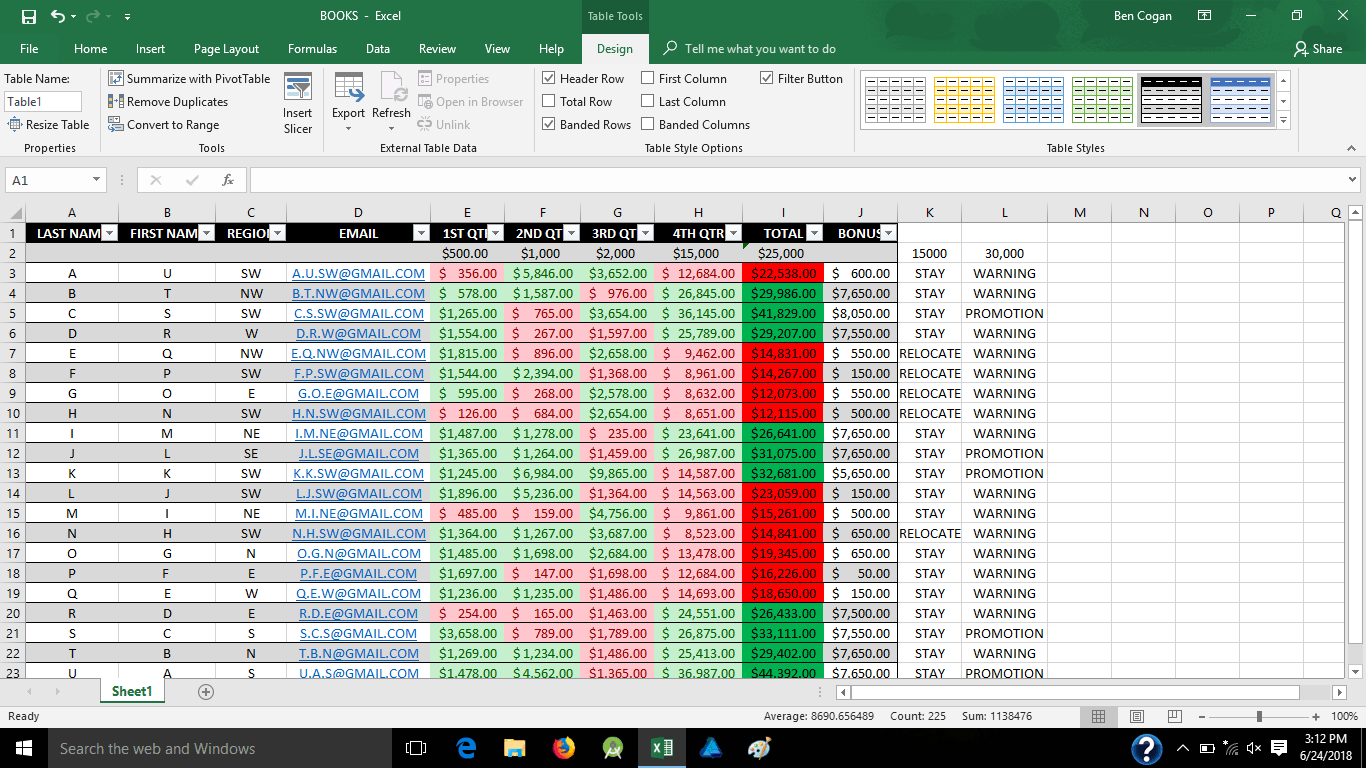
Bonuses are based off of their quarterly sales, the other conditional formulas indicate whether a sales rep did good or bad and will either be staying or relocating to a different region, and if they will receive a promotion or warning for their performance. Here are those formulas;
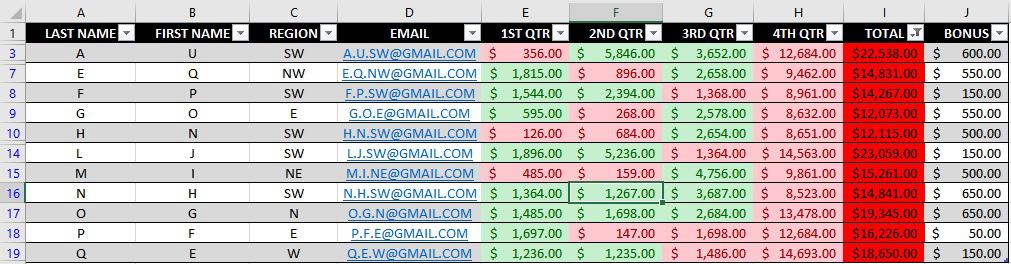
Now lets focus a little more on the table for easy sorting, here I’m clicking on the drop-down arrow of the “total” column;
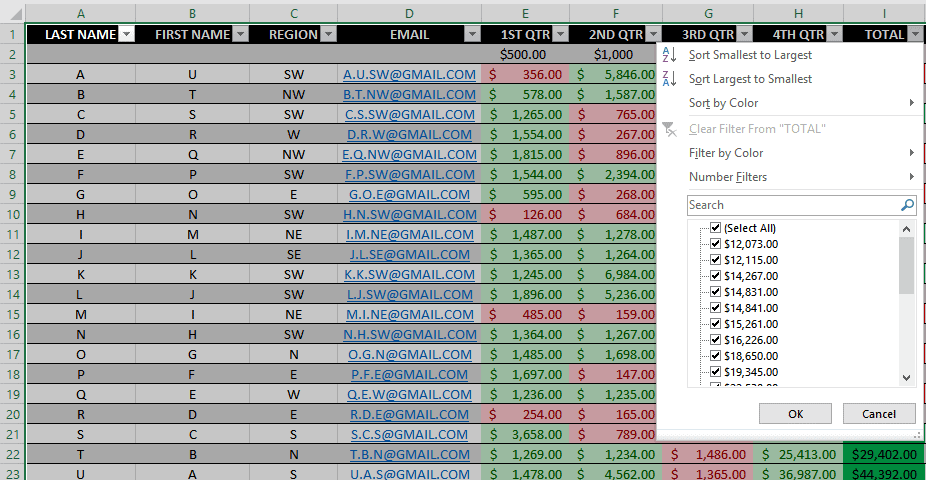
And we are going to sort by color, looking at only the lowest totals in red. You can play around with this and change by region, names, quarters, colors and even basic low to high/high to low numbers.
Charts
Now let’s add some charts to make it look a little better, highlight the area you want to chart out as well as the headers for the axis titles, then go to “insert” tab and click “recommended charts”
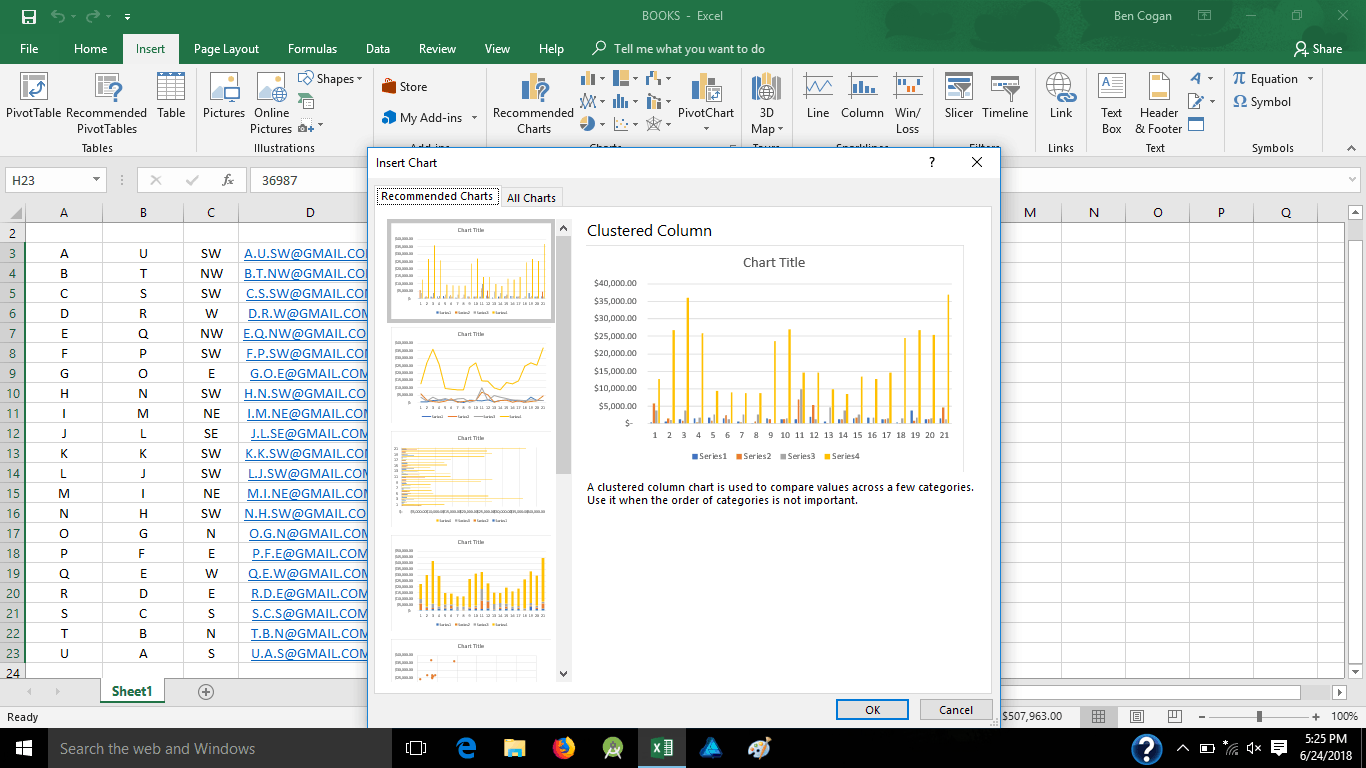
Here it will give you a list of charts it recommends will flow well with your data, we will just grab a simple bar graph, then pick the cell you want it to appear in;
And here it is;
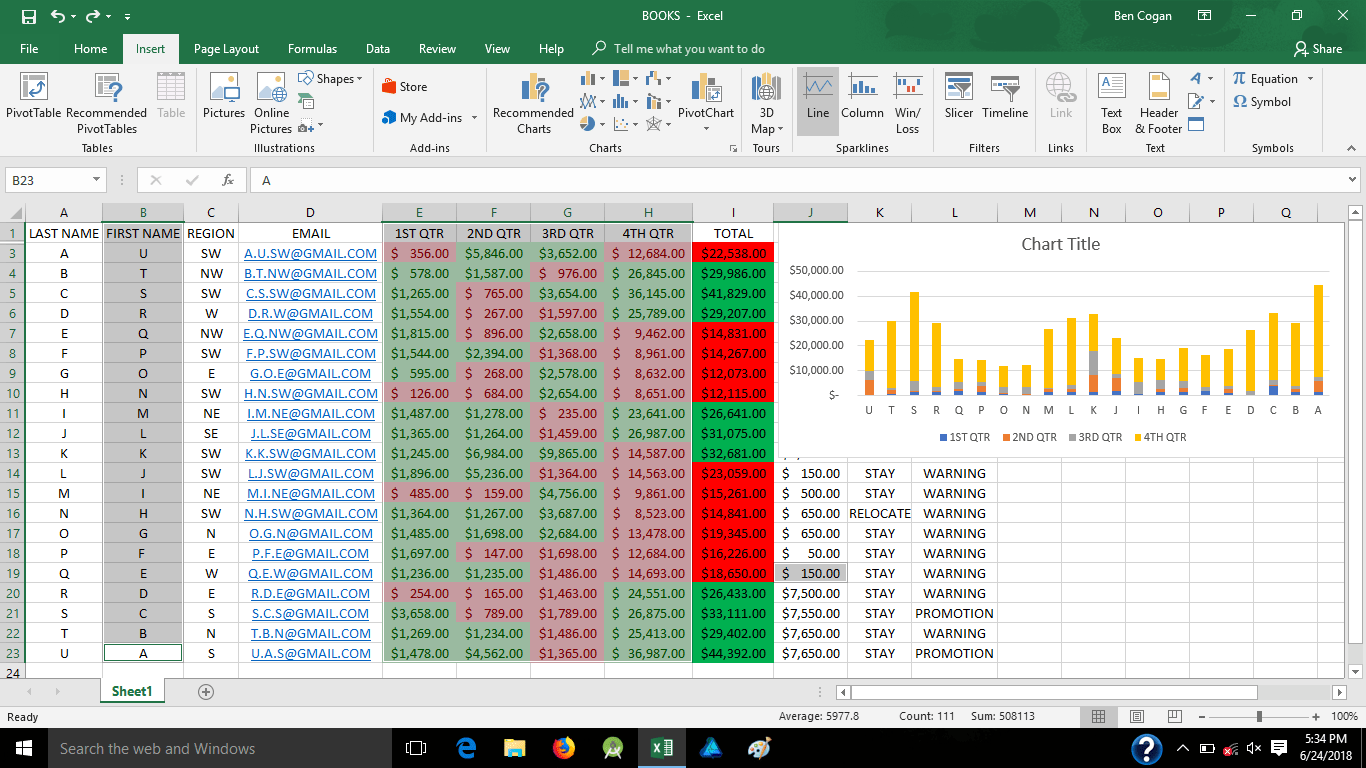
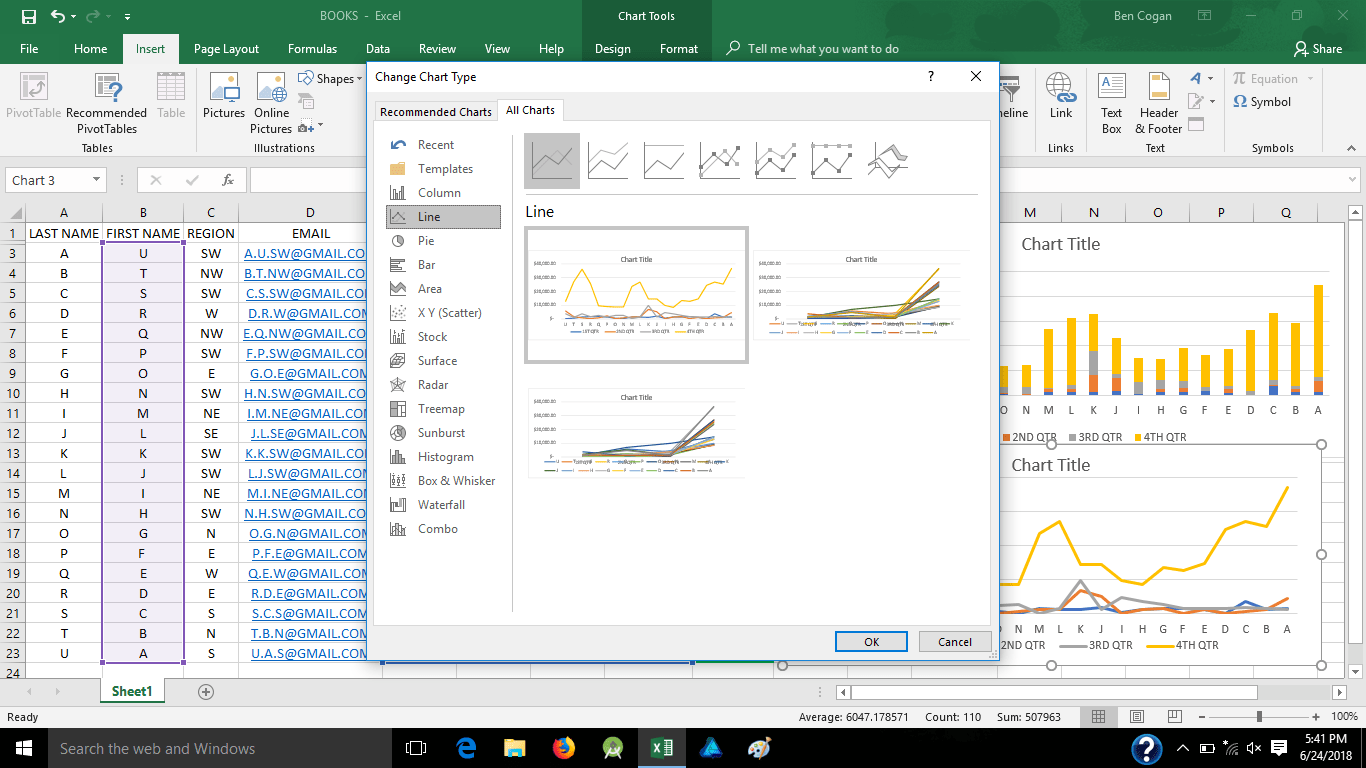
Now lets add another, this time a line chart;
and place it, if prompted
Now you can click on the charts and edit the layout and/or title 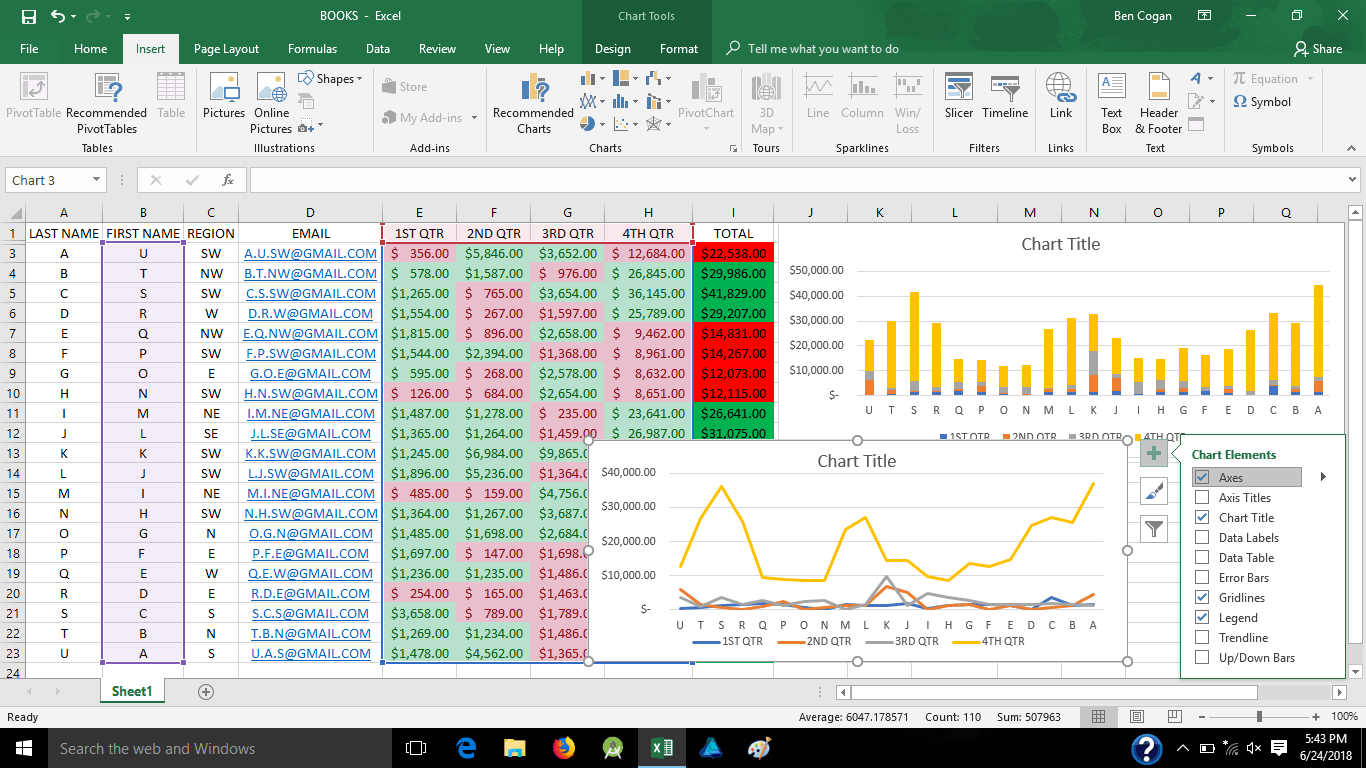
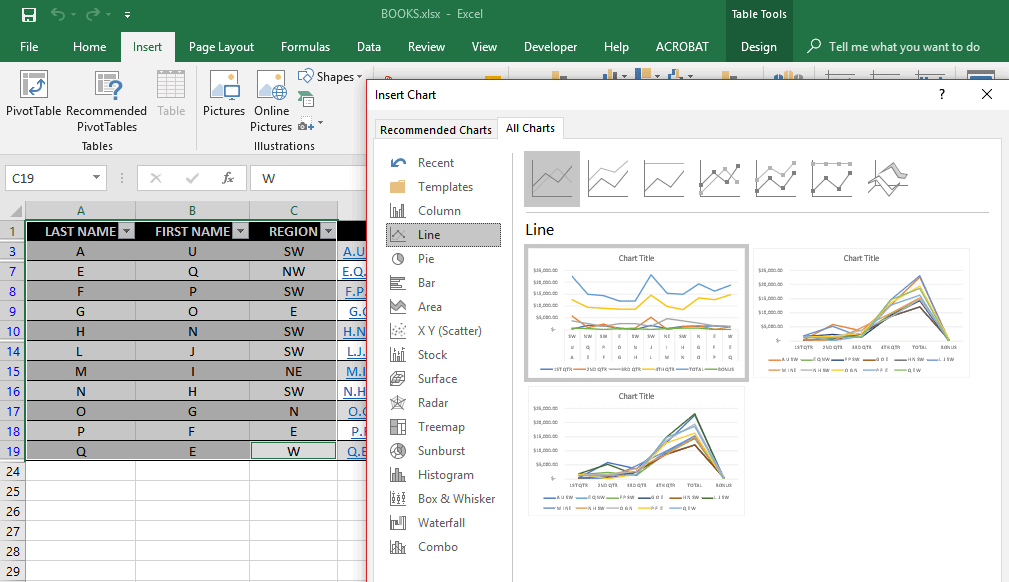
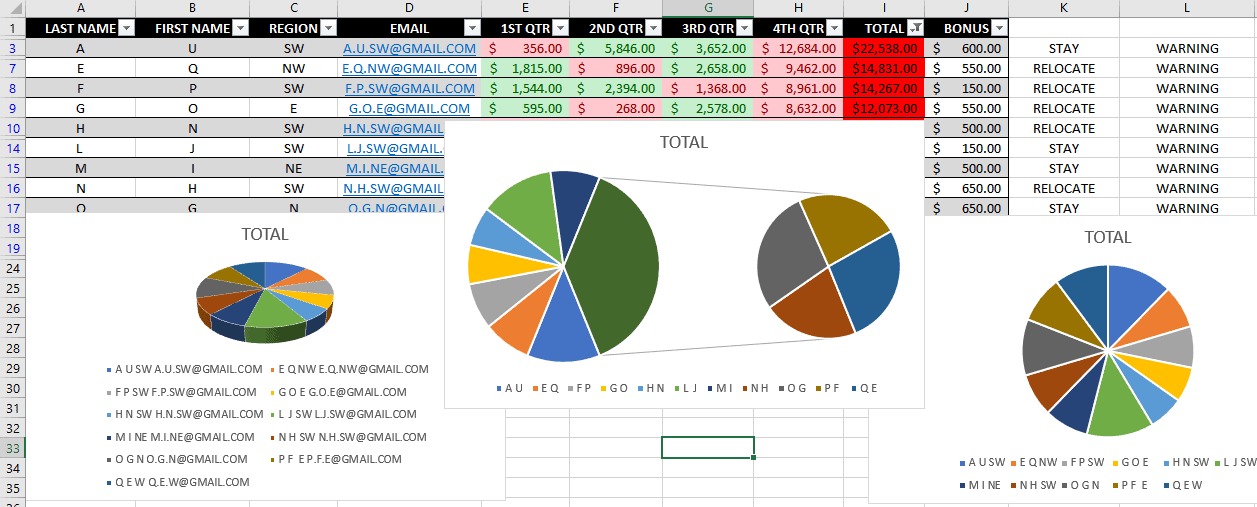
Here’s a few pie charts of the same data;
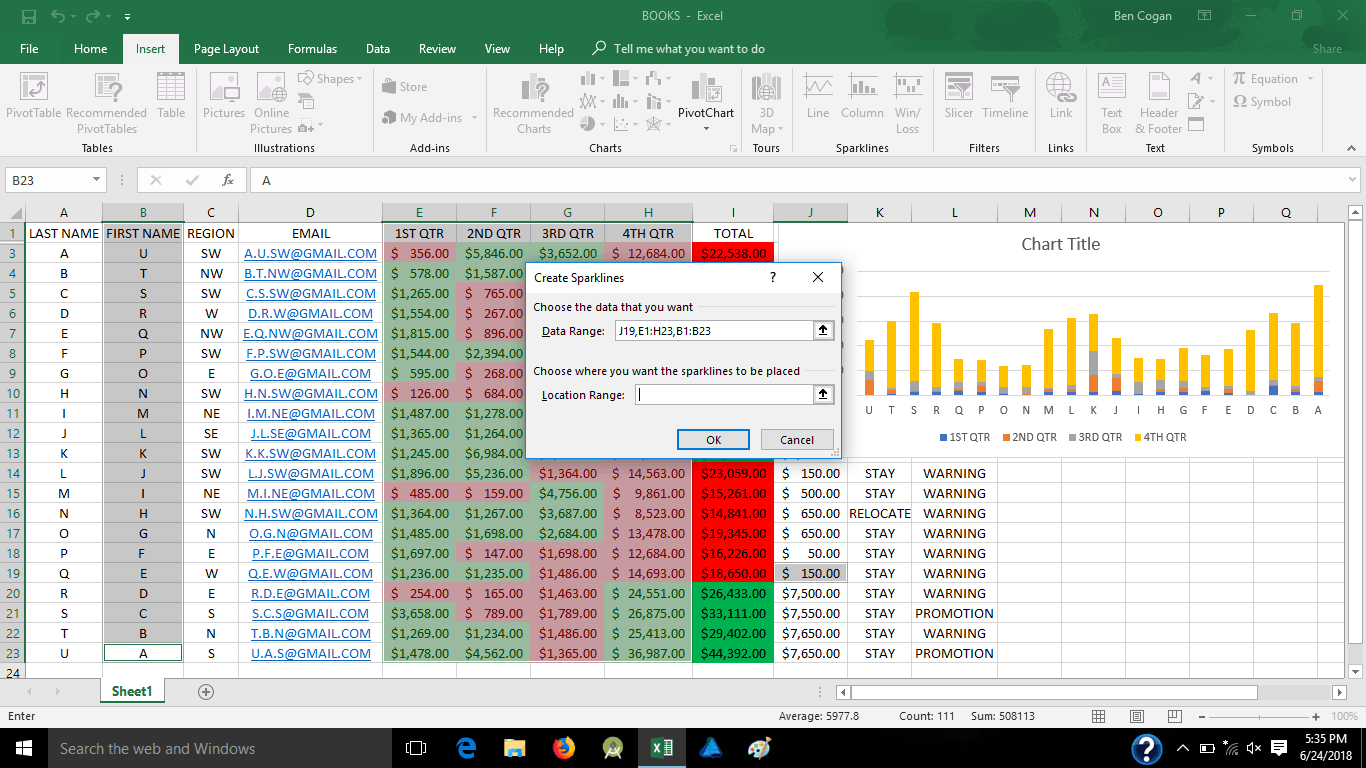
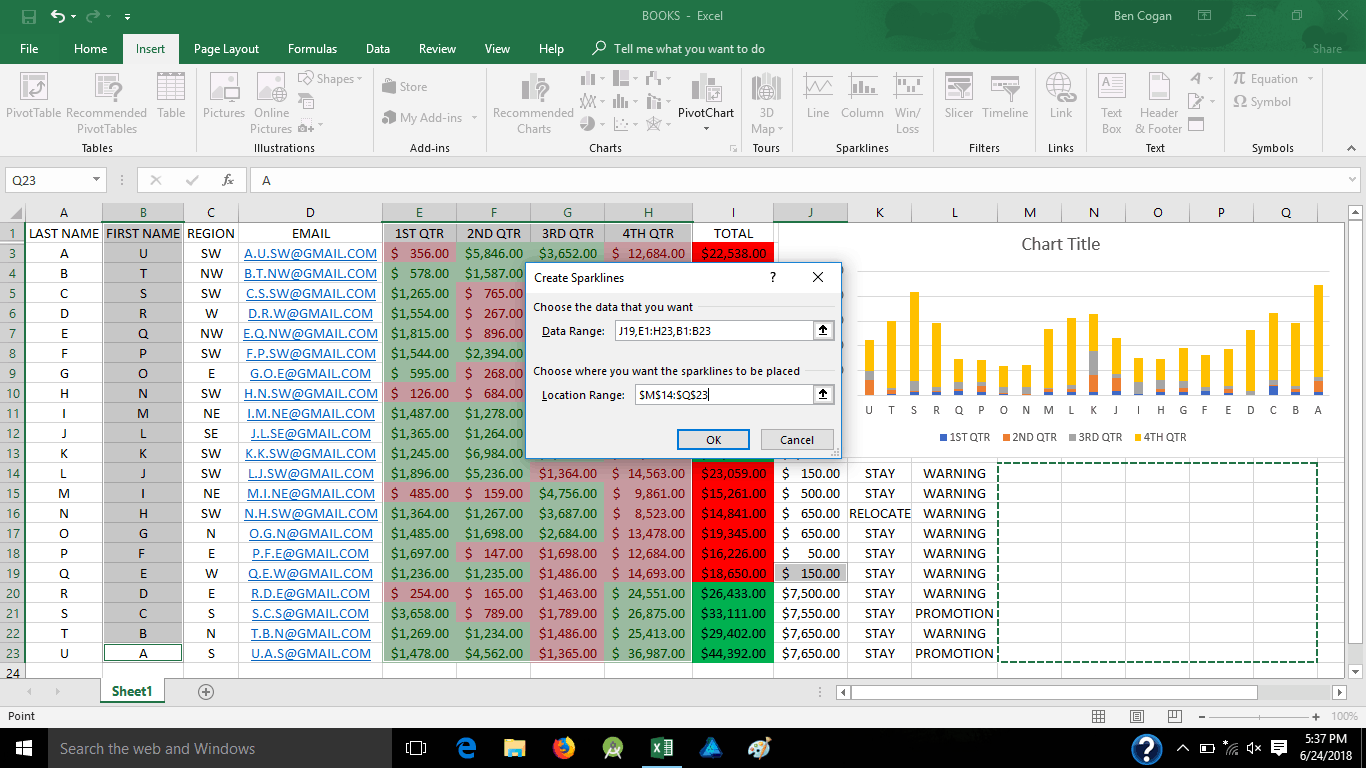
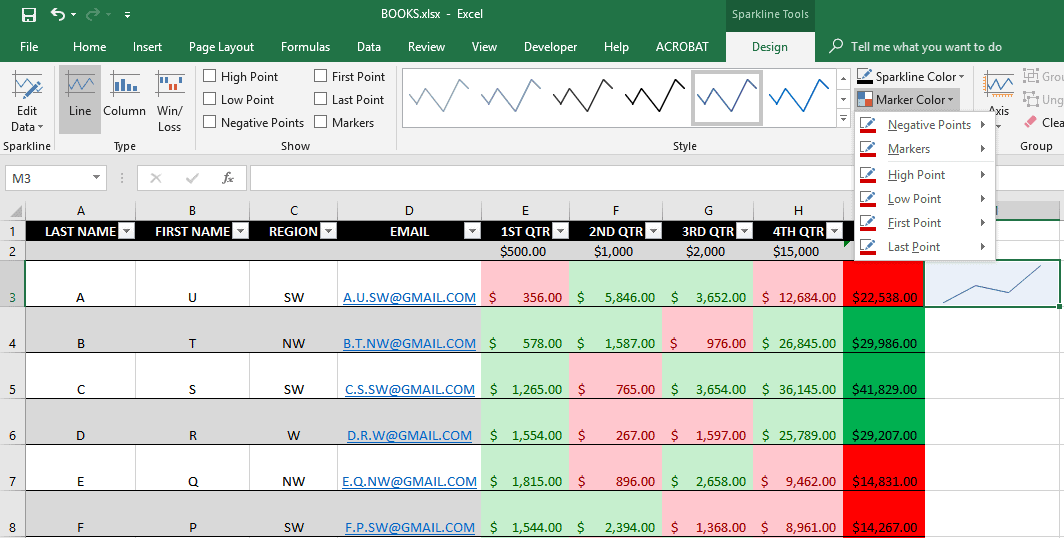
If you don’t like everything grouped together and just want a simple line chart for each person’s progress, you could easily do 1 for each line, just highlight the cells you want, add line chart (also know as spark-line) and place in the cell you wish them to go to;
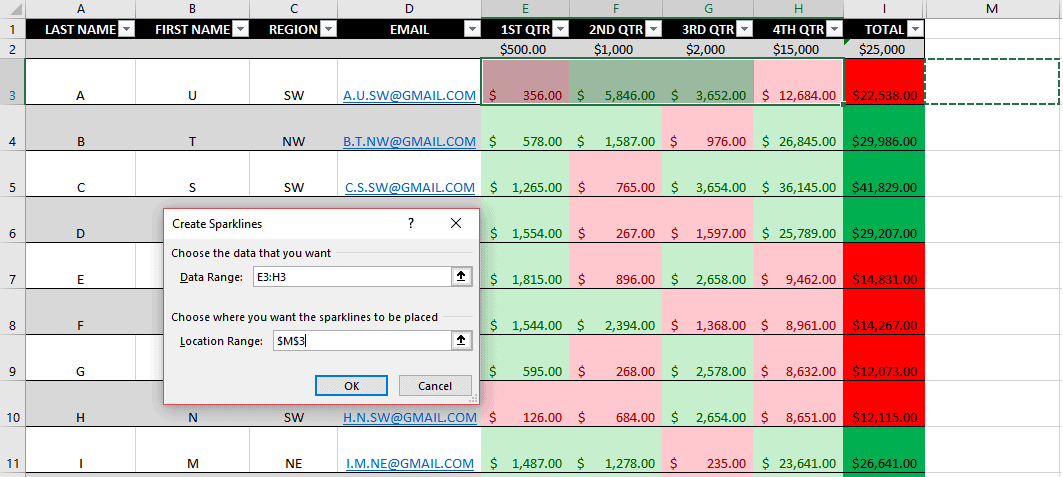
Now we add some style to it by coloring the line and marker points;
Notice that the “location range” when you pick where you want the line to go has the “absolute reference” ($), that means that once the line is set, if you go to the bottom right corner and use the black + symbol to copy it to the other cells, it will pick up the new data from each row, with markers;
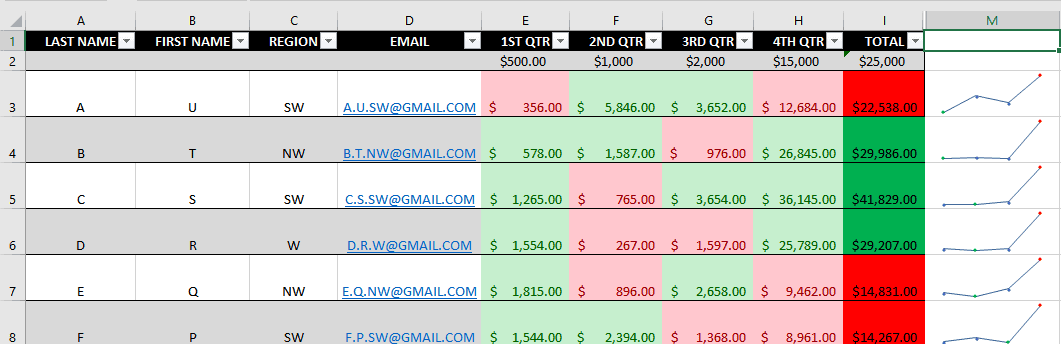
Just that easy.
Football Pool Formula
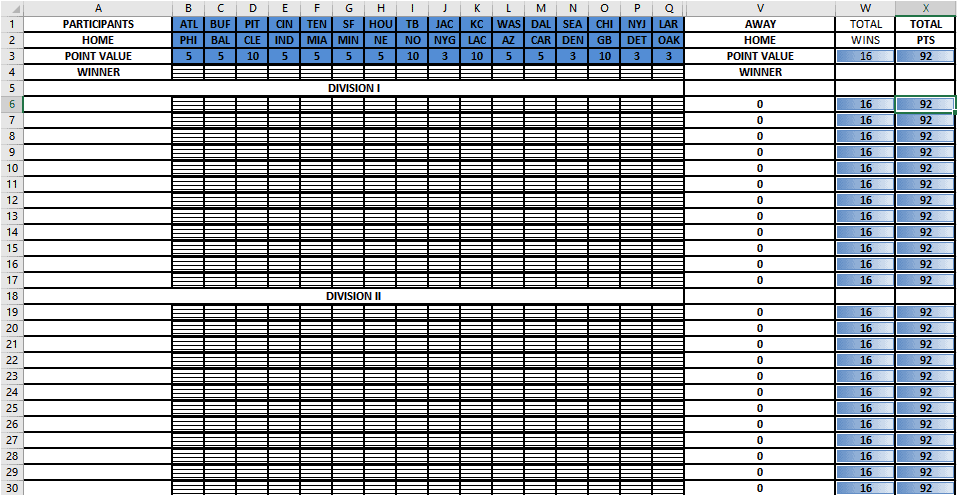
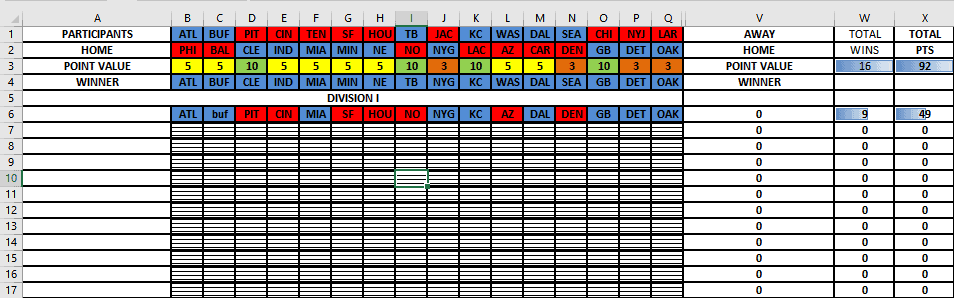
Now let’s get back to conditional formulas. I learned these the hard way many years ago creating football pools. It literally took me about 7 hours to create. This was also because I had no idea about the absolute reference, I manually punched the formula in 20 times before I even realized I could copy that formula to word 100 times, then find and replace each number with the next number in line… hence why it took 7 hours. Here is that football pool for your reference;
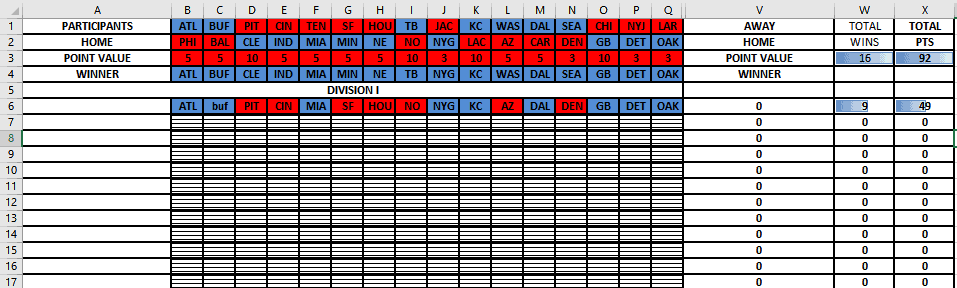
This is week 1 spreadsheet, there is a lot going on here from conditional rules, to conditional formulas, to even data point bars ranged so you can clearly see the difference between you and your opponents without looking at points tallied.
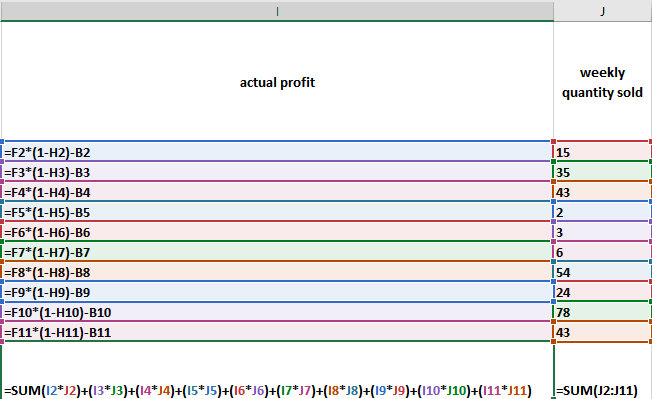
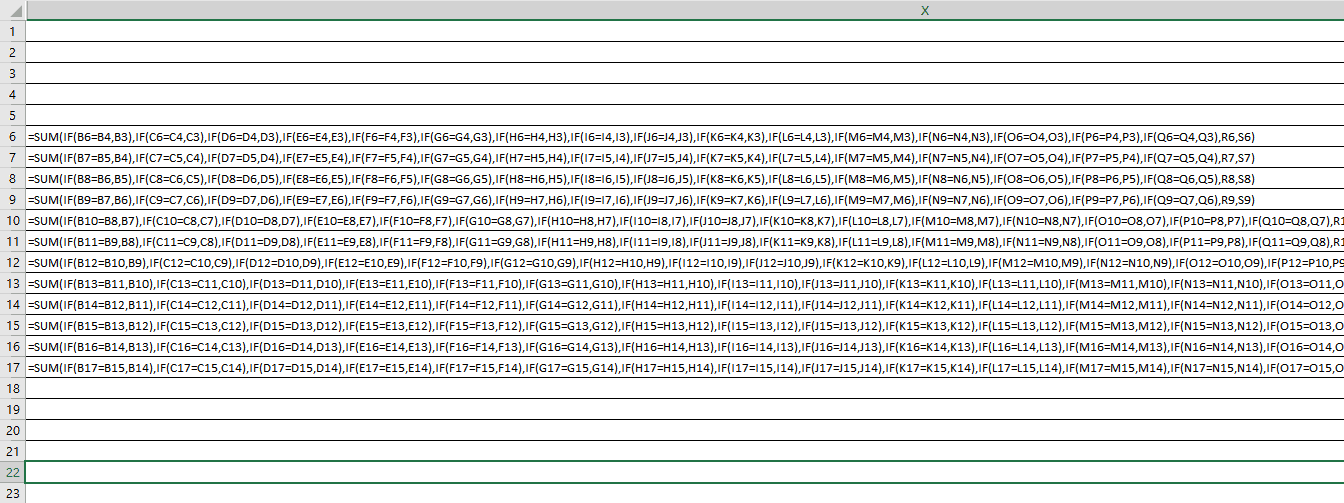
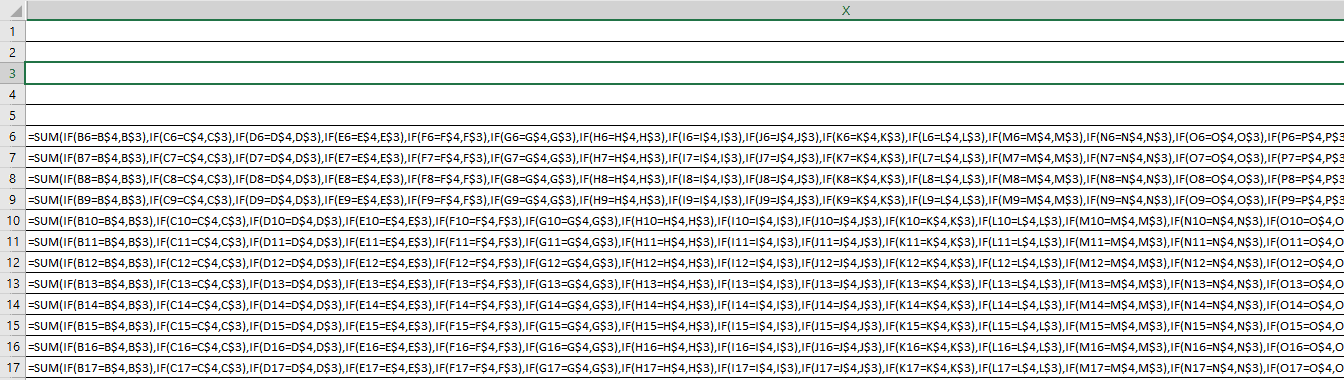
Here is the full formula for the total wins, (disregard the letters between Q and V, they were for a different format) this is my original formula, notice no “$” absolute references. This is how I got the 16 for total wins, 1 point for each game.
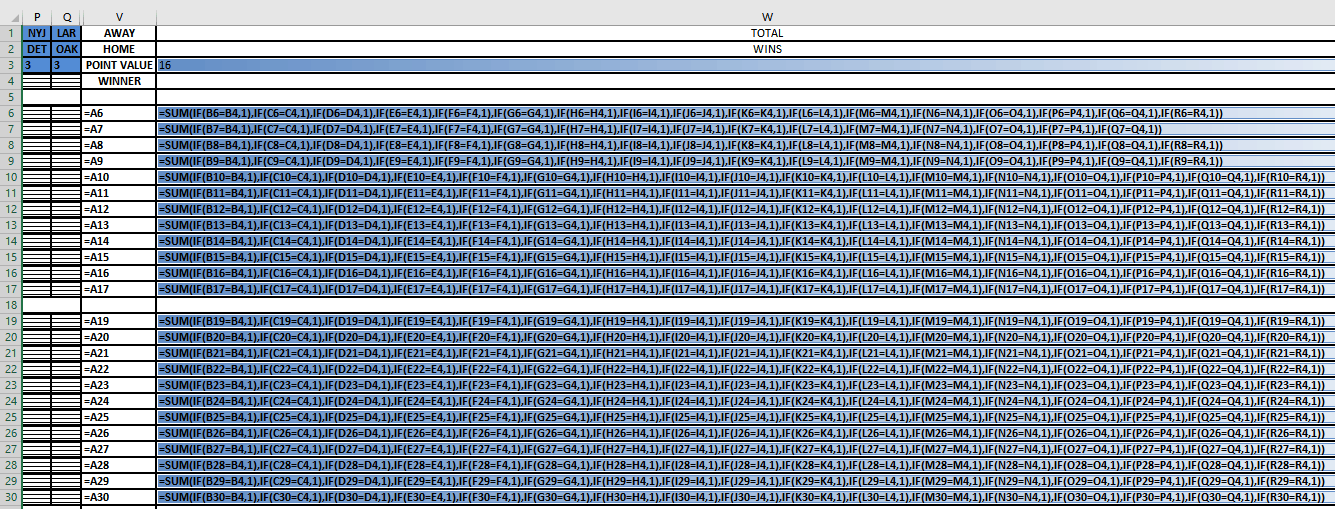
A little more complicated, here are the total points where each one is looking at cells matching to add the value found in row 3
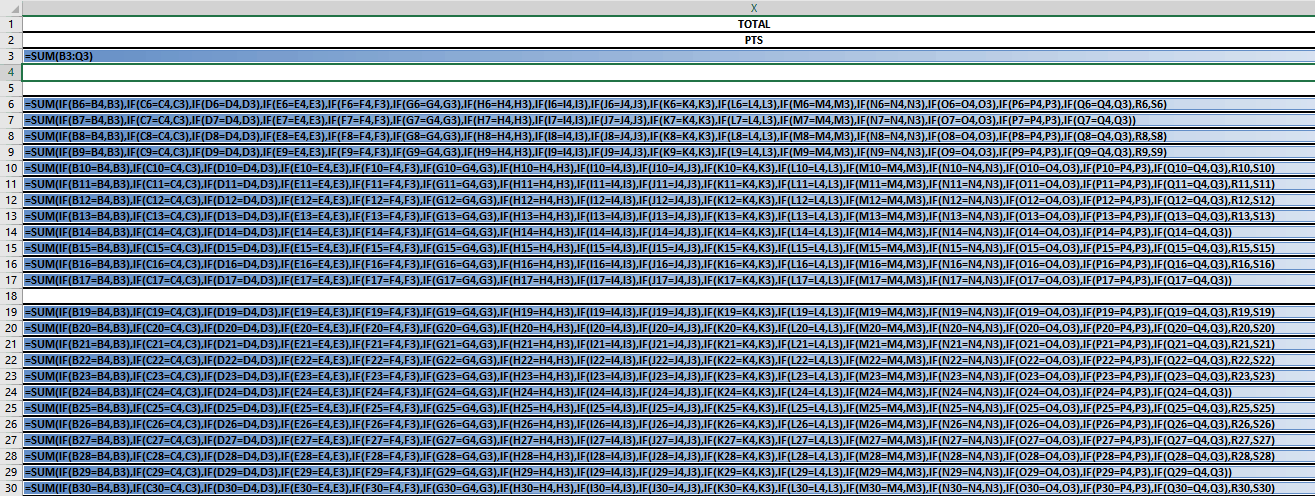
Now lets start fresh, here I put in the one formula and spread it across the other cells, you can see only the first is accurate
Here is the formula side, this is what happens when you do not use the absolute reference ($) for these kinds of complicated formulas;
Notice it keeps counting the cells below, in pattern, now let me delete it all and go back to that first one and add the absolute reference ($);

Now when I pull it down, I get the actual formula;
Here is the other end;
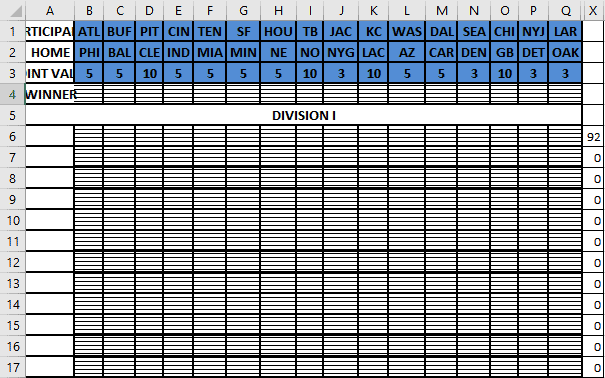
Now back to those data bars, we need to add rules for those;
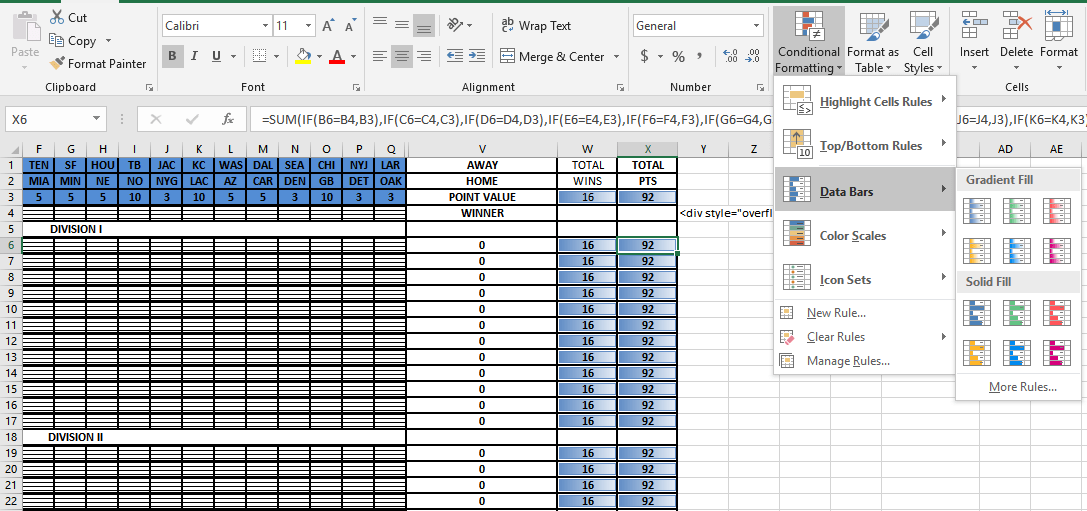
Under manage rules you can adjust the format style (Data bar) and adjust the number to minimum and maximum values. Here they were set 0 to 92, the most points you can get that week;

Now let’s fill in some winners to watch those bars in action;
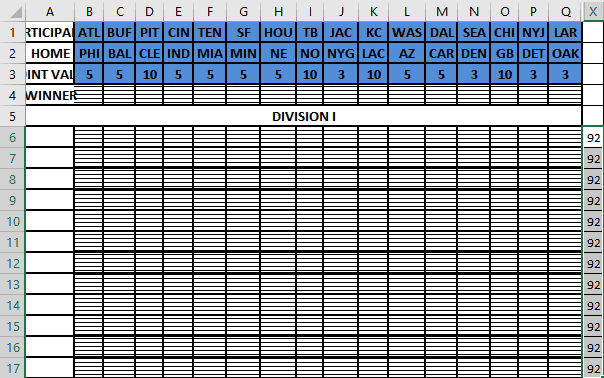
It was easier to add the rule of the “red for losers, blue for winners” with point value in tow but we want to set those different so we add more rules, this time I want the “Format only cells that contain”, and here I select “3” and fill it orange if 3 is shown.
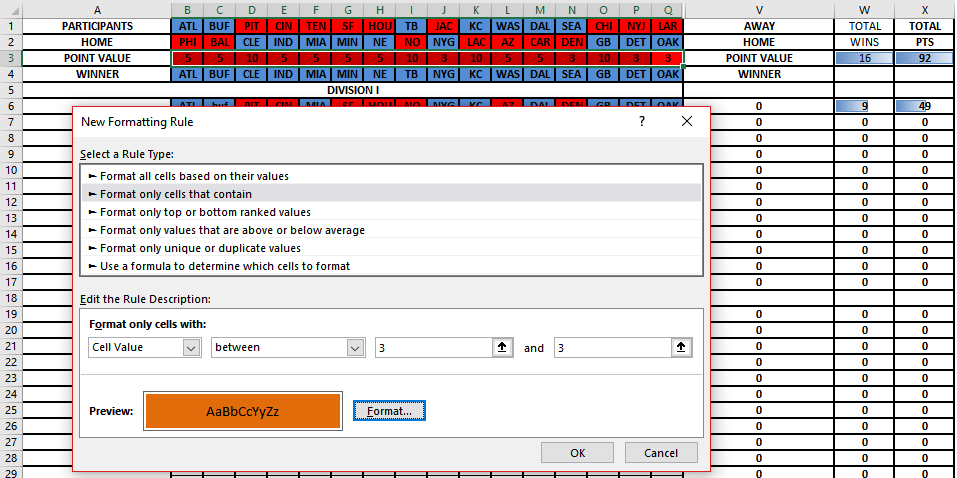
But I am not stopping there, I need to differentiate 5 and 10 as well so here are those rules;
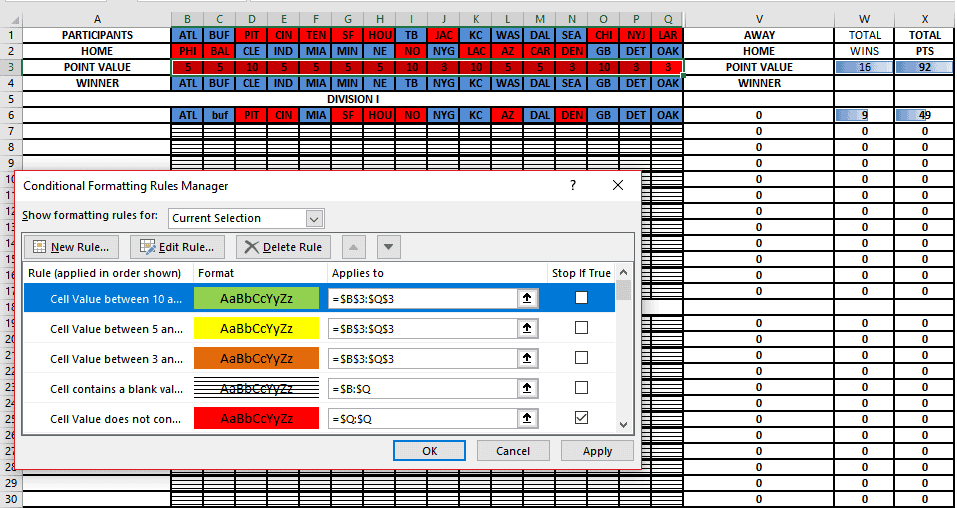
And the final results;
That’s it. When I did this formula the long way, it paid for itself in the time saved but had I known then, what I know now, it would have paid off much sooner.
Now you should be a little more comfortable and less intimidated by conditional formulas and formatting, flash filling, tables, and charts so go play with your new-found skills and feel free to contact me below or at Ben@eagleyeforum.com if you have any questions or suggestions.
For our last level, we will learn how to take tables further into pivot tables, how to make a macro, 3D map and timelines, and drop down lists.
There is still so much more I am learning so I will add more to each level, if relevant, as much as I can, and I will start posting “Updated XX/XX/XXXX” at the top of these pages when adding more starts.
Raspberry Pi’s are little computers that can be used for various things with the right parts, but I use it for a basic setup of retro gaming. These are strong enough that they can hold hundreds of games ranging from Nintendo, Super Nintendo, N64, Sega, Atari, and Playstation. You can pick up the Pi’s and accessories for around $75-$150, prices vary by types of controllers, size of memory, etc., but then you can flip it for around $50 more to cover your time. 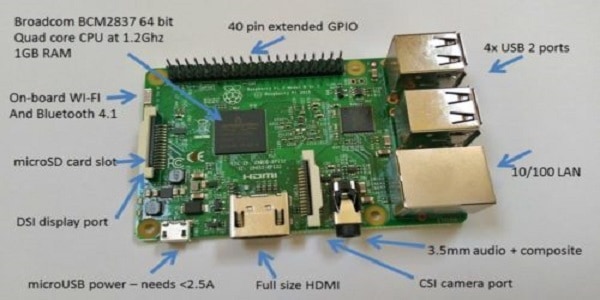
Modifying Raspberry Pi 3 for retro gaming
Almost every house probably has a Nintendo Wii, did you know you can add retro gaming to it as well? In addition to all the systems that the Pi shows, the Wii is also strong enough to carry Gamecube games too. You can pick these up from anywhere between $40-$100, add your work to it and then flip it for around $50 more. 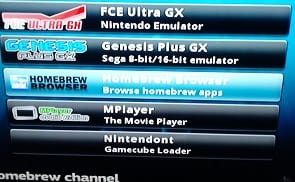
Modifying Nintendo Wii for retro gaming
Ever wanted to learn graphic design but scared of the price tag that comes with Photoshop? I recommend Affinity Designer, I have been using it for a while now and love it. It costs around $50 but once you get the hang of it, your creative side can take off and pay for itself;
After spending numerous hours working on electronics, everyone will have some kind of tip or trick to share to cut down maintenance time. Electronics can be very intimidating, one little mishap can set you back hours and/or fully erase critical data so one tip is to always back up your data somewhere (flash drive, external hard drive, cloud, etc.) in order to prevent these mishaps. I made this page to share some mishaps I have had, the solutions to remedy them, and as well as a few other tips I learned along the way when playing with computers and other devices.
First off, when dealing with computers as well as other electronics with the worldwide web, there are things you need to do in order to keep them in great shape and working properly, here is a basic list of tips;
- Use passwords that are not easily detectable by anyone, other than yourself and change it on a regular basis.
- Backup important documents and pictures online through a cloud or offline through CDs, flash drives, or external hard drives
- Have PC protection; antivirus, firewall, cleaners, etc.
- Use email filtering; when in doubt, throw it out
- update your system(s) regularly
- Let recipients know when you are sending them an email attachment
- Remember viruses can come from anywhere at anytime, shit happens.
- Lock your computer if you fear someone in the area may access it while away, you can do so easily by holding the window button on the bottom left of your keyboard and pressing the L
- Password protect files like excel with critical info that you do not want to be altered by another user.
- Use a secured credit card if possible when purchasing online
- Lockdown your wireless connection
- Scan e-mail attachments before opening them, even if from a trusted recipient.
- Be careful downloading files and programs from sites you do not know or trust, if its something you feel you really need or want, run cleaners and scanners afterwards.
- Don’t open unexpected email attachments, especially from unknown sources
- Don’t use the same password for everything
- Don’t open the PC case while still plugged in
- Don’t panic if your computer crashes.
- Don’t give out valuable information like credit card numbers or social security numbers unless through a secured site.
- Don’t reply to junk or spam e-mail unless you know for sure it ended up in the folder by accident.
Want to have some old childhood games at your disposal, on one system? We are talking Nintendo, Super Nintendo, Nintendo 64 and many more. Follow these steps and you will have them at the edge of your fingertips in no time.
The hardware you will need are linked below to Amazon where I ordered mine. They are;
Raspberry Pi; $50
Micro SD card (w/adapter); $10
Computer adapter for SD card; $7
Controllers; $12
That’s it! For less than a $100 you can get more childhood games than you can think of.
Step 1: Acquiring the supplies;
Raspberry Pi
I purchased this Pi 3 kit through Amazon for a very fair price and it has been worth every penny, I would highly recommend it;
Controller(s)
You will also need the controllers, which you can use any controller type for any system. Keep in mind that if you strictly use SNES controller, like I do, you may need to reconfigure it to play some playstation and N64 games where they have L1 and L2 buttons needed to play some games.
Secure Digital Card (SD card)
You will need a micro SD card, if you do not have one, you can purchase one through Amazon with an adapter which you will need to plug into your computer provided it has the slot for it;
If you do not have a connection on your computer for an SD card then you will need an adapter for the computer, like this (sd card adapter is not necessary if you go this route since a micro sd card fits too);
Step 2: FORMATTING;
Once you have all your supplies you will need to format the SD card to FAT32. You can do so by downloading Fat32 formatting;
http://fat32-format.en.softonic.com/

Step 3: Installing Retropie;
After your SD card is formatted, now it is time to install Retropie. Here is a link to do so;
Click on the download tab and then on the new page, download Pi 2/Pi 3

Step 4: Burning the image;
Once you have Retropie downloaded to your PC, you will need to unzip it and burn it as an image to your SD card. I recommend using this imager;
https://sourceforge.net/projects/win32diskimager/
Once saved, run it, locate your Retropie unzipped folder and burn your image to the SD card.
Now you can pull your SD card and plug it into your Pi. Start your Pi (plugging power cord in last) Once booted, click on the RetroPie icon and setup your wifi at the bottom, or plug in your ethernet.
Once your Pi has internet, check your computer networks, find Retropie, Roms and upload your unzipped roms to each emulator you plan to use.
Step 5: Find your ROMS;
You can upload via direct connect or through flash drive (see step 6)
A couple good sites I used for them are
You save them as a zipped folder in your downloads folder and then unzip them and add them to the retropie roms folder
NOTE: ANTI-VIRUSES MAY BLOCK YOU FROM GETTING THE CONTENT, AND DISABLING IT, MAY INFECT YOUR PC WITH VIRUSES/MALWARE. I STRONGLY RECOMMEND RUNNING CLEANERS AND SCANNERS WHEN DONE DOWNLOADING, JUST TO BE SAFE.
Step 6: Configuring your flash drive (optional);
Now, if you use a flashdrive instead to load games, format it like the sd card and then create a folder called Retropie. Once you have the folder, take out the flashdrive and put it into the Pi. When it is done blinking (or after 3 minutes) put it back in the computer and that folder you created should have folders in it like these;

Open the Roms folder and find the system for which you downloaded the games, there are hundreds, and most are abbreviated; NES, SNES, N64, PSX, etc.
Step 7: Extraction;
Now you will need to open the folder (downloads) and find your games. Again, you will need a program that unzips these folders to extract the files, I use Winopener and 7-zip for these, you can get those apps here;
https://www.microsoft.com/en-us/store/p/winopener/9nblggh5xmmg
http://www.7-zip.org/download.html
Once you have that you can decompress and extract each file and place it in your Roms appropriate system folder on your Retropie flash drive (or Retropie itself through internet) and after all the games you want are loaded, it is time to test and play.
Step 8: Testing;
Make sure you plug in everything on your Pi with power cord being last so it detects everything. Upon startup you will configure your controller which is self explanatory, then it is time to play. Every time you add games directly to the Pi through internet, you will need to reboot your Pi.
Want to take it a step further and add cheat codes?
Want to upload cheat codes to your RetroPie, Raspberry Pi setup? First, you will need internet on your RetroPie, as well as a separate computer. Once you have the box set with internet you will want to copy down your box’s I.P. address somewhere, you can find the I.P address under RetroPie setup area.
Next, you will need some tools, here are links to download those tools;
STEP 1: Putty
On Putty, you will need your I.P. address here; Type it in where “Host Name” is and keep the port 22. Save it with a name too for quicker availability in the future if necessary. Login to your Pi through Putty, if you have not changed the credentials, it should be;
Username: pi
Password: raspberry
Once in, type “cd cheats” and “mkdir settings” on separate lines, without the quotations.
STEP 2: Notepad++
Now find your SAMBA folders that the Pi is sharing, to do that, use File Explorer in Windows and type \\RETROPIE.
Go into the configs/all folder and find retroarch.cfg. When you have found it, right click over it and open with Notepad++. Once in there press ctrl+F and do a search for “cheat”. Scroll down until you come to a line that reads # Path to cheat database directory. Delete the # symbol from it and where it says “cheat_database_path =” add ~/RetroPie/cheats with a space so it should say;
cheat_database_path = ~/RetroPie/cheats
Now go down to the next section where it says “# path to XML cheat config…” and delete the # symbol in front of “cheat_settings_path =” and then add ~/RetroPie/cheats/settings with a space so it looks like this;
cheat_settings_path = ~/RetroPie/cheats/settings
Next, hit ctrl+F again and this time search for “Retropad Button Combination“, when you find it, delete the # symbol on “input_menu_toggle_gamepad_combo” and edit the section like this;
- # Retropad button combination to toggle menu
- # 0 = none, 1 = L + R + Y + D-pad Down, 2 = L3 + R3
- input_menu_toggle_gamepad_combo = 2
Now save it.
STEP 3: Retroarch
Back on Putty, reboot your Pi with the command “sudo reboot” without the quotation marks. You will need to close Putty and start a new session as well.
On your Pi go to RetroPie settings, then Configure Retroarch / Launch Retroarch RGUI. Go to settings–> directory, and see if Cheat File Dir says “/home/pi/Retropie/cheats“. If it does, go ahead and back out to the main menu of the Retroarch Config GUI. Go to “Online Updater” and choose “Update Cheats“. This may take a minute, it should tell you on the bottom left of the screen when it is complete. Once this is done, back out of the config GUI and quit Retroarch.
Now you’re ready to play with what is already setup from the updater. To access Retroarch during games you press select+X, turn the codes on with left/right arrows and be sure to hit “apply changes” at the top by pressing A and/or start. If you want to add your own codes, delete some, or see a list, go to step 4.
STEP 4: Cheats
Back on putty, and logged into your Pi, you can look through, add, or delete cheat codes. Here are the inputs for each system as is;
- cd RetroPie/cheats/”Game Boy Advance”/”CodeBreaker”
- cd RetroPie/cheats/”Game Boy”/”Game Genie”
- cd RetroPie/cheats/”Genesis”/”Pro Action”
- cd RetroPie/cheats/”Nintendo Entertainment System”/”Game Genie”
- cd RetroPie/cheats/”Playstation”/”GameShark”
- cd RetroPie/cheats/”Sega Game Gear”/”Game Genie”
- cd RetroPie/cheats/”Sega Master System”/”Pro Action Replay”
- cd RetroPie/cheats/”Sega Saturn”/”GameShark”
- cd RetroPie/cheats/”Super Nintendo”/”Game Genie”
Once you’re in either one, you can press “ls” for a list of current cheats. To edit or create new cheat file types you use the following;
nano “Game name in quotations, as it is written in the cheat index.cht”
EX: nano “Super Mario Bros.cht”
The format for codes is;
cheats = 2
cheat0_desc = "Enter a description here"cheat0_code = "GAME GENIE CODE IN CAPS"cheat0_enable = "false"
cheat1_desc = "Enter another description here"cheat1_code = "STILL STAYS IN CAPS"cheat1_enable = "false"
etc….
Then to save, press ctrl+X, then Y when prompted Yes or No on overwriting the file. If it is just a modified cheat, press enter when done. If it is a new game then it should be listed as the name you had under nano “gamename.cht” with the .cht but not the “nano”
Wii-Retro is for those who enjoy the nostalgia in gaming. You can add Atari, Nintendo, Super Nintendo, Sega Genesis, Nintendo 64, Playstation, and even Gamecube ROMS to your Wii easily. There is much more you can do with your Wii but for now, lets stick to the basics; gaming
Tools you will need:
- Wii (of course, with Gamecube controller ports)
- controllers (Wii and Gamecube ones)
- SD card (at least 4gb capacity, bigger is better if you want more games, Gamecube games are 1.3gb each)
- Computer that can take SD cards (you will need to go back and forth between your computer and Wii with your SD card a few times)
Step 1: Format your SD card to FAT32
First you need to make sure your SD card is formatted as FAT32, if not, you can do so through gui format HERE. Once that is complete, create 3 folders in your SD card, titling 1 “apps”, the other “Nintendont”, and the last “games”. Put Nintendont in your “apps” folder for now, that is your Gamecube emulator so we will get to that later.
Step 2: Download Homebrew Channel
Now you need Homebrew Channel which you can get through Letterbomb. You will need your Mac Address for this which you can find under “Wii settings” in the bottom left corner of your homepage, from there you go to “Console Information”, and while you’re there, also confirm what your Wii version is (should be 4.3U) in the upper right hand corner of the settings area, you will need to know that too.

Now you need to visit the Letterbomb site to input your information.

Also go ahead and “bundle the HackMii installer”, you may want to use it later. Enter your “CAPTCHA” and “cut the red wire” when prompted. This should start a “letterbomb.zip” file download. Once downloaded, right-click the file in your downloads and copy it to your SD card and then extract all the files there. Along with your “apps”, “games” and “Nintendont” folders, you should have your zipped letterbomb, a “private” folder, and other files like Apache-2, boot.elf, etc.
Now take your SD card from the PC and put it in the Wii. Click on the mail icon on the homepage on your lower right corner. When it pulls up scroll back a few days and forward, you’re looking for this;
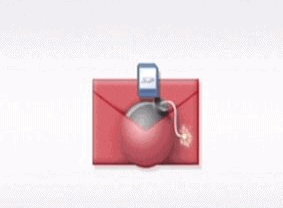
Once you find it, open it.
NOTE: If you don’t see it, put your SD card back in the PC and make sure the letterbomb extracted fully and the extractions are on the main page of the SD card.
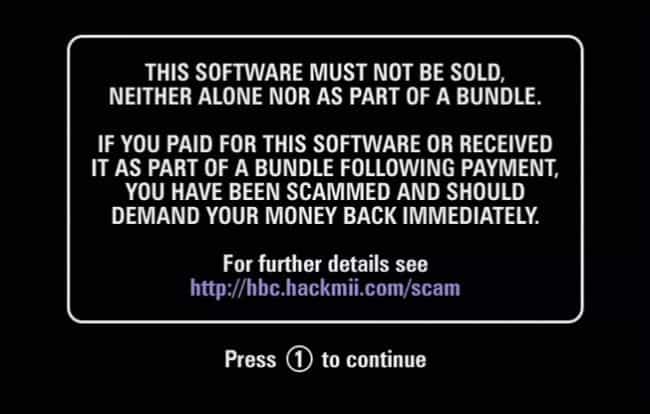
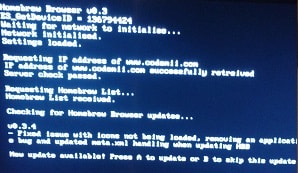
After the letterbomb is opened, you should get this after downloading it to the Wii
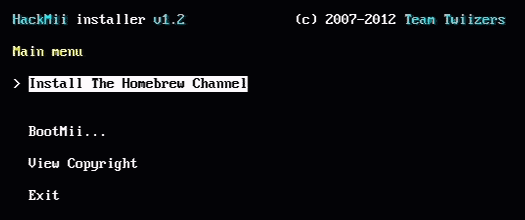
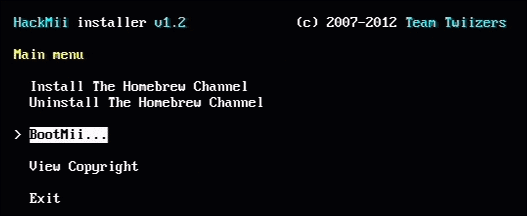
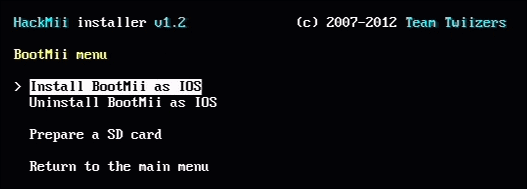
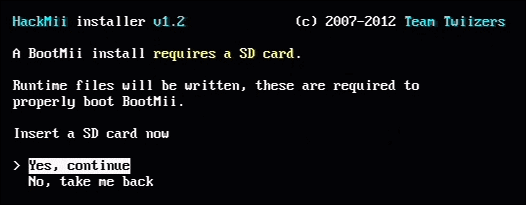
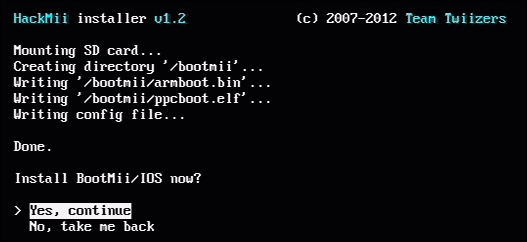
Now you want to install Homebrew channel and Bootmii
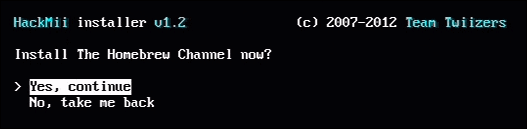


Now you should have Homebrew Channel on your Wii Homepage.
Step 3: Download Homebrew Browser
Next, you will want the Homebrew browser to download all your emulators. I found 2 versions; 3.9 and 0.3 but could only get the 0.3 to work, maybe you will have better luck. Move the SD card back to your PC and download one of these;
Once you have the zipped folder, copy it and put it in your “apps” folder on the SD card and extract it there. Once that is done put it back in the Wii and run Homebrew Channel and you should get a list like this but with just “Homebrew Browser”

Once you open it up, you should get an install page that may ask to update, in which case hit A when prompted;
You may get a screen that looks like it froze up, but just wait it out, shouldn’t take long and it looks like this;

From here you can play around and find games, emulators, or media but I just stuck with getting emulators.
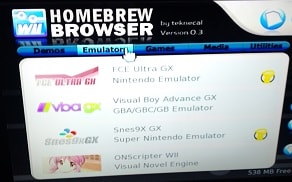
Step 4: Download your basic emulators
Now it is time to download the emulators you want. They have quite a few like Nintendo, Super NES, N64, Sega, Atari, Playstation, and more. Once you have the emulators that you want, pull the SD card and put it back in the PC.
Once you have them inline, you can pull them up from the Homebrew Channel and play;


Step 5: Download your Gamecube emulator
Now, go to your “Nintendont” folder under your apps, download this file; Nintendont-dol and place it in your folder, change the name to boot.dol. You can also download this one, extract it and copy the “boot.dol (loader.dol)” and “meta.xml” files to the Nintendont folder as well.
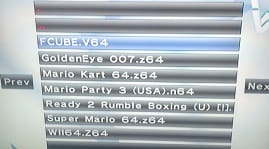
Now, Nintendont is tricky, you don’t actually put the gamecube roms in there, for them you make a separate folder on the main SD card page and call it “games”. Get the games you want, extract them and place them in the folder. You need to double click on each Gamecube game folder you extract and change their “ISO” name to “game.iso” so one page should show all your Gamecube games and each of those should go to at least 1 file saying “game.iso”. Your directory at that point should look like this;
SD Card> Games> “game name”> game.iso
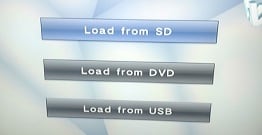
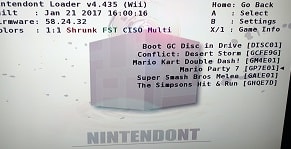
When you upload Nintendont from the Homebrew main page, it should take a few seconds and then take to the loader where you can pick from either SD or USB, whichever you have your games stored in.

Step 6: Download your ROMS
I found the best place to get roms are;
Just like all the other zipped folders, just extract the roms one by one in the “roms” or “games” folder of the emulator you are going to be using. Only Nintendont requires the file change of “game.iso”
Thats it! Wii-Retro at its finest. Got anything to add or did you run into a snag, feel free to drop a message.

Ever wanted to make your own t-shirts? How about wooden plaques or tool holders? Here you can take graphic design a step further and bring them to life, or just do more with your favorite photos, logos, and designs already out there.
Here is my walk-through on graphic design using Affinity Designer. As mentioned before it can be purchased for a one time fee of $50 and used on multiple computers. It may not have as many features as Photoshop but for the price-tag, it is totally worth it. Here is the layout, we will go to file and start a new image which will prompt a command screen with options on what your preferences are for the new file;
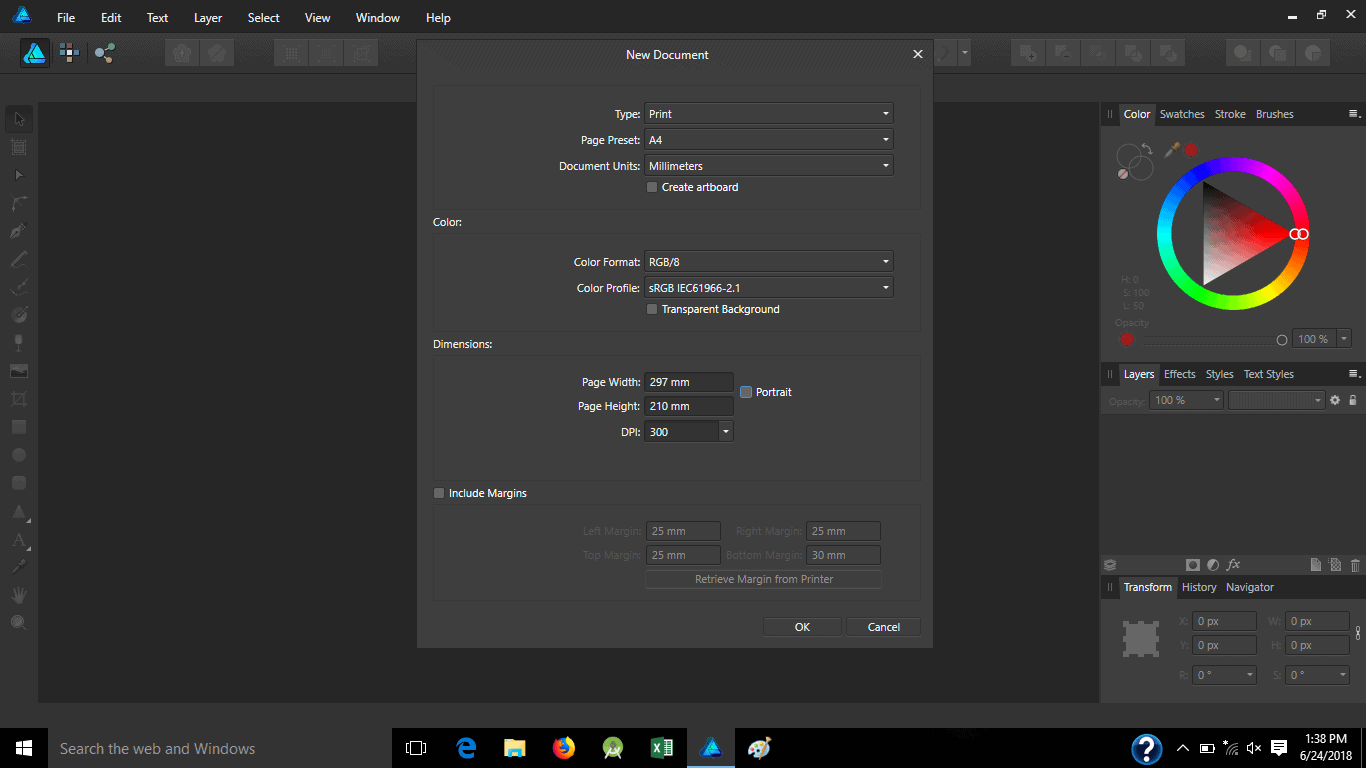
Pick the size, color theme, whether it is landscape or portrait, margins, and even if it has a transparent background or solid. (Transparent background is best because printing with a transparent background gives you the same type but pasting a transparent background on another image leaves the background off)
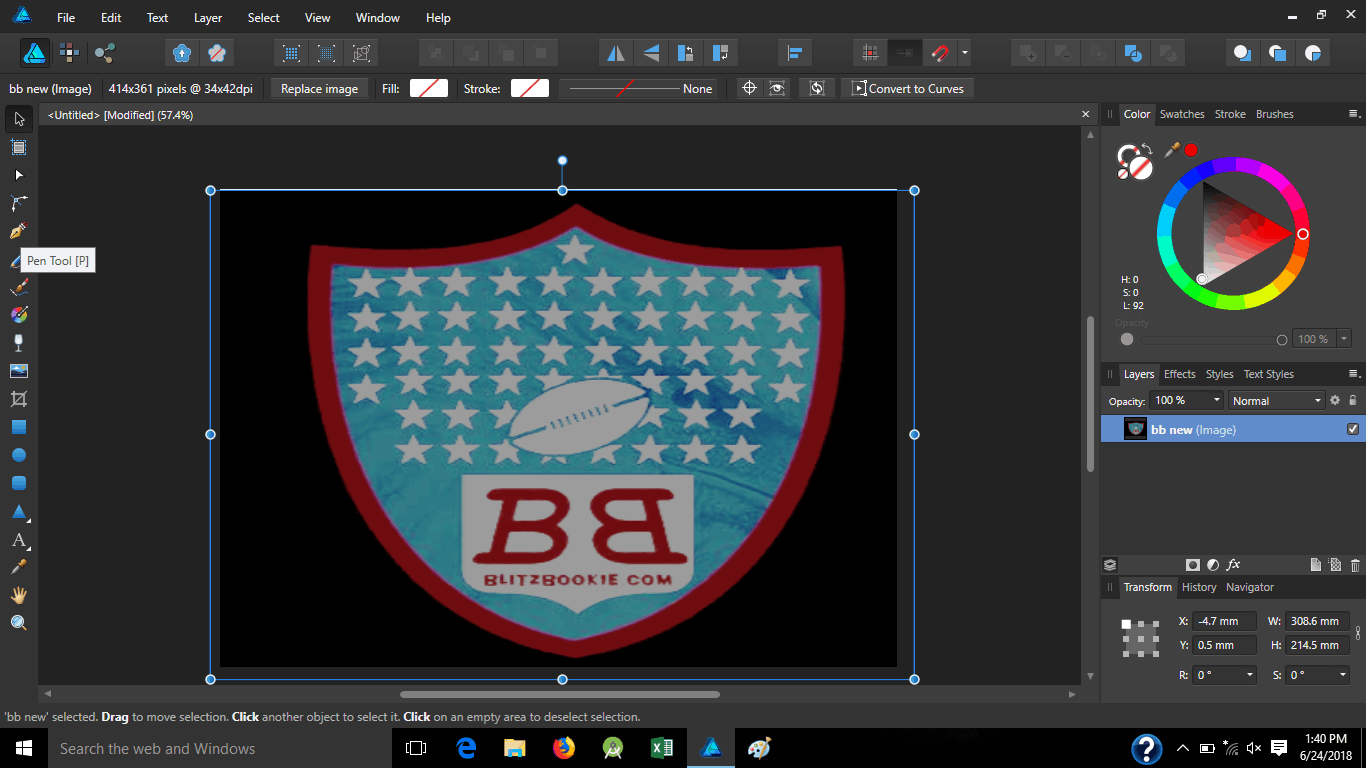
Now we will start with adding an image here, you can open a file with that image or click the picture icon on the left panel located between the “wine glass” and “crop” box. Find your image and insert it
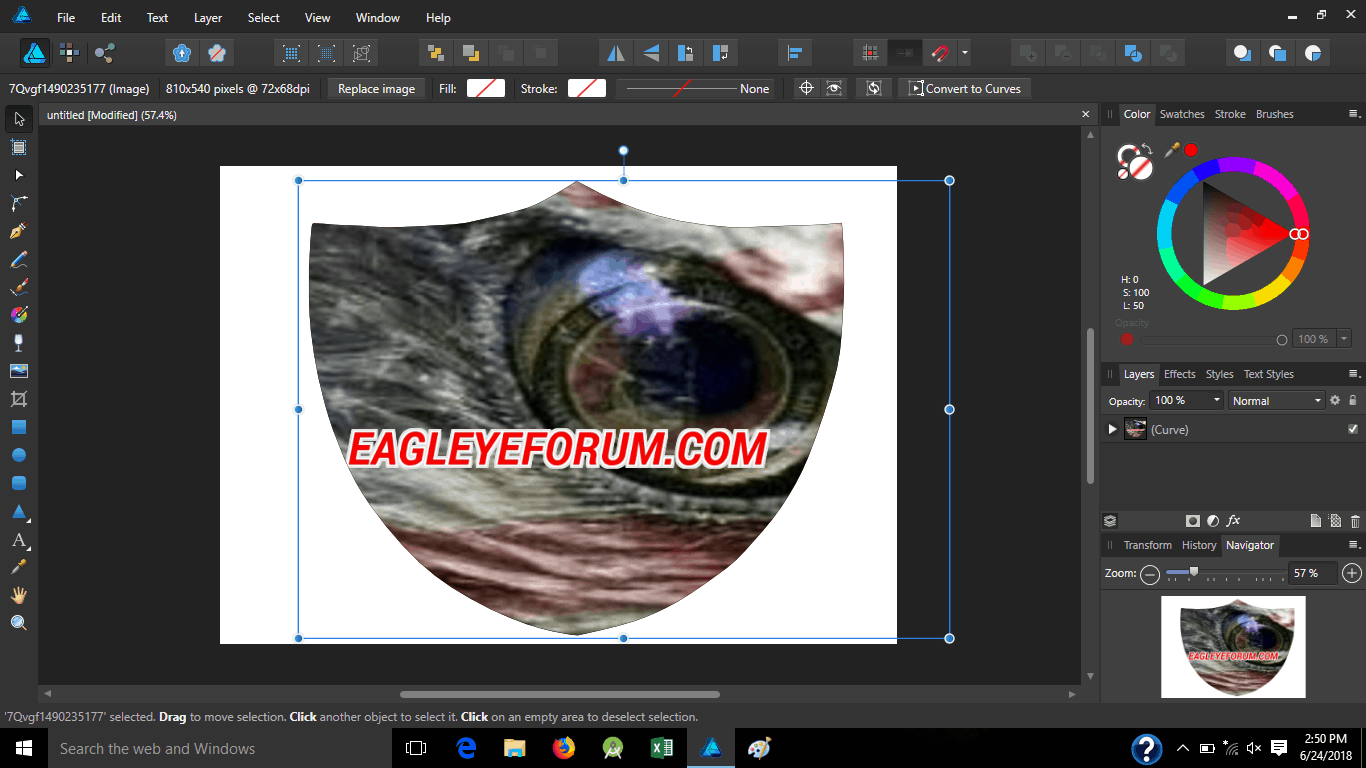
This one is with a normal background since we are going to cut the image out anyways. To do that, click the “pen tool” located 5th from the top on the left panel. It has the yellow tip, just above the pencil, and get ready to draw an outline of the image
Zoom in on the picture for cleaner lines, which you can do at the lower right, navigator panel and make your first mark
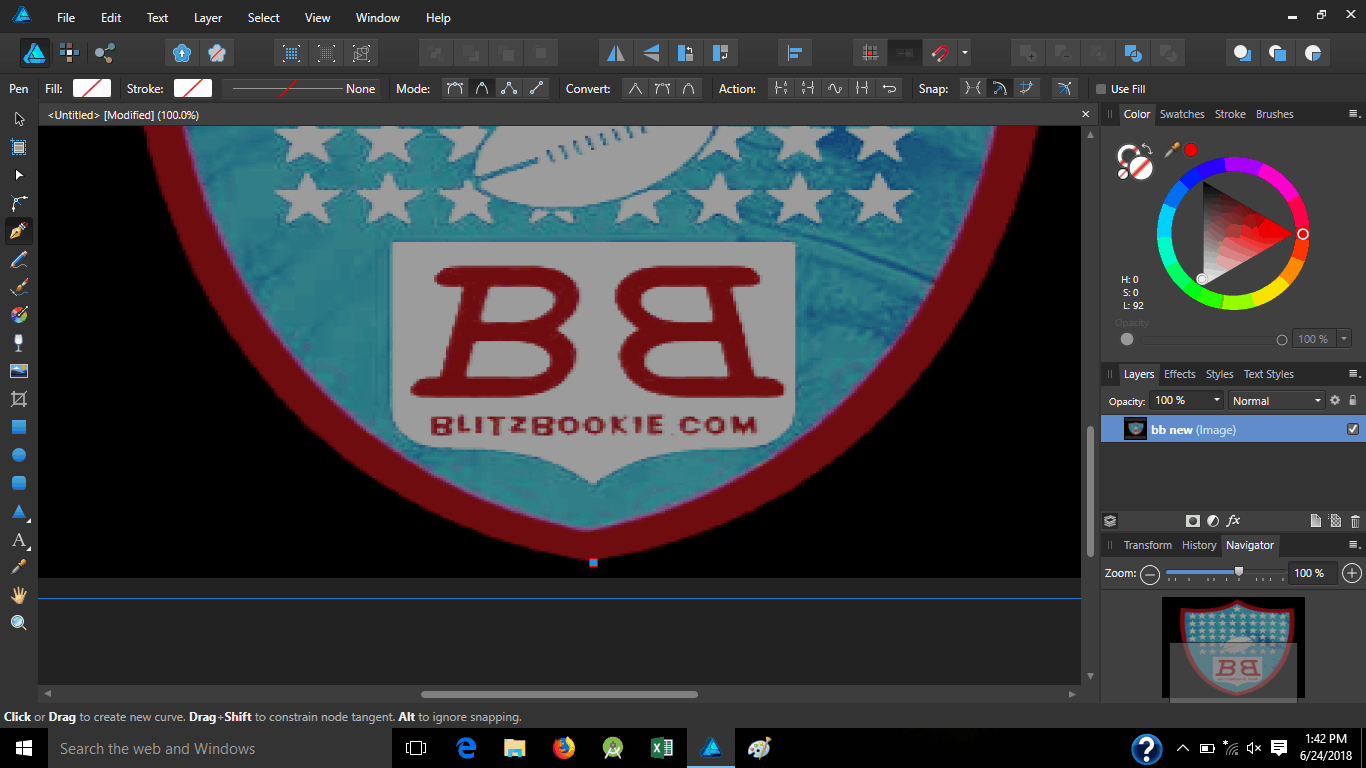
Up top, next to “mode”, notice I clicked the 2nd one, it comes with curves so it is better for rounded images. Now start tracing the image around, zoom in more if you have to and go all the way around, trying to straighten it as much as possible;
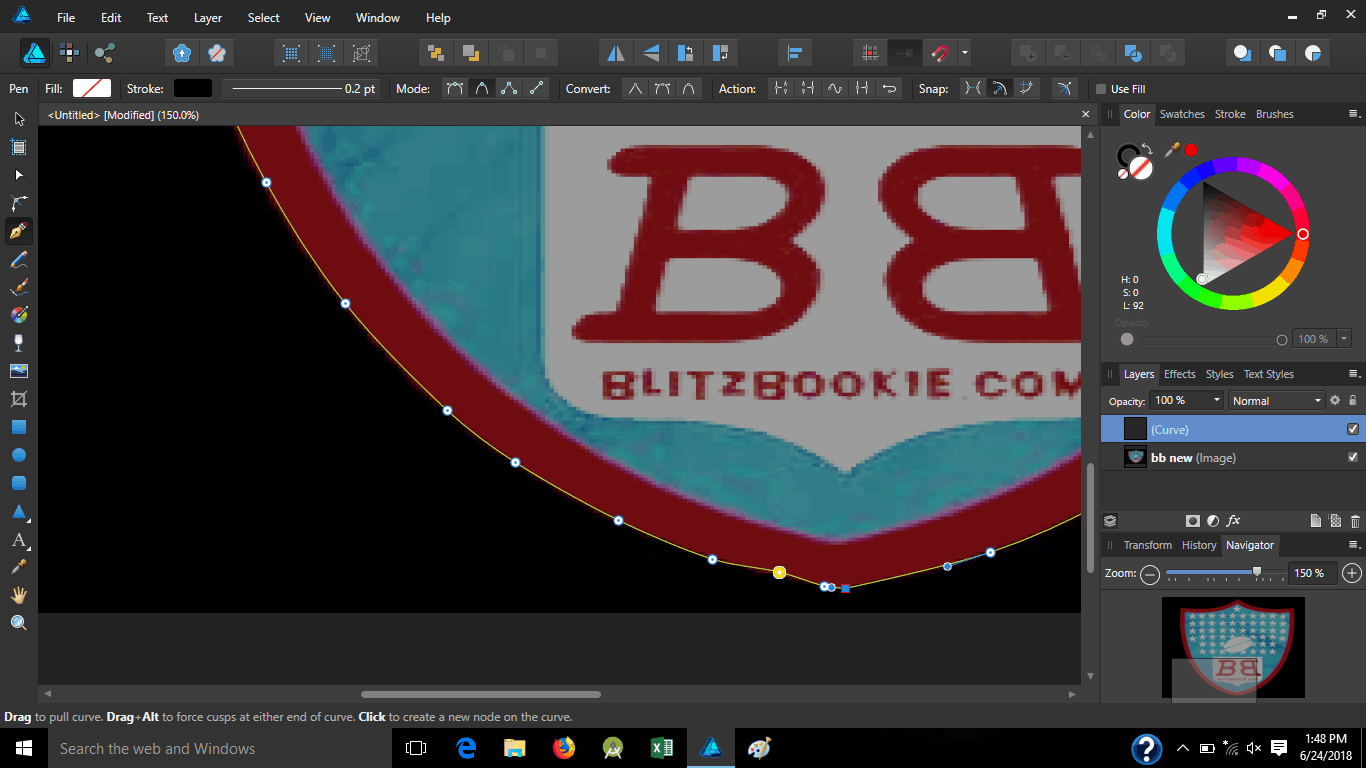
Once completed, scroll back and take a look;
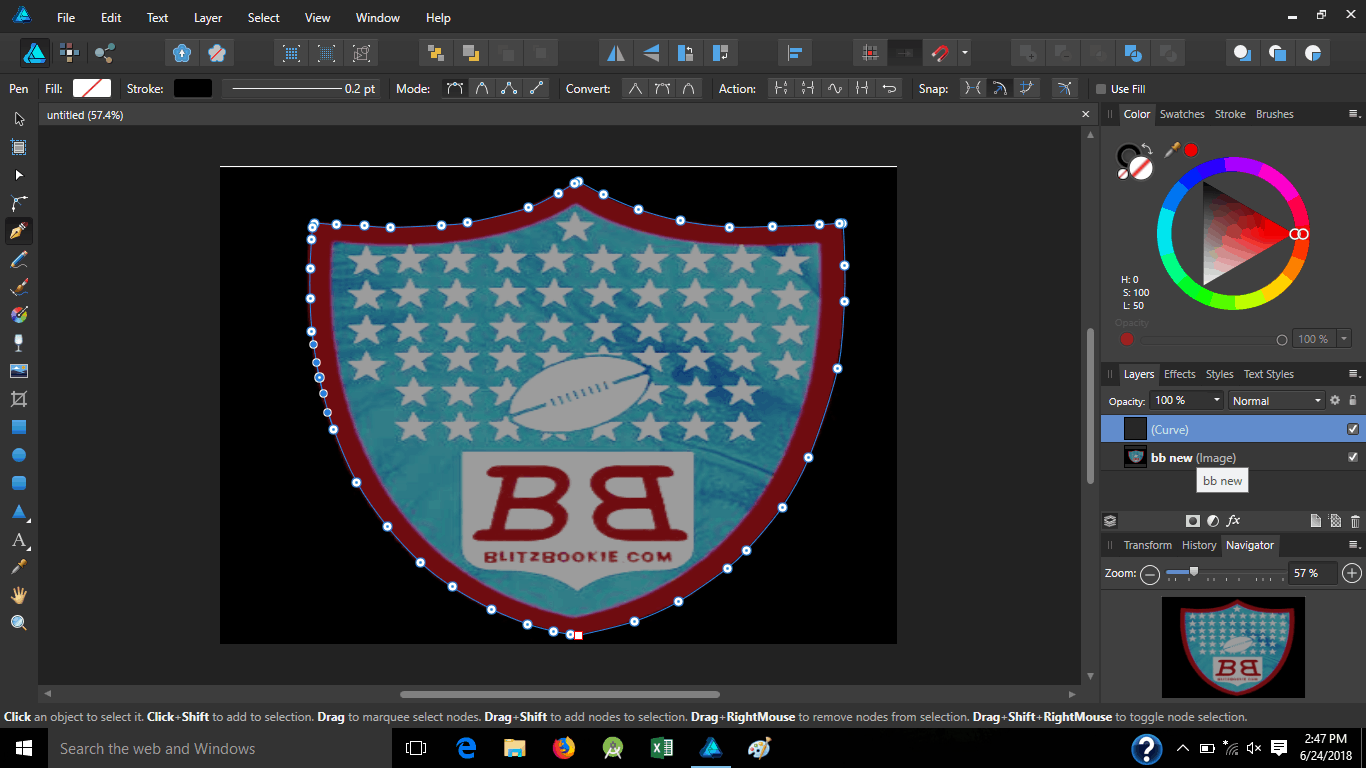
Once you have it set, go to your right “layer” tab, click on the 1st image (here it is “bb new”) and drag it to inside your curve, that will take out the background, then you can insert a new one;
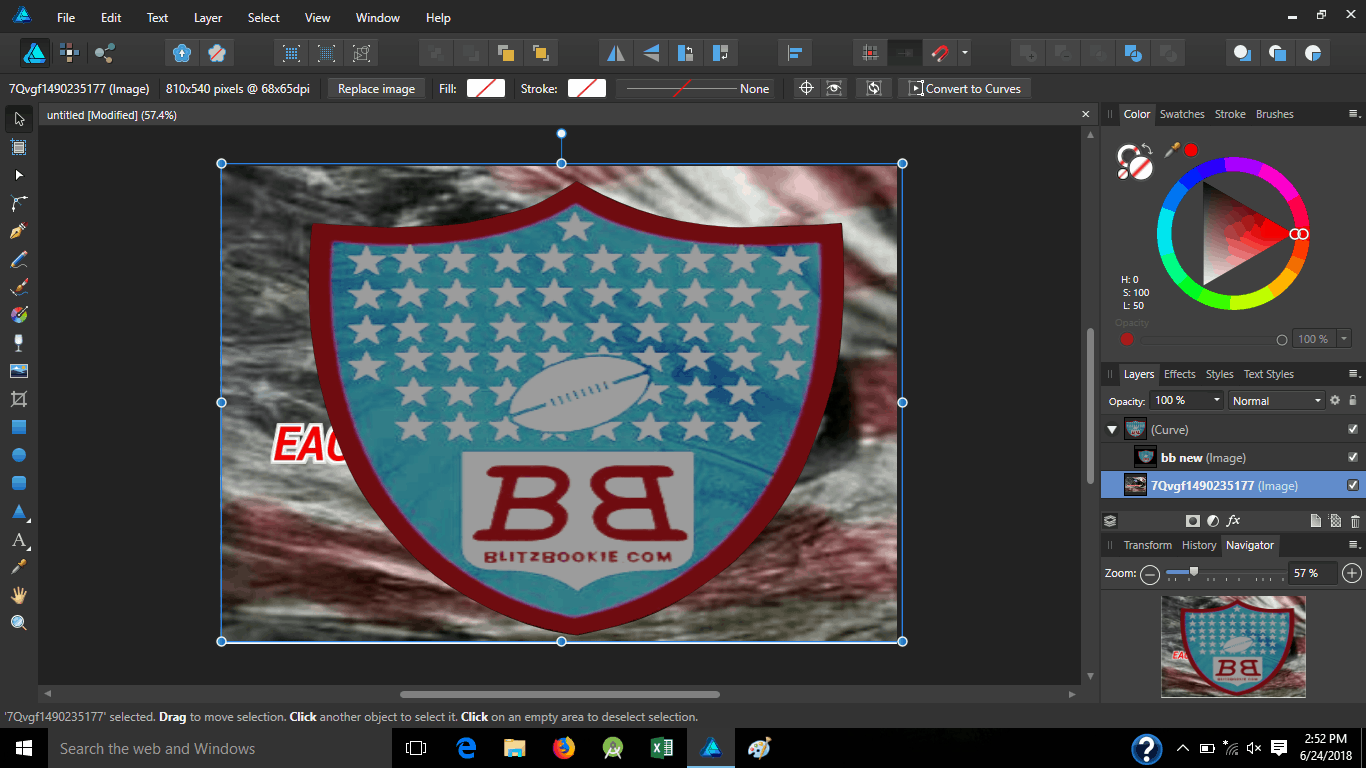
But watch where it lands, you could end up putting it in your 1st image;
In which case “CTRL+Z” could undo it.
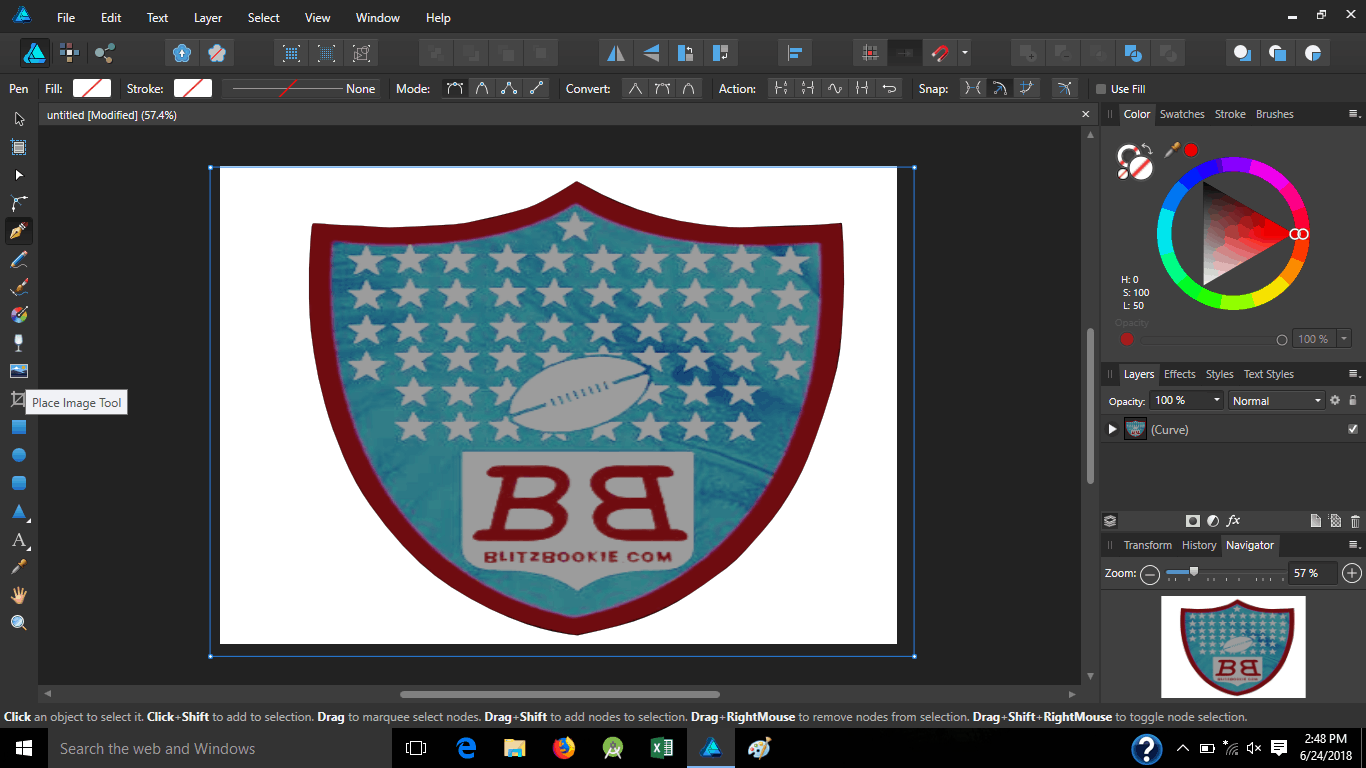
Now we want to bring that image lower so I click on the layer curve with the top pointer in the left panel, and shrink the pic down to fit the eye;

I don’t want it taking away from the eye so I lower the opacity of it, which pretty much makes it see through the lower you go, here I went 25%;

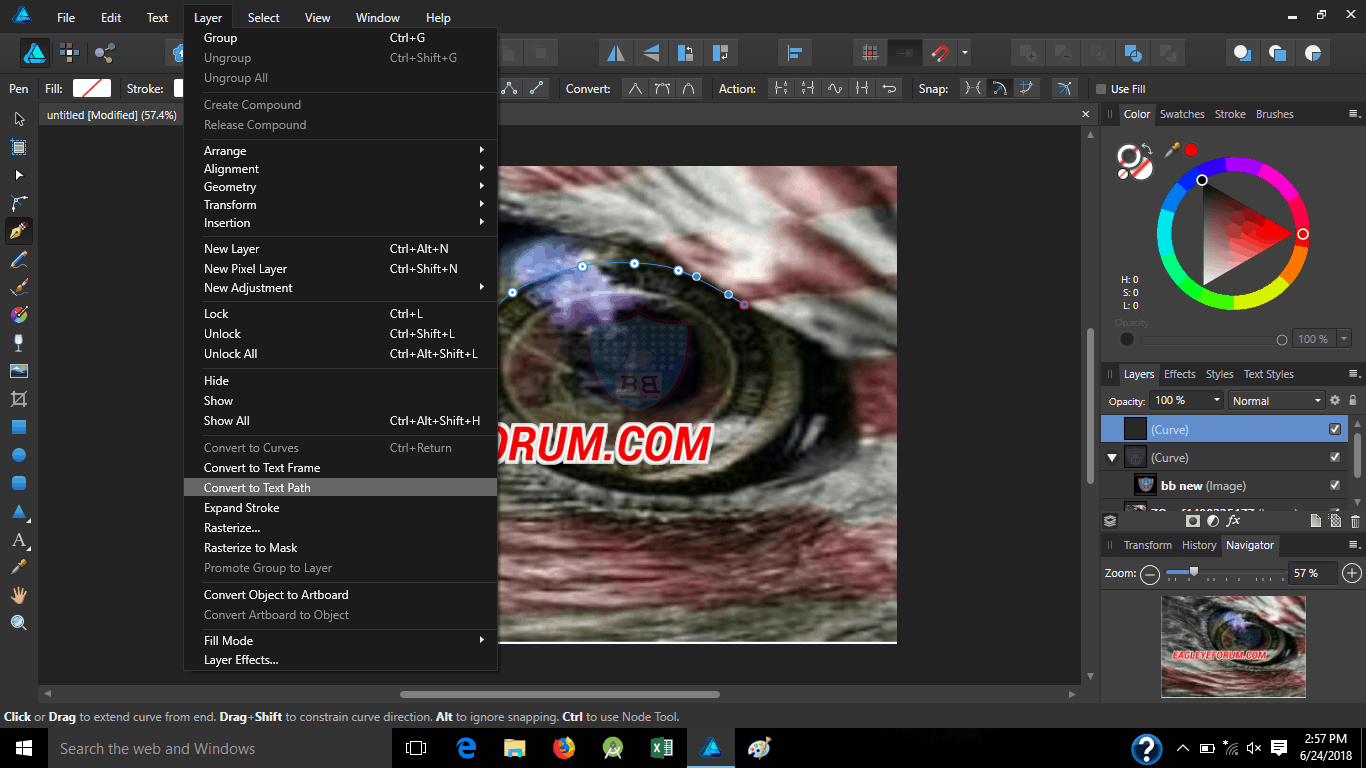
Now I want to add text around the eye so I will got to pen and add the curve, draw a line over the eye, head to “layer” on the menu and scroll down to “text to path”;
Highlight the text and you can change the size and/or font;
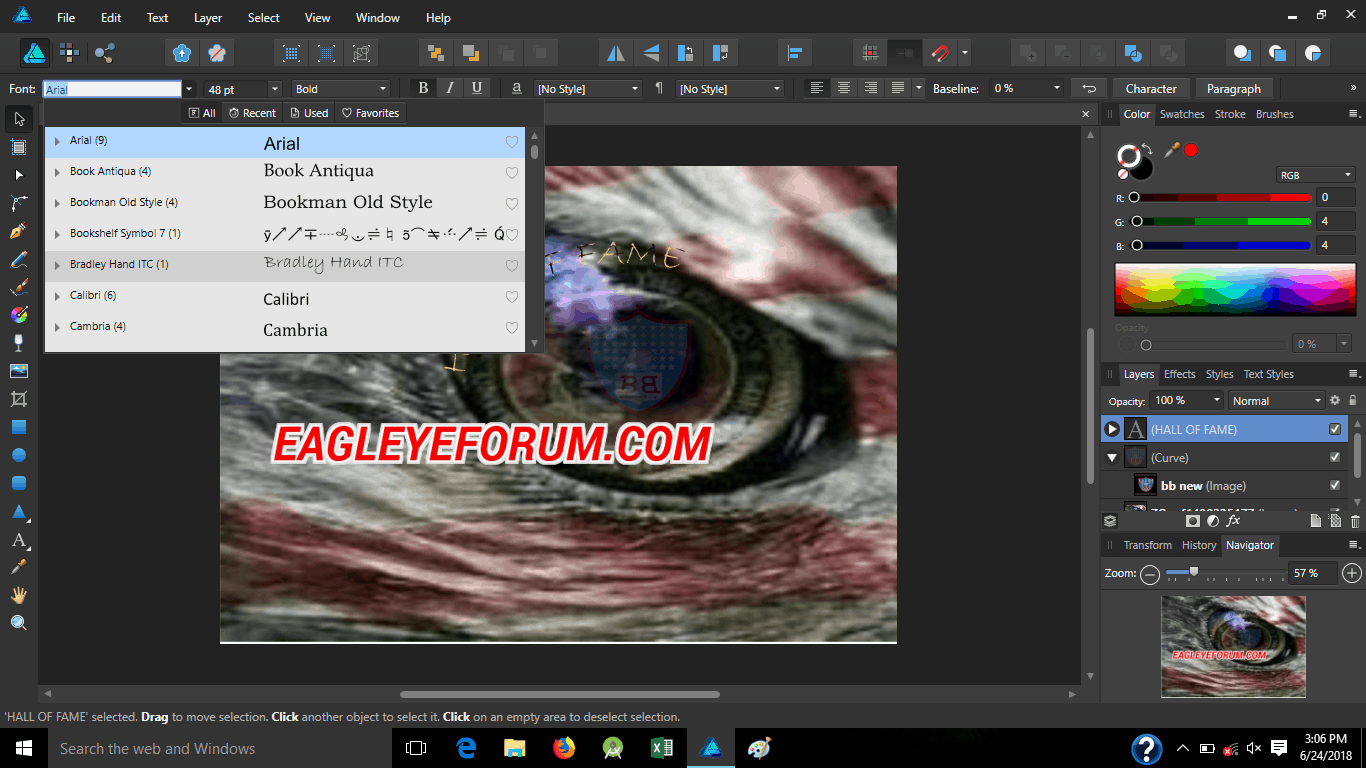
Or even upload an image to it;

You can change colors through “styles”, or the drop-down list by “opacity and spread that image out.
AUTOMOTIVE
In order to keep your vehicle running smooth there are things you will need to either maintain yourself, or have others do it for you. Now, some of you may know a personal mechanic that takes care of your needs for a fair price, while others are forced to take it to the dealer and get charged a hundred (or more) dollars an hour for labor, plus parts, to get the job done. If you know of a local mom and pop automotive shop, that helps save you a little more but even then you’re still paying around fifty to eighty an hour for labor alone. If you really want to save some money and get that feel good accomplishment when its all done, do it yourself.
Now, some things do require special tools or certain equipment and/or just aren’t worth the time and hassle to do it yourself, in which case a shop is where to go, but the majority of things you need to do on a regular basis can be done in your own carport/garage area. Tools to conduct these tasks come fairly cheap and will last long enough to get your money’s worth so they are well worth the investment. I have created a list of some basic tools for the beginner and throughout this section we will go over other special tools necessary for certain tasks.
First, I would highly recommend investing into a Haynes Repair Manual if you want to learn more about the ins and outs of your specific vehicle, outside of what your owner’s manual will show you. I have purchased one for every vehicle I have ever had because of how detailed they are. You can get them at your local auto parts store or order online through Amazon for around $20 pending your vehicle make and model.
Before I go over some routine maintenance you can do at home, lets go over some basic “DOs and DONT’s”;
DO;
- Wear safety glasses when working with power tools or under a vehicle to protect your eyes from falling or flying debris.
- Clean up any oil spills or grease splatters immediately to avoid someone slipping. Cat litter or fine sand is good to soak up oil spills, brake cleaner and paper towels are good for small spills and stains.
- Use every nut, bolt, washer, and wire you take off.
- Make sure the engine is cool before working on it
- Keep chemicals out of reach of children and pets. Anti-freeze especially, as it gives off a sweet smell and pets have been known to get sick after digesting.
DON’T;
- Don’t rely on a jack when under a vehicle, make sure you have a sturdy jack-stand supporting where you are under.
- Don’t push on wrenches when loosening or tightening a bolt to avoid knuckle busters. If you have to push, push with an open palm.
- Don’t use loose wrenches or other tools that may slip and cause injury
- Don’t remove a radiator cap while it is hot.
- Don’t wear loose clothing or have long hair hanging while working on, or around, moving parts.
- Don’t use your battery as a tool holder, a wrench that touches the positive and negative post can complete the circuit and cause damage to your vehicle and or injury to yourself
- Don’t leave tools in the sun because they can get blistering hot quickly
Routine Maintenance schedule;
WEEKLY;
Check fluid levels; oil, coolant, windshield washer (if applicable), brake, and clutch (if applicable)
Engine Oil;
The level indicator (dipstick) for the engine oil can usually be found on the passenger side of the vehicle by the spark plugs.
Coolant;
The engine coolant level can be found either by looking at the reservoir that is usually located on the passenger side or by looking in the radiator itself. Make sure the system is cool and depressurized before opening either cap so you don’t get sprayed with scolding hot water.

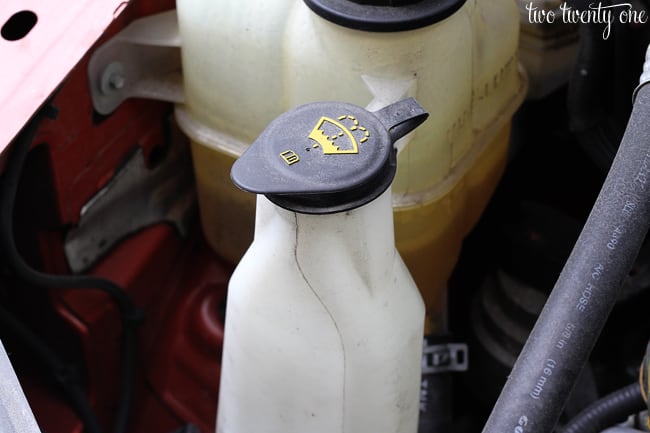
Windshield washer;
Normally located under the hood around the coolant area but have been found
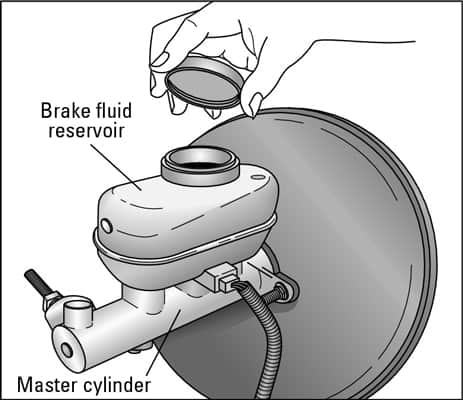
Brake fluid;
Located under the hood on the driver side of the vehicle

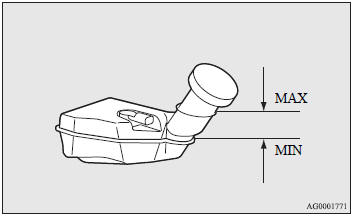
Clutch fluid;
Normally located by your brake reservoir on the driver side under the hood
Inspect tires overall condition and air pressure, check for;
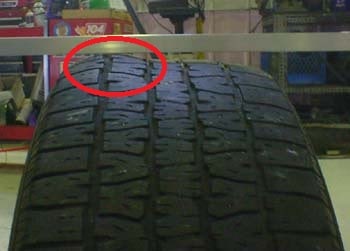 Tire separation; break in steal belts causing a bubble effect on tread
 Dry rot; old dry rotted tires from sitting in sun too long
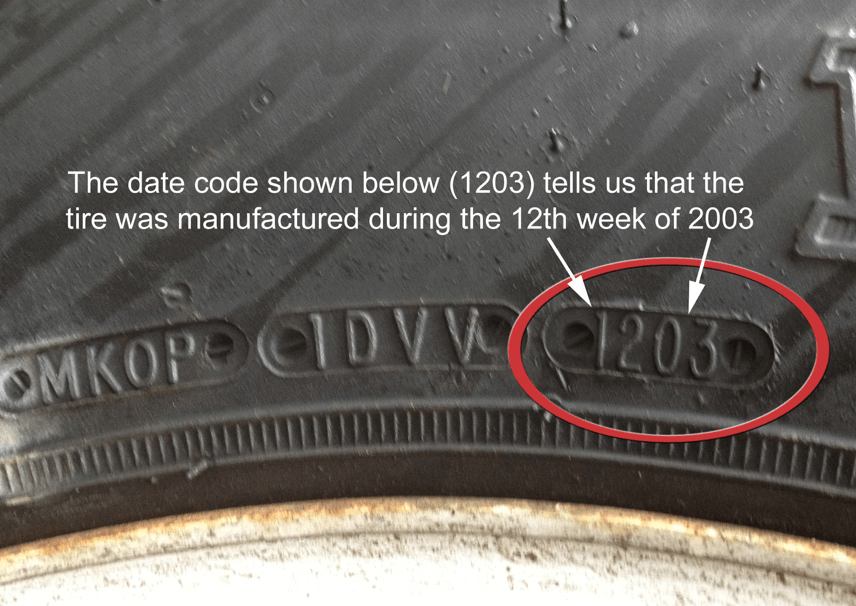 DOT #’s; check the date. Most manufacturers recommend replacement no matter what the tread condition looks like every 10, 8, or even 6 years. Some, if not most, tire shops recommend replacement every 6 years
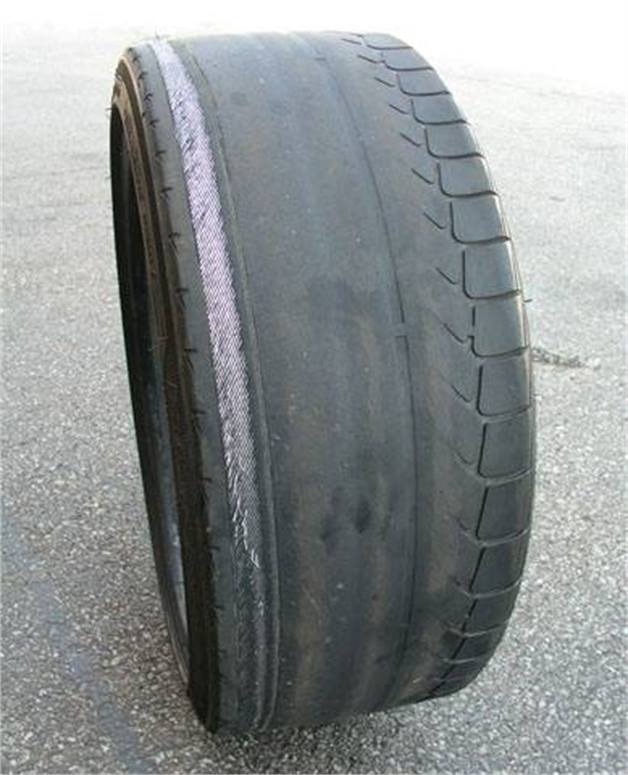 Tread depth, flat spots, steel belts exposed;
- Tread depth should be above 4/32nds
- Check for smooth tires or flat spots from locking up brakes
- Check for steel belt exposure
Replace immediately if your tire looks like this, take your vehicle down to have the suspension/alignment inspected as well
 Impact break; belt separation caused from impacts such as hitting a curb hard
Air Pressures; check your owner’s manual or placard located on your driver side door for appropriate air pressure but a standard rule of thumb is;
- Small car; 25-30 psi
- Medium car/small truck; 35 psi
- Light duty truck with load range C tires; 35 psi standard, 50 psi loaded up
- Light/Medium duty truck with load range D tires; 50 psi standard, 65 psi loaded up
- Medium/heavy duty truck with load range E tires; 65 psi standard, 80 psi loaded up
- Special note; Low profile tires should be set to max air
Tire pressures should be set when they are cold but if they are hot be sure to account for the extra air and set for 3-4 psi more
QUARTERLY (Every 3 months or 3,000 miles)
- Check fluid levels for power steering and transmission
- Change oil filter and oil
BI-ANNUAL; (Every 6 months or 6,000 miles)
- Inspect seat belts
- Inspect windshield wiper blades
- Inspect battery, add DI or Distilled water if necessary (just enough to cover the bottom cells)
- Inspect the drive belt
- Inspect hoses under the hood
- Inspect the cooling system
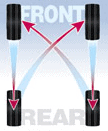
- Rotate tires; 4-tire and 5-tire (if you have a full size spare) recommended rotations

ANNUAL; (Every 12 months or 15,000 miles)
- Inspect the differential fluid level
- lubricate the chassis
- Inspect the fuel system
- Inspect the brake system
- Inspect the exhaust system
- If 4WD, inspect transfer case level
- Inspect the air filter
Every 30,000 miles or every 2 years
- Change the brake fluid
- Replace the air filter
- Replace spark plugs, if conventional non-platinum, non-indium type
- drain, flush and refill cooling system
- Inspect the steering, suspension and drive-axle boots/bushings
- Change transmission fluid and filter
Every 60,000 miles or 4 years
- Change the transfer case lubricant (if 4×4)
- Change the differential lubricant
- Replace the PCV (Positive Crankcase Ventilation) valve (if applicable)
Every 100,000 miles or 5 years
- Replace spark plug wires (platinum and indium type)
- Inspect and replace spark plug wires if necessary
RADIATOR TESTER
Radiator testers can run anywhere between $40-$200 depending on which type you buy, but there is a cheaper alternative, you can go to your local hardware store and make your own for around $20 with cheap materials. Radiator pressure varies from make and model but can range from 4-30 psi (pounds per square inch), be careful to not over pressurize because you can blow your radiator. The standard for most vehicles is between 10-14 psi so use a standard bike pump where you have complete control, and remember, all you are trying to do is find leaks, once you start pumping, start listening, and DO NOT over pressurize your system.
Here is what you need;
(8) hose clamps; 
(3) pieces of 5/16 hose; ![]()
(1) 5/16 “T” shaped barb fitting; 
(1) 5/16-1/2″ adapter; 
(1) piece of 1/2″ hose; 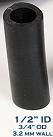
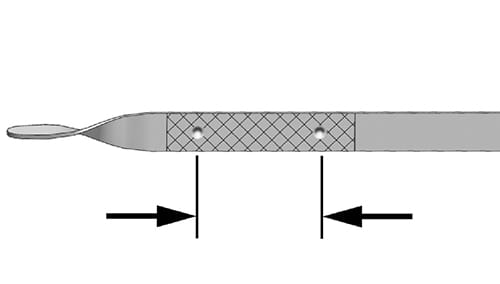
(1) valve stem; ![]()
(1) pressure gauge; 
1st step:
Take the 5/16 “T” shaped barb fitting and attach a piece of 5/16″ hose to each side with a hose clamp. Note; I cut my sizes at 5″, 5″, and 2″ (2″ up top).
2nd step:
Cut the bottom part of the valve stem off (where it starts to widen) if you have a decent saw and clamp to cut it down, otherwise, just use a utility knife and cut it down to bare metal. Once done, insert it into one of the hoses on the sides and attach a hose clamp Note; I wrapped this end with electric tape to avoid cutting my hand on the hose clamp in the future.
3rd step:
Add the 5/16-1/2″ adapter to the top hose, with hose clamp, then add the 1/2″ hose at the end of that with another hose clamp. Note; Hose can be cut to whichever length you prefer, I cut mine around 5″
4th step:
Attach pressure gauge to 1/2″ hose, with hose clamp. Note; You can use any type of gauge and the top hose can be any size as long as it fits the gauge.
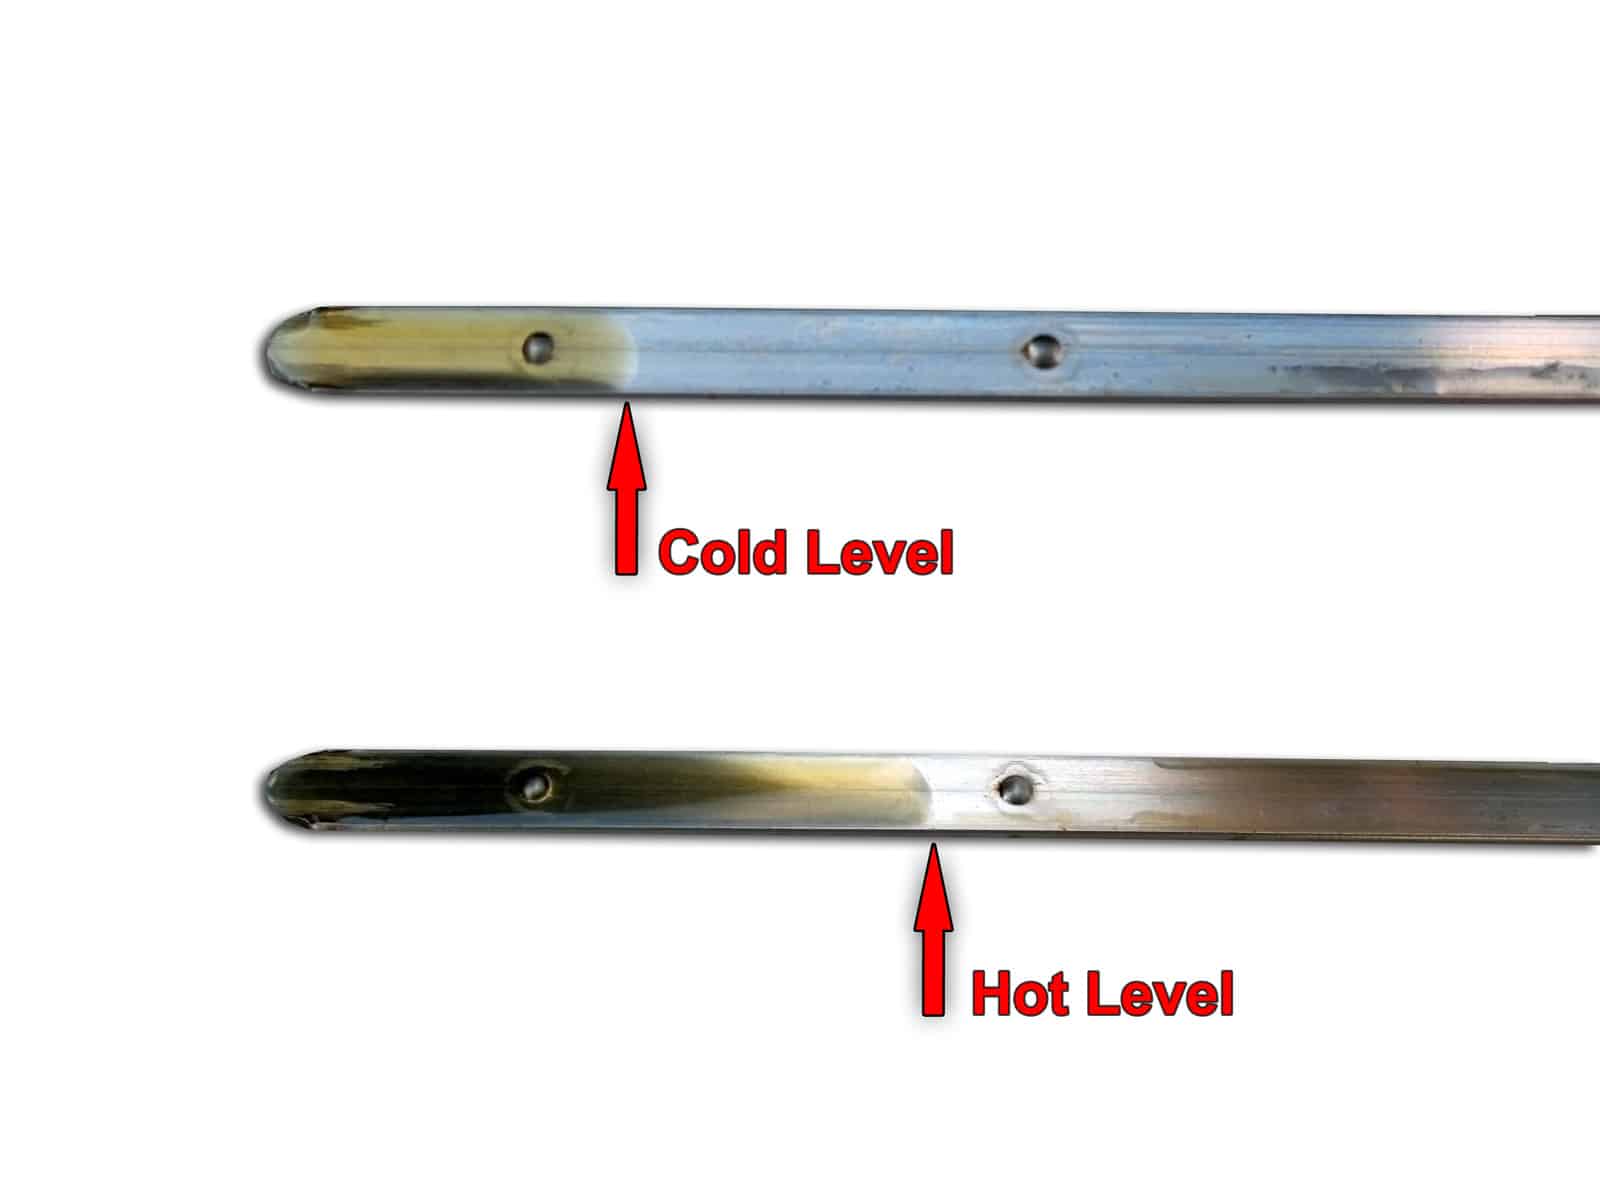
End result;
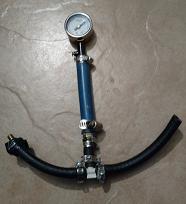
Worked like a charm when finding a leak in an old radiator, leak in freeze plugs and even found a leak by the head gaskets. You can modify this any one you see fit, I’m just throwing out the concept of what you should be looking for.
Final Note and disclaimer; Be sure to use low pressure (10-13psi) when conducting this test, this is just a sample. You can alter it however you see fit.
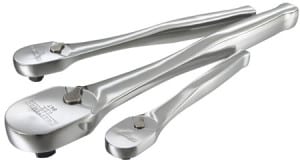
BASIC TOOLS

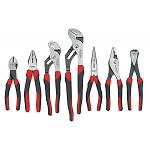
When it comes to work around the shop or home, in order to do it yourself you are going to need tools to get the job done. I have thrown together a list of basic tools that everyone should have at their disposal. You can purchase kits at Amazon for a fair price, the one above is a decent set by Pittsburgh which you can pick up for just over $50;
Or if you want to go a little bigger and better you can go with a Crescent kit for around $100
Now, lets go over some basics;
fastener is a piece of hardware that mechanically joins or affixes two or more objects together; screws, nuts/bolts, etc.
torque means to apply force by twisting
With fasteners, remember;
left is loose (counter-clockwise)
right is tight (clockwise)
The best way to accumulate tools is buying at least one every payday if you can’t afford to get a full kit, buy just one tool at the least, and your collection will grow pretty quick. I’d recommend starting with at least a small set from your local hardware or auto parts store that comes with a variety of things, then piece in others as you go. Here are the basics;
WRENCHES AND SOCKETS
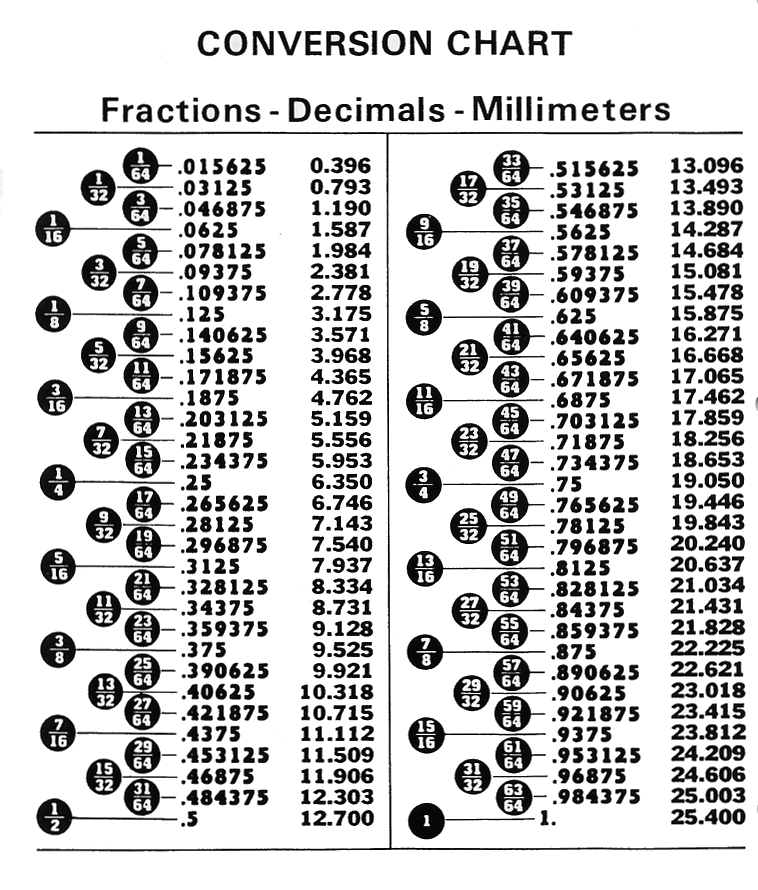
A wrench (also known as a spanner outside of North America) is used to grip and help apply torque to rotary fasteners, such as nuts and bolts or to keep them from turning when wrenching down another side. Sized wrenches come in fractions; SAE (Society of Automotive Engineers) and metric. Here is a conversion chart for SAE and metric sizes;
There are over 20 different types of wrenches so here we will just throw out a few basics to get you started;
ADJUSTABLE WRENCH
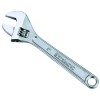
Commonly referred to as a Crescent wrench, but Crescent is actually a name brand and trademark that made them famous. They come in a variety of lengths and are great tools to have around, one of the first you should purchase. When using them always make sure the adjustable jaw is at the side you are turning, for example; if you are tightening a bolt, the adjustable jaw should be on the left of the nut/bolt, if loosening, it should be on the right, that way the pressure is being put on the “fixed” jaw. The problem with these is they are bulky so you need space around the bolt or nut you are trying to get to.
COMBINATION WRENCHES
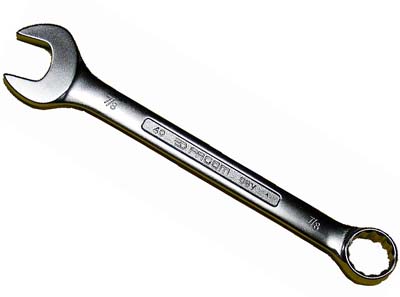
OPEN-END

BOX-END or RING-END
Combination wrenches are the main ones you want to stock up on, long and short types and it seems you can never have too many of either size. You can buy them individually or as a set;
SAE 9 piece set usually consists of; 1/4, 5/16, 3/8, 7/16, 1/2, 9/16, 5/8, 11/16, 3/4
Metric 9 piece (MM) set usually consists of; 7, 8, 10, 11, 12, 13, 14, 17, 19
Another type of these wrenches that are handy to have are the ratcheting box-end type that contain a one-way mechanism which allows the wrench to be turned without removing it from the nut or bolt simply by cycling the handle backward and forward;

The upper one loosens or tightens depending on which side is up. The lower one has a lever where you can easily switch in place the loosening or tightening function.
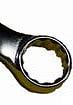
Next we have the hex key wrenches;
Also commonly referred to as Allen wrenches but Allen is actually a name brand trademark, like Crescent. They are usually shaped as an “L” with hexagon shapes on both ends (some have a ball on one end as shown in the picture, good for swiveling if you can’t get the key in straight) used to drive bolts and screws with a hexagonal socket in the head. They come in metric and SAE as well and are sold usually as a set of each or a set with both types.
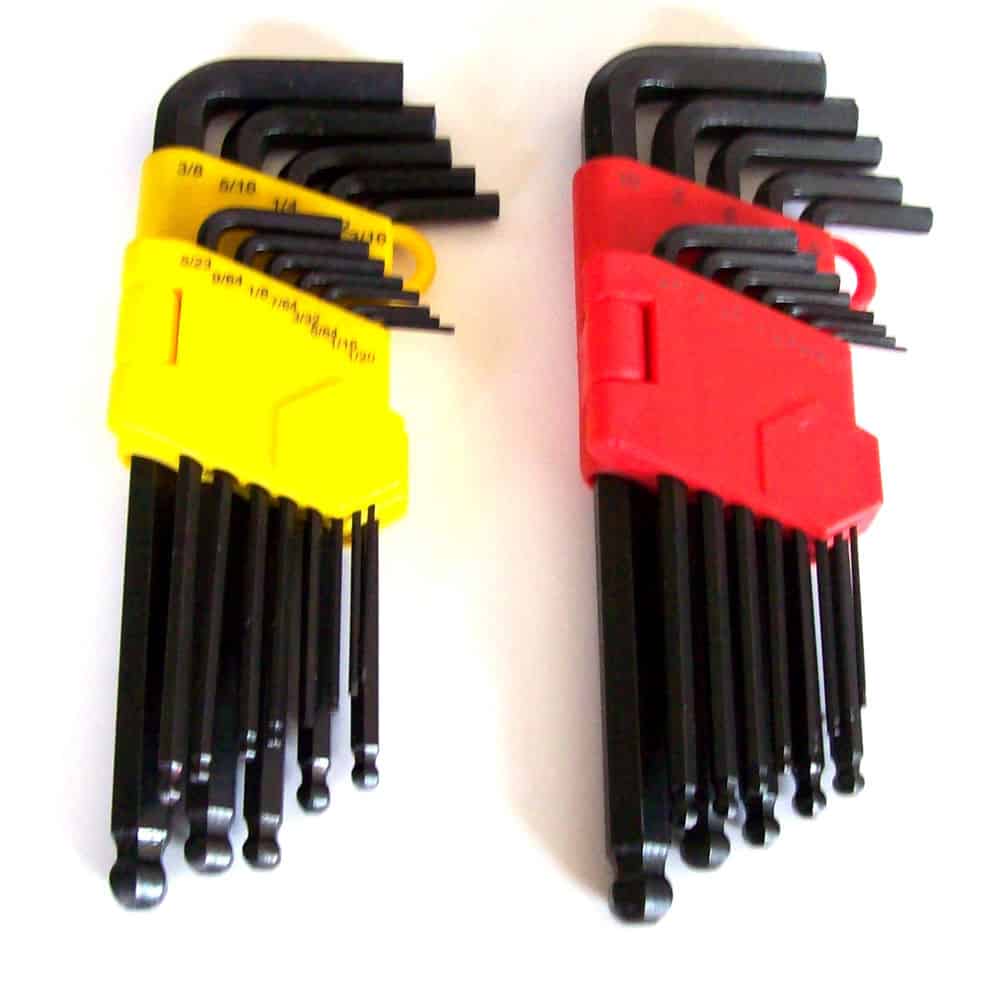
Ratchet/socket wrenches are another tool used to torque fasteners (nut/bolt combo) in quicker fashion than a normal wrench. It is a metal handle attached to a ratcheting mechanism normally consisting of a bar or wheel having inclined teeth into which a pawl drops so that motion can be imparted to the wheel or bar.
There are multiple types of square drive head ratchets but the primary use ones are as follows;
1/4″ drive (small) is good for smaller nuts and bolts that you don’t want to over-torque, like electronics. Think of its use as to just snug up nuts/bolts. I recommend using just 1 hand when tightening to prevent over-torque
3/8″ drive (medium) is good for your standard jobs like spark plugs, brake pads, and most under the hood work.
1/2″ drive (large) is more for vehicle lug nuts and larger bolts requiring more torque.
All ratchets allow effective motion in one direction only, but you can switch sides with a locking mechanism located on the back. You can also add things to these for optimal use like;
Extensions

and swivel extenders

Then you have the sockets that make them function;
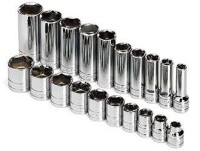
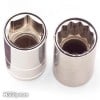
Like ratchets, sockets come in three common sizes (drive end) 1/4″, 3/8″, and 1/2″. Like wrenches they come in standard and/or metric sizes. Some can be short (shallow) and others can be tall (deep), some come thick walled for extra torque while others come thin walled for those tight applications. They come in 6 point or 12 point female ends for wrapping around nuts and bolts;
6-point & 12-point
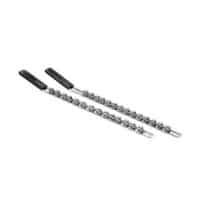
Other accessories you can get to organize or better utilize your socket sets are;
Socket rails to organize those sockets
As well as the speed wrench for quick jobs that require little torque;

Breaker bar for loosening those corroded or over-torqued bolts;
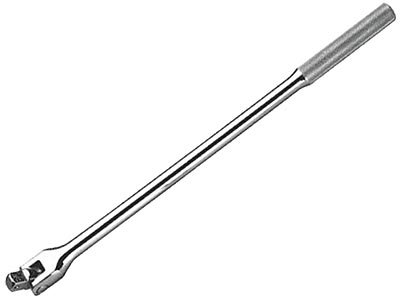
A breaker bar is a long non-ratcheting bar that is used with sockets. Breaker bars are used to break loose very tight fasteners because their additional length allows the same amount of force to generate more torque than a standard length ratchet as well as prevents damage to the ratcheting mechanism of a ratchet. Since it is just used to break, you can switch to a ratchet once you get at least a half of a turn on the fastener.
You can improvise here and just add a long pipe wrapped around the ratchet too, referred to more commonly as the cheater bar
Breaker bars can have 3/8″ or 1/2″ ends but since they are primarily used to remove strong bolts like lug nuts that are applied with great torque by impact wrenches, 1/2″ would be needed the most.
Since power tools can be expensive, this is your best friend when you need to apply heavy torque to break loose or tighten down bolts/nuts.
TORQUE WRENCH;

Torque wrench is used for precise torque power on each nut/bolt.
SCREW/NUT DRIVERS
Screwdrivers are a necessity and come in all shapes and sizes and each are equally important, you can never have too many it seems.
Here are some standard shaft lengths and their uses;
Stubby for tight spaces usually have a shaft length of 1-1/2″
Standard for all around good use have a shaft length of around 4″
Tall and skinny for hard to reach spaces (tall and skinny can snap easy if heads are over torqued) have a length around 8-12″
Thick and sturdy ones can come in any length, the width is what is important here. These are good for using as small pry-bars as well as hitting them with hammers to get over-torqued stripped ones out or to knock things in and out of tight spaces.
Head shapes and sizes and their uses are;
FLATHEAD

Flat head, also known as slotted driver are one of the most basic tools ever designed. They come in a variety of sizes and lengths, with each meant to serve a specific purpose. They often serve as a miniature pry bars, scrapers, or chisels too, beyond their driving capabilities. Each size uses the same basic design with differences lying in the length of the shaft as well as the width and thickness of the driver itself. These tend to strip easy when trying to torque down so they are best used on adjustable settings or even applications just requiring a snug fit, like electronics.
PHILLIPS
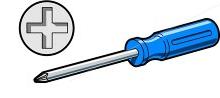
Phillips, also known as cross driver are the more popular screw brand because they tend to torque better and strip less. Like the flat-head, they too come in many shapes and sizes but they are indicated by numbers, not fractions. Head numbers can fit multiple screws, here are some numbers with matching screw numbers;
Head #0 fits #0 and #1 screws.
Head #1 fits #2, #3, and #4 screws.
Head #2 fits #5, #6, #7, #8, and #9 screws.
Head #3 fits #10, #12, #14, and #16 screws.
Head #4 fits #18, #20, and #24 screws.
Of course, you can also learn head to screw sizes by trial and error, pending on torque of the screw needing to be loosened, heads may fit other screws not associated.
TORX

Torx, also known as a star driver seem to be more common nowadays as new automobile models come out with more electronics. Initially they were used more as a tamper resistant. Their sizes range in numeric as well but with a “T” defining it, such as T1-T10, then going to T15, T20, T25, T27, T30, etc. These are only a necessity if you plan to work on electronics or know that your vehicle has multiple torx heads.
HEX (NUTDRIVERS)
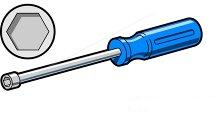
Nut-drivers are used to tighten nuts and bolts requiring much less torque than a wrench or ratchet is needed. Mainly used for electronics and connectors that just need to be snugged up. They tend to have hallow shafts to accommodate shanks/bolts that nuts are on. There are different variations of these as well;
1/4″ DRIVE HANDLES
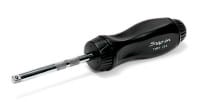
1/4″ drive handles for switching sockets but as you can see, these are shallow drivers so if you’re trying to wrap around a long bolt you will need the standard or following types.
T-HANDLES
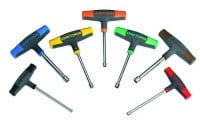
T-handles for better handling and hallow shafts
INTER-CHANGEABLE DRIVERS

Inter-changeable drivers have hallow shafts with a hallow slotted handle for quick and easy change outs. You can find kits of all drivers in this style.
MULTI-DRIVERS

These multi-drivers are very handy to have. Not quite as strong as standard drivers, these hold their own for standard jobs not requiring too much torque. Some swivel, some ratchet, some even work as storage containers for other bits.
PLIERS
Pliers are another necessity, there are many different varieties made for general or specific purposes. While they can be used to hold objects firmly, they are also useful for bending and compressing a wide range of materials. Pliers have a pair of short metal serrated jaws on one end and longer handles on the other. With a pivot point between the handle and jaws, it creates an advantage allowing the force of a hand grip to be amplified and focused on an object with precision, therefor, you can use them to manipulate objects that you normally can’t with fingers.
Different types of pliers are;
SLIP-JOINT
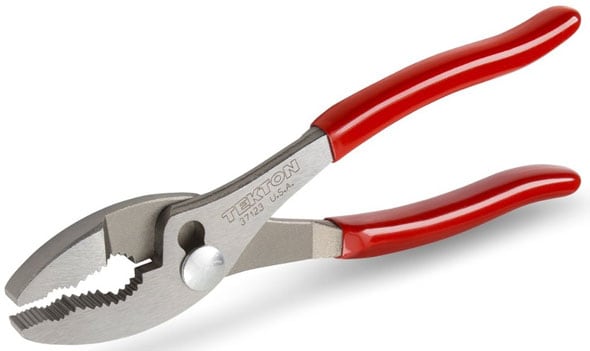
Slip joint pliers can adjust to two sizes, one where the serrated jaws meet when closed, and the other where there is about a 1/4″ gap closed. They are good for holding small to medium objects.
ADJUSTABLE PLIERS
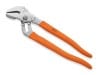
Adjustable pliers, also known as water-pipe pliers or just Channellocks (Channellocks is actually a name brand, but some people refer to all these pliers as Channellocks) are serrated jaws sitting 45 to 60 degrees from the handles. The lower jaw can be moved to a number of positions by sliding along a tracking section under the upper jaw. They can adjust to a number of sizes without the distance in the handle growing wider, as well as often having longer handles for increased leverage.
DIAGONAL PLIERS
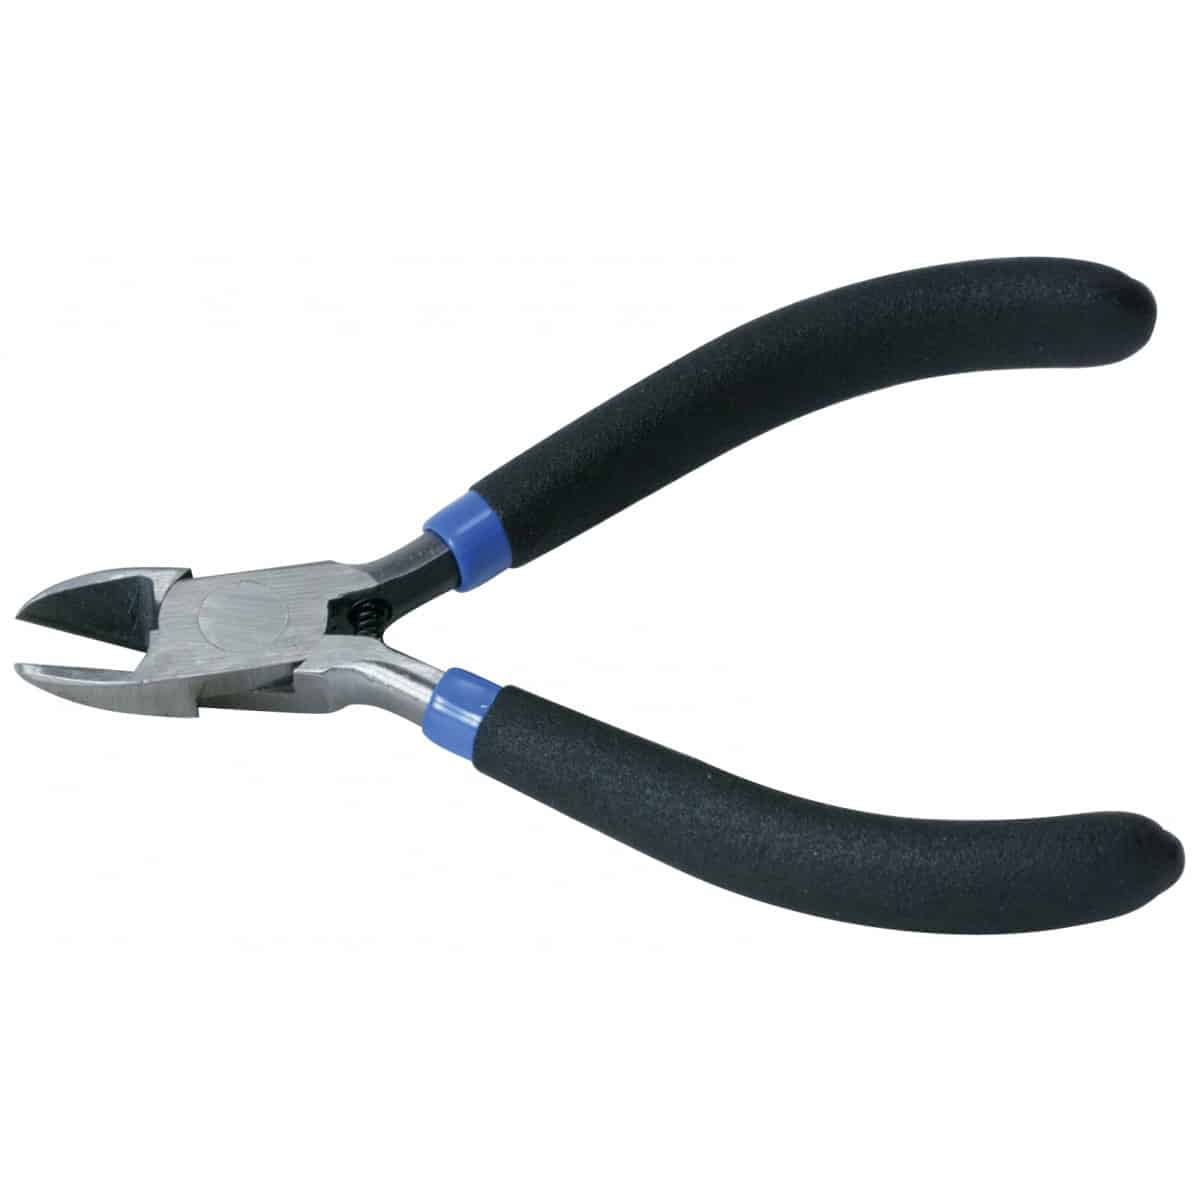
Diagonal pliers, also known as dikes in the US and snips or side-cutters to other parts of the world, are used for cutting wire and cables.
LOCK-JAW PLIERS
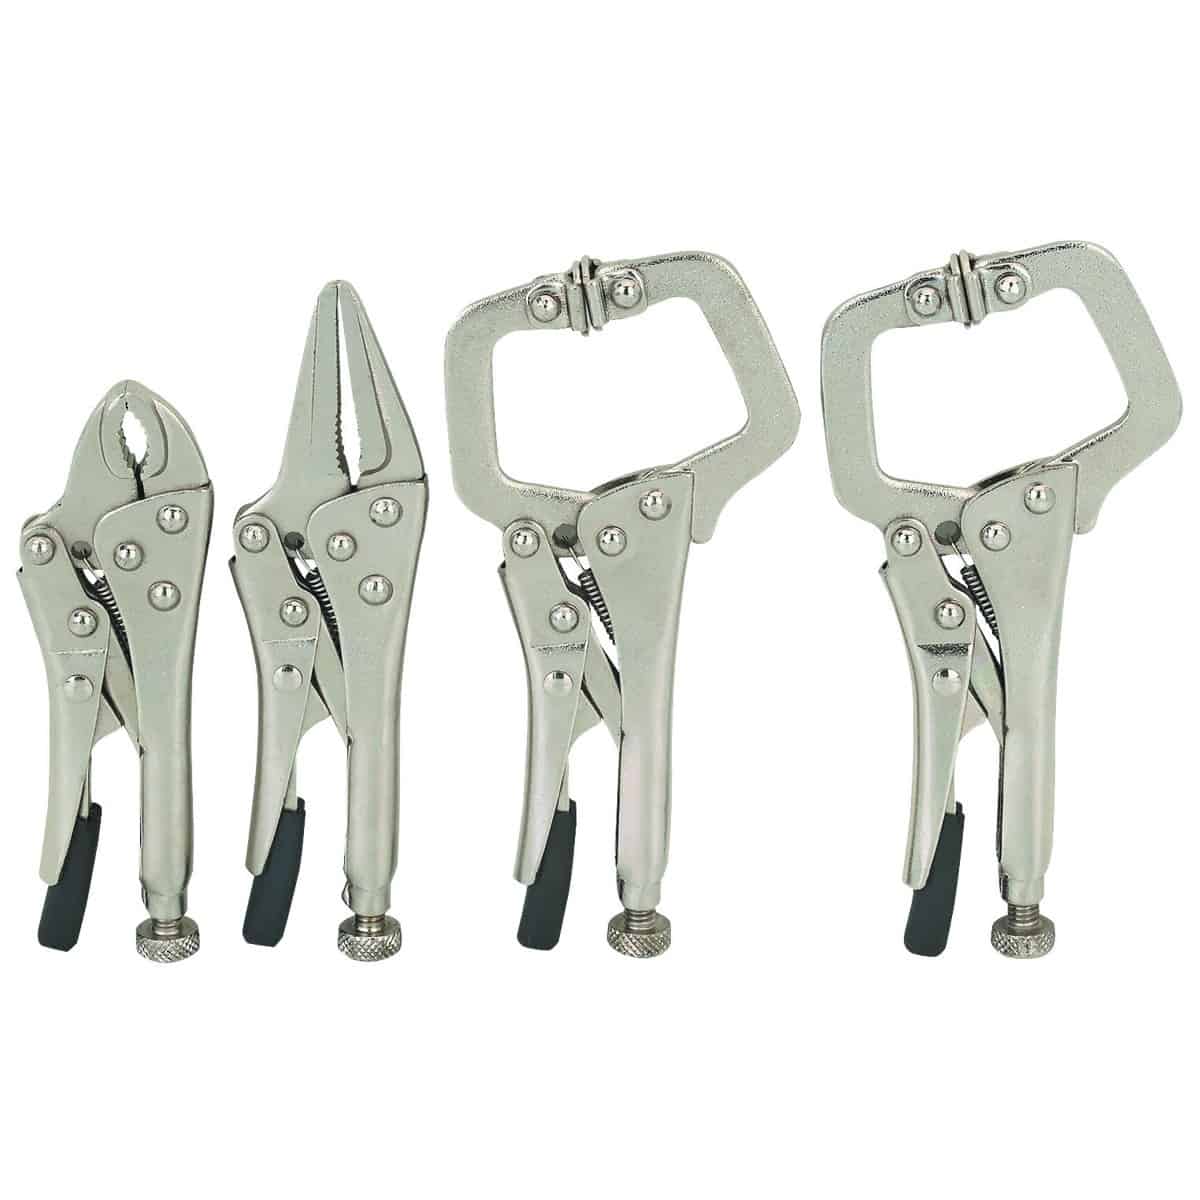
Lock-jaw pliers, also known as mole grips or the more popular term vice grips (Vice grip and Mole are name brands but the terms are still used as a common name to describe lockjaws) have an adjustable bolt on the longer side used to adjust the spacing of the jaws. The other side has a lever used to push the two sides of the handles apart for releasing the hold. They come in a variety of sizes and jaw styles like needle-nose, clamps, and even wrenches.
NEEDLE-NOSE PLIERS
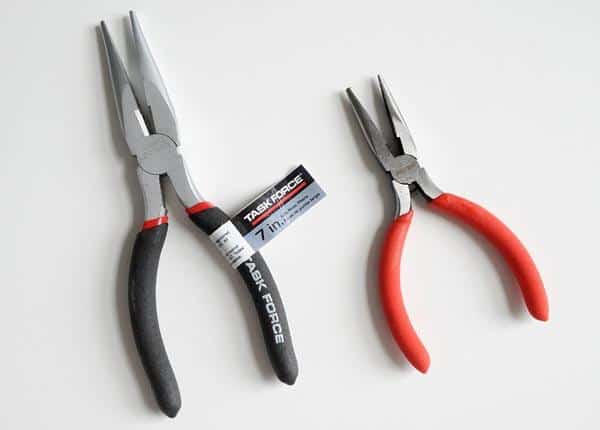
Tall and short Needle-nose pliers, also known as long-nose pliers or pinch-nose pliers have long narrow serrated jaws with cutters on the closest to the handle. They are used for holding, bending, re-positioning and/or snipping wire. Their long shape makes them useful for reaching into small areas where cables and/or other materials have become stuck or unreachable with fingers.
HAMMERS AND PRYBARS
A hammer is a tool that delivers a blow to an object. Most hammers are used to drive nails, fit parts, forge metal, and break apart objects, they are basic tools in many trades. The usual features are a head (most often made of steel) and a handle (also called a helve or haft). There are over 10 different variations of hammers, varying in shape, size, and structure, for different purposes, here are 6 basic types you can use around the shop and home;
1. STANDARD CLAW HAMMER
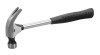
Claw hammers are used to drive nails and fit parts with the flat end, as well as break apart objects and pull nails with the claw end but generally, a claw hammer is associated with woodworking but is not limited to use with wood products. It is not suitable for heavy hammering on metal surfaces though, such as in machining work, as the steel of its head is somewhat brittle. It is really a weaker version of #2;
2. FRAMING/CARPENTER CLAW HAMMER
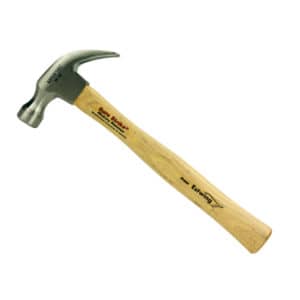
The framing hammer is an over-sized claw hammer used in framing carpentry. The larger and heavier head can decrease the number of blows required to fully insert nails. Framing hammers commonly have a “checkered” face, which reduces skip-off of the head if the blow is not precisely struck on the nail. Framing hammers also have a much straighter claw than regular claw hammers, as the claw is designed more for prying nailed boards apart, rather than removing nails (though its claw can also be used in that capacity).
3. BALL-PEEN HAMMERS
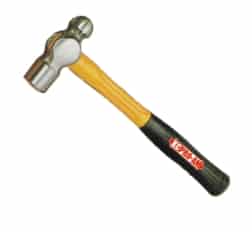
Ball-peen hammers are good for striking punches and chisels (usually performed with the flat face of the hammer) and rounding off edges of metal pins and fasteners, such as rivets with the peening edge. They are more known as a machinist’s hammer and are more distinguished from other types such as cross-peen hammer, diagonal-peen hammer, point-peen hammer, or chisel-peen hammer by having a hemispherical head.
4. DEAD BLOW HAMMER
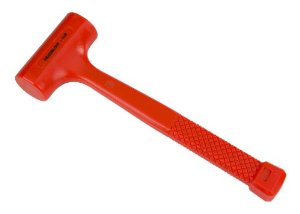
Dead blow hammers typically have an internal cavity partially filled with steel, lead shot, or loose sand. This modification evens out the curve of the impact, enabling a more powerful blow to be delivered without risk to the target.
5. RUBBER MALLET

Mallets are usually made of rubber, wood or rawhide, but there are soft metal types like copper and brass as well. They are used when a softer blow is called for than that delivered by a standard metal hammer or even a dead blow, and since they do not leave marks and are less likely to dent the work-piece, they are handy to have around when working on cars when you need to fit parts together by force.
6. SLEDGEHAMMER

Sledgehammers are great when absolute force is needed to drive an object into the ground or to dislodge something that is too big for a standard hammer.
STANDARD PRY-BARS

Pry-bars are heavy iron levers with one end forged into a wedge. Used to typically pry away parts (hence the name) but there are other variations like
JIM CROW-BAR
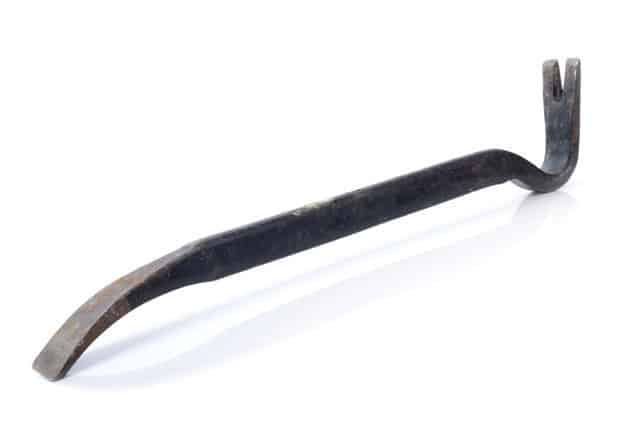
The Jim Crow is a crowbar slotted for pulling nails, others made for the same purpose are;
CAT-CLAW PRY-BAR
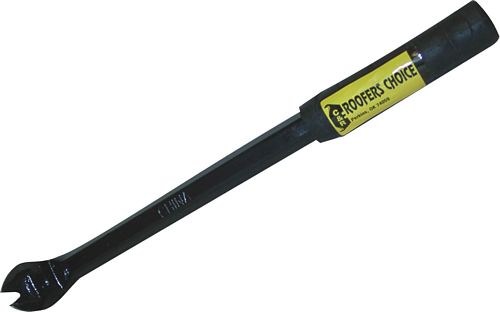
FLAT-BAR
There are a bunch of safety and survival tips that people need to know, especially if you’re off on your own on a hike (which is never recommended, always go with a friend). For starters, when finding a camp site you want to stay high and dry, so avoid alleys and paths that can become flooded easily in rain. Try to find somewhere close to a water source, dry wood, or rock walls for shelter and security purposes and avoid danger areas that look like they can be harboring insect nests or trees with rotten branches that can come crashing down on you.
If you have a watch you can navigate easily by using the sky to find your way. The most obvious method to get a general bearing by day is to look at the sun, which rises in the east and sets in the west anywhere in the world. But you can also use an analog watch to find the north-south line in midday if you lose track; hold the watch horizontally and point the hour hand at the sun. Imagine a line running exactly midway between the hour hand and 12 o’clock (1 o’clock if in daylight savings). This is the north-south line. At night you can find the North star by finding the big dipper, draw an imaginary line from the 2 outer edge stars of the dipper, follow them straight to the little dipper, the beginning of the handle, is the North Star. Face it, and you are facing true north.
Here are some tips to help you through, should you ever find yourself in need;
Misc tools you should consider for your survival kit
- Knife to cut down and gather shelter, food, and/or fuel for your fire
- Toothpaste is good for relieving the pain from burns, wounds and some bug bites
- tampons are great for deep wounds since they can absorb and expand, stopping blood loss
- lighter; bic or an old zippo that still has spark can go a long way
- aluminum foil is good to use as a dry surface for a fire
- flashlight and masking tape to dim it, if necessary, to draw less attention to yourself
- guitar cases make great survival bags
- glow sticks, if you’re looking to be found at night
- cotton balls covered in vaseline are good for starting fires
- Char cloth
Tips to create a fire
If you are stuck in the outdoors, you will need to make a fire to provide warmth, light, cook your food or to keep pests and predators away, here are some tips;
- To make a good fire and keep it going you need 3 things; fuel, oxygen and heat
- Dry grass, leaves, pine needles, paper, wood shavings like bark, and small sticks are great for starting fires. You will need larger branches or sticks of wood to keep it going.
- Best way to produce more smoke if you are looking to signal someone is using live and/or wet trees
Tips to keep cool
- Stay in shade and out of wind to keep your sweat in
- Hike at dawn and dusk to avoid the desert elements
- In worst case scenario, urinating on a bandana or shirt and wrapping it around your head can help prevent heatstroke
Tips to keep warm
- Insulate your clothing with newspapers, leaves, dry grass, etc. That extra padding will help you retain body heat
- if possible make a bed about 6″ thick of debris to separate you and the ground
- use rocks around your campfire, rocks store heat so they can still help long after the fire has died and can be used to purify water as well
Tips to stay hydrated
- Extract water from trees and plants by wrapping a plastic bag around healthy leaves in the sun, as the sun causes the evaporation, that water will just collect in the bag.
- Add charcoal to questionable or smelly water when boiling for a more tolerable taste
- boil water you find to kill off pathogens in the water
- try to harvest water from rain, snow, or dew
- You can squeeze water from vines, thistles and some cactus, although most cactus water can make you sick so boil it all to be safe
- Maple trees store water, cut a hole in the bark for a watery syrup flow
Tips to find food
- You can eat plants like cattail, dandelions, and lambsquarter but it is recommended to research what plants are in your area before going out so you can memorize the good ones and make sure the bad don’t kill you
- make a 4-pronged spear easily by cutting a sapling about an inch in diameter, then split the fat end down in 4 equal sections, about 10″ down, jam a stick in the middle and sharpen those 4 prongs with a knife or rock
I was able to take a Heartsaver first aid CPR (cardiopulmonary resuscitation) AED (automated external defibrillator) class and learned a lot of valuable information. I have attached photos of the pamphlets I received in hopes it can help someone else out should the need arise.
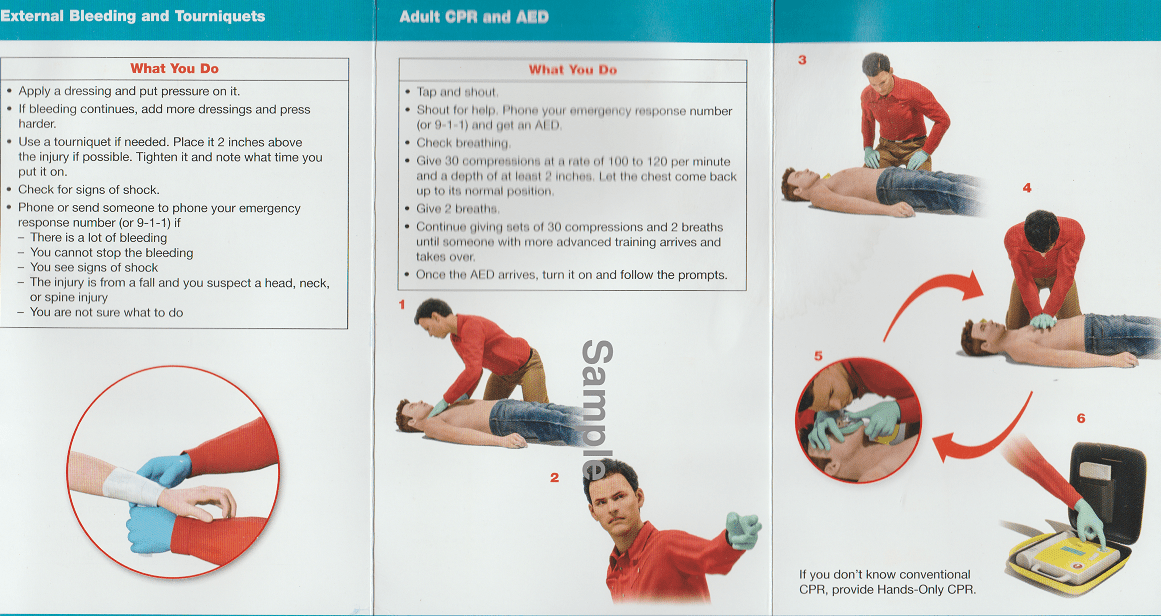
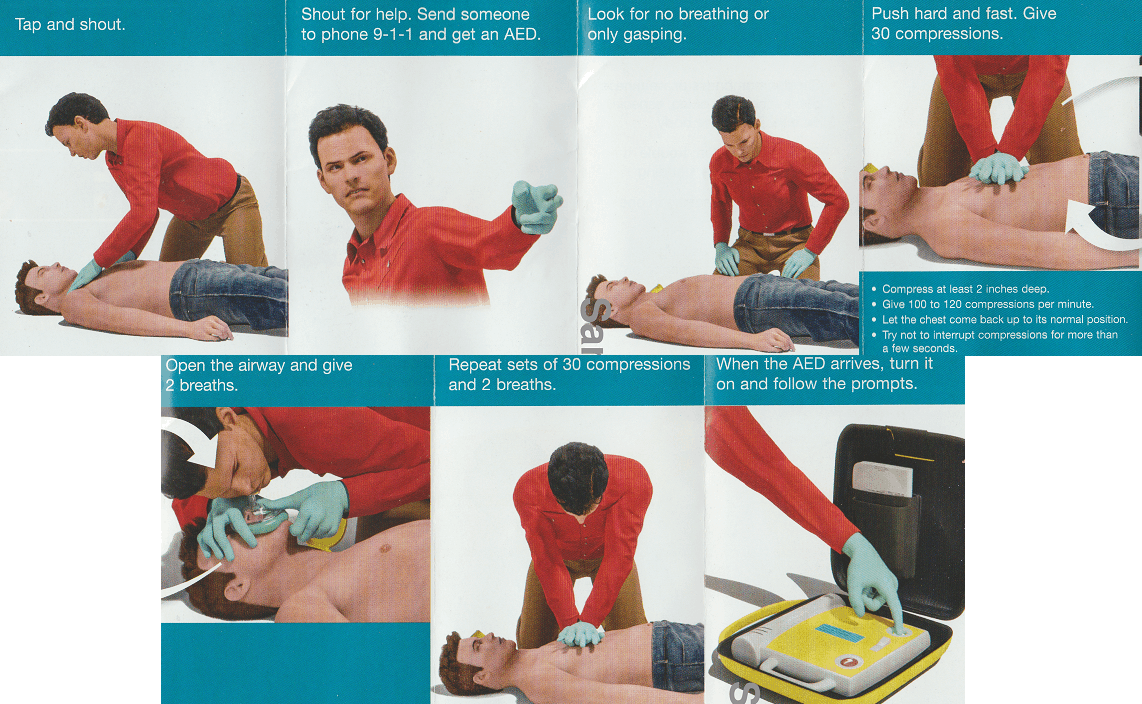
CPR AED on an adult
It is taught now that if you are going to give mouth to mouth or use an AED you should always start with compressions first, in case there is something blocking the airways
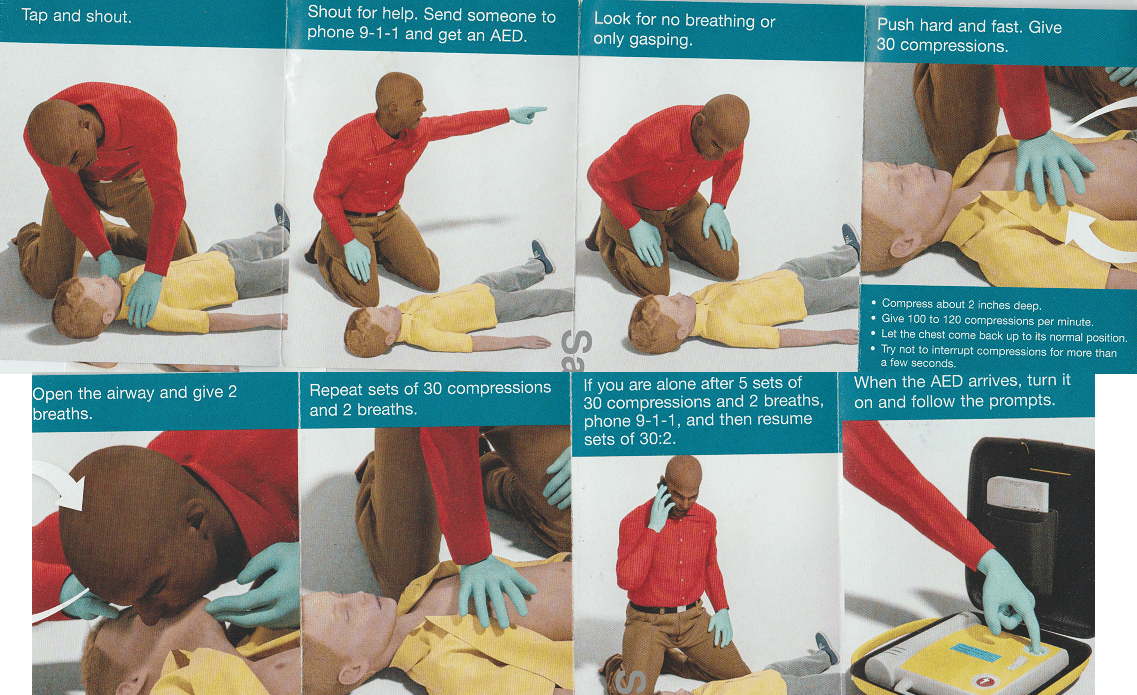
CPR AED on a child
When conducting CPR on a child the same rules apply as an adult except that just one hand should be enough to avoid collapsing their chest.
CPR AED on an infant
When conducting CPR on an infant the only things to remember are use 2 fingers on the chest area so you don’t collapse the chest and your mouth goes over their nose and mouth, not just mouth like adults or children.

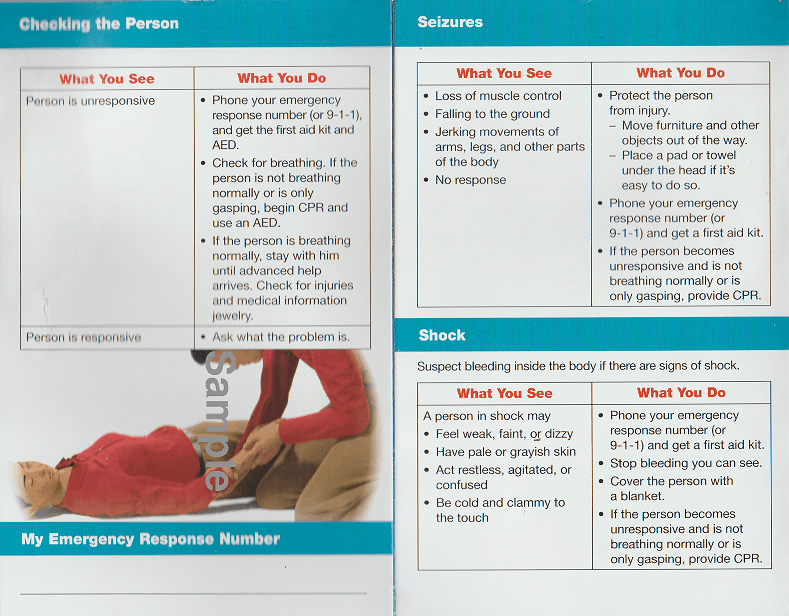
“WHAT YOU SEE, WHAT YOU DO”

Recognize the signs of heart attack & stroke

External bleeding, tourniquets and more CPR
A tournaquet is something you use to alleviate blood loss by tightening down on the area just above the wound to restrict blood flow. If you don’t have the elastic band, you can always use a cloth, like a shirt, and use a stick wrapped in it and turn in a circle to tighten it