
Wii-Retro: Turn Your Nintendo Wii Into the Ultimate Retro Gaming Console
Do you miss the golden age of gaming? With a few simple tools and a soft-modded Nintendo Wii, you can play classics from Atari, NES, SNES, Sega Genesis, Nintendo 64, PlayStation, and even GameCube—all from one system!
Whether you’re a nostalgic gamer or a DIY enthusiast, follow this step-by-step guide to build your own retro console and bring back the games that defined your childhood.
What You’ll Need
Here’s a list of the essentials:
- Nintendo Wii (must include GameCube controller ports)
- Controllers and GameCube controllers (for GameCube and other emulation)
- SD Card (at least 4GB, 32GB+ recommended for GameCube games — which are ~1.3GB each)
- Computer with an SD card reader (you’ll transfer files multiple times)
Step 1: Format Your SD Card (FAT32)
- Insert your SD card into your PC.
- Format it to FAT32 using GUIFormat if your operating system doesn’t offer FAT32.
Create these three folders on your SD card:
apps– for emulator and browser filesNintendont– your GameCube emulatorgames– where you’ll store GameCube ISO files
Step 2: Install the Homebrew Channel (Using Letterbomb)
To install custom software on the Wii, you’ll first need the Homebrew Channel.
1. Find Your MAC Address
- Go to Settings (bottom left corner of the Wii home screen)
- Click Internet > Console Information
- Note your MAC address and confirm your system version (e.g., 4.3U)
2. Visit the Letterbomb Website
Go to please.hackmii.com
- Enter your system version and MAC address
- Check “Bundle the HackMii installer”
- Enter the CAPTCHA and “Cut the red wire”
This will download a file called letterbomb.zip.
3. Extract Letterbomb
- Extract everything from the
.ziponto the root of your SD card - Ensure these are on the card:
privatefolder,boot.elf, and any supporting files
Now insert the SD card into your Wii.
Step 3: Launch Letterbomb and Install Homebrew
- On the Wii, go to the Mail icon (lower-right corner)
- Scroll to find a red envelope (go forward/backward a few days)
- Open it—this will launch the HackMii installer
When prompted:
- Install the Homebrew Channel
- Install BootMii (optional but recommended for system recovery)
After installation, you should see the Homebrew Channel on your Wii’s main screen.
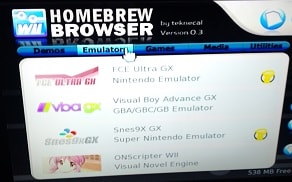
Step 4: Install the Homebrew Browser
The Homebrew Browser lets you download emulators and apps directly to your SD card through the Wii.
- Download Homebrew Browser v0.3 (v3.9 may work for others)
- Unzip the contents into your
appsfolder on the SD card - Insert the SD card into the Wii and launch the Homebrew Channel
- Select the Homebrew Browser—allow it to update and load (it may freeze briefly; be patient)
You can now browse and install emulators directly on your Wii!
Step 5: Download Basic Emulators
Once in the Homebrew Browser, search for and install emulators like:
- FCE Ultra GX – NES
- SNES9x GX – Super Nintendo
- Genesis Plus GX – Sega Genesis
- Wii64 – Nintendo 64
- WiiSX – PlayStation
- Yabause – Sega Saturn
- Visual Boy Advance GX – Game Boy Advance
After downloading, return the SD card to your computer if you’d like to manually add ROMs.
Step 6: Set Up GameCube Emulation (Nintendont)
Nintendont allows your Wii to run GameCube games.
Here’s how to set it up:
- Download Nintendont from GitHub
- Copy the file named
boot.dolinto theapps/Nintendontfolder - Download and add
meta.xmlfor description support (optional) - Your folder path should be:
SD:appsNintendontboot.dol
Set Up Your GameCube Games:
- On the root of your SD card, create a folder named
games - Each GameCube game should have its own subfolder: arduinoCopyEdit
SD:gamesMarioKartDoubleDashgame.iso SD:gamesZeldaWindWakergame.iso
Make sure the file inside each subfolder is named game.iso, even if the actual game name is different.
Step 7: Load Your ROMs
To load ROMs for other systems:
- Download ROMs from trusted sites (e.g., FreeROMS, Emuparadise)
- Extract them using 7-Zip or WinRAR
- Place each game in the corresponding emulator’s folder, usually: arduinoCopyEdit
SD:romssnesSuperMarioWorld.smc SD:romsnesMetroid.nes
Caution: Only download ROMs for games you legally own. Avoid shady websites, and always scan your downloads for malware or viruses.
Step 8: Testing & Playing Games
Once all ROMs and emulators are in place:
- Insert the SD card into your Wii
- Launch the Homebrew Channel
- Choose the emulator (or Nintendont) you want to use
- Load and play your favorite retro titles!
You’ll be prompted to configure your controller the first time, and after that—you’re all set.
Pro Tips
- Use a higher-capacity SD card (64GB or more) for GameCube collections
- Keep your Wii plugged into a surge protector during setup
- Add themes and covers to your emulators for a polished look
- Use USB storage for large game libraries if your SD card is limited
- Backup your Wii NAND using BootMii before heavy modding
That’s It! Wii-Retro at Its Finest
You now have a fully functional retro gaming system powered by your trusty old Wii. From NES to GameCube, it’s all playable with the touch of a button—no discs, no cartridges, no problem.
Got tips of your own or hit a snag along the way? Drop a comment or reach out—happy to help fellow retro gamers get up and running!
Learn how to add it to a Raspberry Pi