
Build Your Ultimate Retro Gaming Console for Under $100
Want to relive your favorite childhood games—from NES to SNES, N64, and beyond—all on one device? With a Raspberry Pi and some basic components, you can turn your living room into a retro arcade.
Here’s how you can create your very own gaming system step-by-step—even if you’re not a tech wizard.
What You’ll Need (Hardware)
Below is the essential hardware you’ll need to get started. You can find these items on Amazon or your preferred electronics retailer. Total cost: under $100.
| Component | Description | Approx. Price |
|---|---|---|
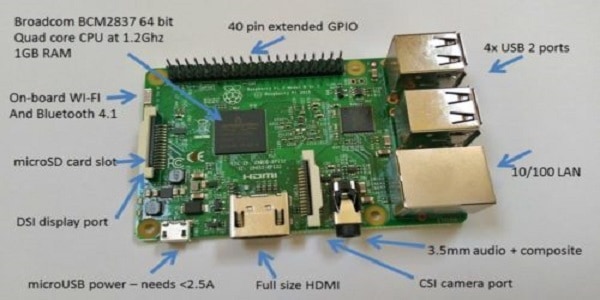
| Raspberry Pi (Model 3 or 4 recommended) | Your emulation hub | ~$50 |
| Micro SD Card (32–128GB) | For storing games and the system | ~$10 |
| SD Card Reader/Adapter | For writing to the SD card | ~$7 |
| USB or Bluetooth Controllers | Any generic USB or retro controller will do | ~$12 each |
Step 1: Acquire & Prepare Your Supplies
- Buy a Raspberry Pi
Look for a complete kit with power supply, heat sinks, and case. (I used a Pi 3 B+ kit from Amazon.) - Get a Compatible Controller
You can use SNES, PlayStation-style, Xbox, or modern USB/Bluetooth controllers.
⚠ Note: SNES-style controllers may need remapping for PlayStation/N64 games due to extra button requirements. - Grab a Micro SD Card (with Adapter)
Minimum 32GB recommended. If your PC doesn’t have an SD slot, get a USB card reader.
Step 2: Format Your SD Card (FAT32)
Before installing anything, format your SD card to FAT32.
Download a FAT32 Formatter:
Install and run the tool, then format your SD card completely to FAT32.
Step 3: Install RetroPie
RetroPie is the software that makes everything work. It’s built on top of Raspbian and designed for retro game emulation.
Download RetroPie Here:
Download
Choose the correct version for your Raspberry Pi model (usually Pi 3 or Pi 4).
Step 4: Burn RetroPie to Your SD Card
Once downloaded:
- Unzip the RetroPie image file
- Use a tool like Win32 Disk Imager to burn the image onto your SD card
- Eject the SD card safely once the process completes
Step 5: Set Up Wi-Fi or Ethernet
- Insert the SD card into your Pi
- Plug in everything (leave the power cord for last)
- Boot up, go to the RetroPie menu, and connect to your Wi-Fi or use Ethernet
- Find the
\RETROPIEnetwork folder from your PC and open the ROMS directory
You’re now ready to upload your game ROMs!
Step 6: Load Your Game ROMs
You can load ROMs two ways:
Option 1: Upload via Network
- Unzip downloaded ROMs
- Drop them into their respective folders (SNES, N64, NES, etc.) inside the ROMS directory
ROM Tips:
- Only use sites you trust. Some popular ones (check legality in your region):
- Emuparadise (archive only)
- FreeROMS
- LoveROMS
⚠ WARNING: Many of these sites are flagged by antivirus software. Always scan downloaded files and use a malware cleaner afterward. Your PC’s safety comes first.
Step 7: Flash Drive Alternative (Optional)
If you’d rather use a USB flash drive to transfer games:
- Format the flash drive to FAT32
- Create a folder called
retropie - Plug it into your Pi (wait 2–3 minutes)
- Plug it back into your PC — new folders (like ROMS) will have auto-generated
- Drop ROMs into the appropriate system folder
- Reinsert the flash drive into the Pi and reboot
Step 8: Extracting Game Files
Game downloads usually come zipped. You’ll need to extract them before use.
Recommended Tools:
After extraction, place the raw ROM file (.nes, .sfc, .n64, .bin, etc.) into the right folder under ROMS.
Step 9: Configure & Test
- Plug in your controller(s)
- Power on the Pi (again, power cord goes in last!)
- Follow on-screen instructions to map your controller
- Navigate through your emulators and test your games!
Every time you upload new ROMs, reboot the Pi so the new systems appear.
Bonus Tips
- Use a heatsink or fan to avoid overheating
- Enable save states for difficult games
- Install themes to customize the interface
- Use shaders for visual effects like CRT scanlines
- Pair Bluetooth controllers for wireless gaming
- Use HDMI audio/video for best compatibility with modern TVs
That’s It — Let the Nostalgia Begin!
With a Raspberry Pi and a bit of patience, you now have access to thousands of classic games from your childhood, all on one sleek little system. Whether you’re revisiting Mario Kart 64 or firing up Chrono Trigger for the first time, RetroPie offers hours of fun.
Want to take it further? How about;
How to Add Cheat Codes to RetroPie on Raspberry Pi (Step-by-Step)
Want to take your RetroPie experience to the next level with cheat codes? Whether you’re looking to unlock infinite lives in Contra or max out your stats in Final Fantasy, RetroPie makes it possible. In this guide, you’ll learn how to set up and activate cheats using RetroArch, Putty, and Notepad++—all through your Raspberry Pi.
What You’ll Need
- A working RetroPie setup with internet access
- A PC with Windows (for file editing and SSH access)
- Your Raspberry Pi’s IP address (found in RetroPie > Show IP)
- Tools to download:
Step 1: Connect to Your Pi Using Putty
- Open Putty
- Enter your Pi’s IP address under Host Name
- Leave the Port as 22
- Save the session with a name like RetroPie for quicker access
- Log in using default credentials (if not changed): makefileCopyEdit
Username: pi Password: raspberry - Once logged in, enter the following commands to set up cheat folders: bashCopyEdit
cd RetroPie mkdir cheats cd cheats mkdir settings
Step 2: Configure RetroArch Using Notepad++
- On your PC, press
Windows + R, then type: CopyEdit\RETROPIEThis opens your Pi’s shared folders (SAMBA). Navigate to:configs > all > retroarch.cfg - Right-click
retroarch.cfgand open with Notepad++ - Use
Ctrl+Fto search for the term “cheat” - Uncomment and edit the following lines: iniCopyEdit
cheat_database_path = ~/RetroPie/cheats cheat_settings_path = ~/RetroPie/cheats/settings(Remove the#and add the appropriate path.) - Now search for: nginxCopyEdit
input_menu_toggle_gamepad_comboModify the line to: iniCopyEditinput_menu_toggle_gamepad_combo = 2This sets the hotkey to open RetroArch during gameplay using L3 + R3 on supported controllers. - Save the file (
Ctrl+S) and close Notepad++.
Step 3: Update RetroArch Cheats
- Return to Putty and reboot your Pi: bashCopyEdit
sudo reboot - After rebooting, go to: mathematicaCopyEdit
RetroPie Menu > Configure RetroArch > Launch RetroArch RGUI - Inside RetroArch:
- Navigate to Settings > Directory
- Verify that Cheat File Dir says:
/home/pi/RetroPie/cheats
- Go to: cssCopyEdit
Main Menu > Online Updater > Update CheatsLet the update run—it might take a few minutes. Once completed, exit RetroArch.
Step 4: Enable Cheats In-Game
- Start any game from your RetroPie library
- Press Select + X on your controller to open RetroArch in-game
- Navigate to: cssCopyEdit
Quick Menu > Cheats - Use left/right arrows to toggle cheats ON/OFF
- Scroll up and select “Apply Changes” to activate them
- Return to the game and enjoy your powered-up gameplay!
Step 5: Create or Edit Custom Cheat Files
Want to add your own cheat codes or edit existing ones?
In Putty:
Navigate to your desired system’s cheat folder:
bashCopyEditcd RetroPie/cheats/"Super Nintendo"/"Game Genie"
(Other systems include “Genesis”, “Playstation”, “Game Boy Advance”, etc.)
To list files:
bashCopyEditls
To create or edit a cheat file:
bashCopyEditnano "Super Mario World.cht"
Cheat File Format:
iniCopyEditcheats = 2
cheat0_desc = "Infinite Lives"
cheat0_code = "C222-3DD4"
cheat0_enable = false
cheat1_desc = "Unlock All Levels"
cheat1_code = "DD3F-ADDA"
cheat1_enable = false
Use
Ctrl + Xto exit,Yto save changes, andEnterto confirm file name.
Make sure the file name matches the exact ROM name (excluding the extension) for the cheat file to work.
Pro Tips
- Backup your original
retroarch.cfgbefore editing - Don’t forget to “Apply Changes” after enabling cheats
- You can edit
.chtfiles directly on your PC using Notepad++ - Not all cheat codes will work—use well-known databases for accurate codes
- Avoid enabling too many cheats at once—it can crash the game
Supported Cheat Systems & File Types
| System | Cheat Type |
|---|---|
| NES | Game Genie |
| SNES | Game Genie |
| Sega Genesis | Pro Action Replay |
| Game Boy / GBA | CodeBreaker |
| PlayStation | GameShark |
| Sega Saturn | GameShark |
| Sega Master System | Pro Action |
| Game Gear | Game Genie |
That’s It! Cheat On, Retro Warrior
You’ve now successfully enabled cheat code support on your RetroPie setup. Whether you’re breezing through difficult levels or just experimenting for fun, this added layer of gameplay gives your old favorites new life.
You can do the same on your Wii if you have one available.