
Master Tech and Play: DIY Tutorials for Computers, Retro Gaming, and Excel Mastery
In today’s digital world, having a well-rounded set of tech skills is both empowering and fun. Whether you’re a beginner learning the basics of computers, a nostalgic gamer setting up retro systems, or someone wanting to master Microsoft Excel for work or personal projects, DIY tutorials can guide you every step of the way. With a little time and curiosity, you can unlock powerful tools for productivity and entertainment.
🖥️ Computer Tips & Tutorials: The Everyday Essentials
Many people use computers daily without realizing how much more efficient and secure their experience could be. Basic tutorials on file management, keyboard shortcuts, system maintenance, and safe web browsing can save time and prevent headaches. Learn how to organize your folders, use the Windows Snipping Tool, back up your data, or troubleshoot common issues like slow performance. Tutorials can also help you customize your desktop, manage startup programs, and understand the difference between RAM, CPU, and storage—all crucial for upgrading or maintaining your device.
🎮 Retro Gaming DIY: Raspberry Pi & Nintendo Wii Hacks
If you grew up with classics like Super Mario Bros., Zelda, or Donkey Kong, retro gaming offers a fun and nostalgic escape. The Raspberry Pi is a fan favorite for building custom emulation stations. With open-source software like RetroPie or Lakka, you can install and organize thousands of classic games from consoles like NES, SNES, Sega Genesis, and more. Tutorials walk you through installing the OS, flashing the SD card, setting up controllers, and configuring display settings for your HDTV or monitor. It’s the perfect weekend project for hobbyists.
The Nintendo Wii is another underrated powerhouse. With some simple softmodding, the Wii can be transformed into a retro arcade using software like Homebrew Channel, USB Loader GX, and emulators like RetroArch. Many tutorials cover everything from backing up your games to installing custom themes and loading ROMs from a USB stick or hard drive. With motion controls and GameCube compatibility, the Wii offers a unique way to enjoy both classic and quirky titles.
📊 Excel Mastery: From Basics to Brilliance
Microsoft Excel is more than just a spreadsheet—it’s a data powerhouse. Tutorials ranging from beginner to advanced help users harness its full potential. Start with the basics: formulas, formatting, and autofill. Then move on to more complex features like pivot tables, conditional formatting, data validation, and lookup functions (VLOOKUP/XLOOKUP). For DIYers managing home budgets, small businesses, or scheduling projects, Excel is a must-have tool.
Advanced users can dive into macros and VBA scripting to automate tasks, build dashboards, or even create inventory systems. Many tutorials offer downloadable templates, making it easier to practice real-world applications. Excel is a powerful blend of logic, organization, and creativity that can save hours of manual work.
Whether you’re organizing your digital life, building your dream retro console, or leveling up your spreadsheet skills, these tutorials offer practical, empowering knowledge. DIY learning has never been more accessible—and fun!
Raspberry Pi’s are little computers that can be used for various things with the right parts, but I use it for a basic setup of retro gaming. These are strong enough that they can hold hundreds of games ranging from Nintendo, Super Nintendo, N64, Sega, Atari, and Playstation. You can pick up the Pi’s and accessories for around $75-$150, prices vary by types of controllers, size of memory, etc., but then you can flip it for around $50 more to cover your time. 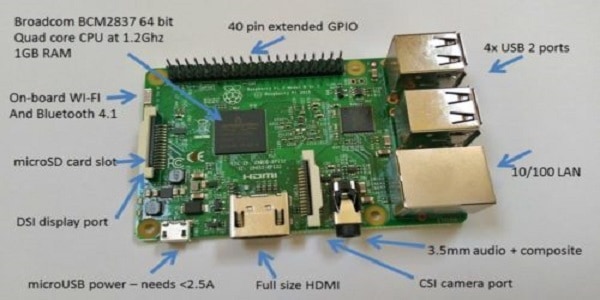
Modifying Raspberry Pi 3 for retro gaming
Almost every house probably has a Nintendo Wii, did you know you can add retro gaming to it as well? In addition to all the systems that the Pi shows, the Wii is also strong enough to carry Gamecube games too. You can pick these up from anywhere between $40-$100, add your work to it and then flip it for around $50 more. 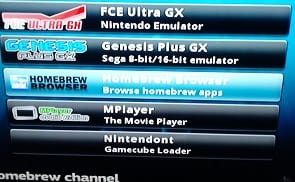
Modifying Nintendo Wii for retro gaming
Ever wanted to learn graphic design but scared of the price tag that comes with Photoshop? I recommend Affinity Designer, I have been using it for a while now and love it. It costs around $50 but once you get the hang of it, your creative side can take off and pay for itself;
After spending numerous hours working on electronics, everyone will have some kind of tip or trick to share to cut down maintenance time. Electronics can be very intimidating, one little mishap can set you back hours and/or fully erase critical data so one tip is to always back up your data somewhere (flash drive, external hard drive, cloud, etc.) in order to prevent these mishaps. I made this page to share some mishaps I have had, the solutions to remedy them, and as well as a few other tips I learned along the way when playing with computers and other devices.
First off, when dealing with computers as well as other electronics with the worldwide web, there are things you need to do in order to keep them in great shape and working properly, here is a basic list of tips;
- Use passwords that are not easily detectable by anyone, other than yourself and change it on a regular basis.
- Backup important documents and pictures online through a cloud or offline through CDs, flash drives, or external hard drives
- Have PC protection; antivirus, firewall, cleaners, etc.
- Use email filtering; when in doubt, throw it out
- update your system(s) regularly
- Let recipients know when you are sending them an email attachment
- Remember viruses can come from anywhere at anytime, shit happens.
- Lock your computer if you fear someone in the area may access it while away, you can do so easily by holding the window button on the bottom left of your keyboard and pressing the L
- Password protect files like excel with critical info that you do not want to be altered by another user.
- Use a secured credit card if possible when purchasing online
- Lockdown your wireless connection
- Scan e-mail attachments before opening them, even if from a trusted recipient.
- Be careful downloading files and programs from sites you do not know or trust, if its something you feel you really need or want, run cleaners and scanners afterwards.
- Don’t open unexpected email attachments, especially from unknown sources
- Don’t use the same password for everything
- Don’t open the PC case while still plugged in
- Don’t panic if your computer crashes.
- Don’t give out valuable information like credit card numbers or social security numbers unless through a secured site.
- Don’t reply to junk or spam e-mail unless you know for sure it ended up in the folder by accident.
Want to have some old childhood games at your disposal, on one system? We are talking Nintendo, Super Nintendo, Nintendo 64 and many more. Follow these steps and you will have them at the edge of your fingertips in no time.
The hardware you will need are linked below to Amazon where I ordered mine. They are;
Raspberry Pi; $50
Micro SD card (w/adapter); $10
Computer adapter for SD card; $7
Controllers; $12
That’s it! For less than a $100 you can get more childhood games than you can think of.
Step 1: Acquiring the supplies;
Raspberry Pi
I purchased this Pi 3 kit through Amazon for a very fair price and it has been worth every penny, I would highly recommend it;
Controller(s)
You will also need the controllers, which you can use any controller type for any system. Keep in mind that if you strictly use SNES controller, like I do, you may need to reconfigure it to play some playstation and N64 games where they have L1 and L2 buttons needed to play some games.
Secure Digital Card (SD card)
You will need a micro SD card, if you do not have one, you can purchase one through Amazon with an adapter which you will need to plug into your computer provided it has the slot for it;
If you do not have a connection on your computer for an SD card then you will need an adapter for the computer, like this (sd card adapter is not necessary if you go this route since a micro sd card fits too);
Step 2: FORMATTING;
Once you have all your supplies you will need to format the SD card to FAT32. You can do so by downloading Fat32 formatting;
http://fat32-format.en.softonic.com/

Step 3: Installing Retropie;
After your SD card is formatted, now it is time to install Retropie. Here is a link to do so;
Click on the download tab and then on the new page, download Pi 2/Pi 3

Step 4: Burning the image;
Once you have Retropie downloaded to your PC, you will need to unzip it and burn it as an image to your SD card. I recommend using this imager;
https://sourceforge.net/projects/win32diskimager/
Once saved, run it, locate your Retropie unzipped folder and burn your image to the SD card.
Now you can pull your SD card and plug it into your Pi. Start your Pi (plugging power cord in last) Once booted, click on the RetroPie icon and setup your wifi at the bottom, or plug in your ethernet.
Once your Pi has internet, check your computer networks, find Retropie, Roms and upload your unzipped roms to each emulator you plan to use.
Step 5: Find your ROMS;
You can upload via direct connect or through flash drive (see step 6)
A couple good sites I used for them are
You save them as a zipped folder in your downloads folder and then unzip them and add them to the retropie roms folder
NOTE: ANTI-VIRUSES MAY BLOCK YOU FROM GETTING THE CONTENT, AND DISABLING IT, MAY INFECT YOUR PC WITH VIRUSES/MALWARE. I STRONGLY RECOMMEND RUNNING CLEANERS AND SCANNERS WHEN DONE DOWNLOADING, JUST TO BE SAFE.
Step 6: Configuring your flash drive (optional);
Now, if you use a flashdrive instead to load games, format it like the sd card and then create a folder called Retropie. Once you have the folder, take out the flashdrive and put it into the Pi. When it is done blinking (or after 3 minutes) put it back in the computer and that folder you created should have folders in it like these;

Open the Roms folder and find the system for which you downloaded the games, there are hundreds, and most are abbreviated; NES, SNES, N64, PSX, etc.
Step 7: Extraction;
Now you will need to open the folder (downloads) and find your games. Again, you will need a program that unzips these folders to extract the files, I use Winopener and 7-zip for these, you can get those apps here;
https://www.microsoft.com/en-us/store/p/winopener/9nblggh5xmmg
http://www.7-zip.org/download.html
Once you have that you can decompress and extract each file and place it in your Roms appropriate system folder on your Retropie flash drive (or Retropie itself through internet) and after all the games you want are loaded, it is time to test and play.
Step 8: Testing;
Make sure you plug in everything on your Pi with power cord being last so it detects everything. Upon startup you will configure your controller which is self explanatory, then it is time to play. Every time you add games directly to the Pi through internet, you will need to reboot your Pi.
Want to take it a step further and add cheat codes?
Want to upload cheat codes to your RetroPie, Raspberry Pi setup? First, you will need internet on your RetroPie, as well as a separate computer. Once you have the box set with internet you will want to copy down your box’s I.P. address somewhere, you can find the I.P address under RetroPie setup area.
Next, you will need some tools, here are links to download those tools;
STEP 1: Putty
On Putty, you will need your I.P. address here; Type it in where “Host Name” is and keep the port 22. Save it with a name too for quicker availability in the future if necessary. Login to your Pi through Putty, if you have not changed the credentials, it should be;
-
Username: pi
-
Password: raspberry
Once in, type “cd cheats” and “mkdir settings” on separate lines, without the quotations.
STEP 2: Notepad++
Now find your SAMBA folders that the Pi is sharing, to do that, use File Explorer in Windows and type \RETROPIE.
Go into the configs/all folder and find retroarch.cfg. When you have found it, right click over it and open with Notepad++. Once in there press ctrl+F and do a search for “cheat”. Scroll down until you come to a line that reads # Path to cheat database directory. Delete the # symbol from it and where it says “cheat_database_path =” add ~/RetroPie/cheats with a space so it should say;
cheat_database_path = ~/RetroPie/cheats
Now go down to the next section where it says “# path to XML cheat config…” and delete the # symbol in front of “cheat_settings_path =” and then add ~/RetroPie/cheats/settings with a space so it looks like this;
cheat_settings_path = ~/RetroPie/cheats/settings
Next, hit ctrl+F again and this time search for “Retropad Button Combination“, when you find it, delete the # symbol on “input_menu_toggle_gamepad_combo” and edit the section like this;
- # Retropad button combination to toggle menu
- # 0 = none, 1 = L + R + Y + D-pad Down, 2 = L3 + R3
- input_menu_toggle_gamepad_combo = 2
Now save it.
STEP 3: Retroarch
Back on Putty, reboot your Pi with the command “sudo reboot” without the quotation marks. You will need to close Putty and start a new session as well.
On your Pi go to RetroPie settings, then Configure Retroarch / Launch Retroarch RGUI. Go to settings–> directory, and see if Cheat File Dir says “/home/pi/Retropie/cheats“. If it does, go ahead and back out to the main menu of the Retroarch Config GUI. Go to “Online Updater” and choose “Update Cheats“. This may take a minute, it should tell you on the bottom left of the screen when it is complete. Once this is done, back out of the config GUI and quit Retroarch.
Now you’re ready to play with what is already setup from the updater. To access Retroarch during games you press select+X, turn the codes on with left/right arrows and be sure to hit “apply changes” at the top by pressing A and/or start. If you want to add your own codes, delete some, or see a list, go to step 4.
STEP 4: Cheats
Back on putty, and logged into your Pi, you can look through, add, or delete cheat codes. Here are the inputs for each system as is;
- cd RetroPie/cheats/”Game Boy Advance”/”CodeBreaker”
- cd RetroPie/cheats/”Game Boy”/”Game Genie”
- cd RetroPie/cheats/”Genesis”/”Pro Action”
- cd RetroPie/cheats/”Nintendo Entertainment System”/”Game Genie”
- cd RetroPie/cheats/”Playstation”/”GameShark”
- cd RetroPie/cheats/”Sega Game Gear”/”Game Genie”
- cd RetroPie/cheats/”Sega Master System”/”Pro Action Replay”
- cd RetroPie/cheats/”Sega Saturn”/”GameShark”
- cd RetroPie/cheats/”Super Nintendo”/”Game Genie”
Once you’re in either one, you can press “ls” for a list of current cheats. To edit or create new cheat file types you use the following;
nano “Game name in quotations, as it is written in the cheat index.cht”
EX: nano “Super Mario Bros.cht”
The format for codes is;
cheats = 2
cheat0_desc = "Enter a description here"cheat0_code = "GAME GENIE CODE IN CAPS"cheat0_enable = "false"
cheat1_desc = "Enter another description here"cheat1_code = "STILL STAYS IN CAPS"cheat1_enable = "false"
etc….
Then to save, press ctrl+X, then Y when prompted Yes or No on overwriting the file. If it is just a modified cheat, press enter when done. If it is a new game then it should be listed as the name you had under nano “gamename.cht” with the .cht but not the “nano”
Wii-Retro is for those who enjoy the nostalgia in gaming. You can add Atari, Nintendo, Super Nintendo, Sega Genesis, Nintendo 64, Playstation, and even Gamecube ROMS to your Wii easily. There is much more you can do with your Wii but for now, lets stick to the basics; gaming
Tools you will need:
- Wii (of course, with Gamecube controller ports)
- controllers (Wii and Gamecube ones)
- SD card (at least 4gb capacity, bigger is better if you want more games, Gamecube games are 1.3gb each)
- Computer that can take SD cards (you will need to go back and forth between your computer and Wii with your SD card a few times)
Step 1: Format your SD card to FAT32
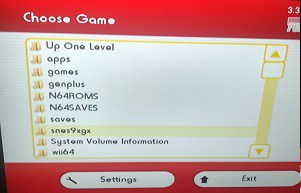
First you need to make sure your SD card is formatted as FAT32, if not, you can do so through gui format HERE. Once that is complete, create 3 folders in your SD card, titling 1 “apps”, the other “Nintendont”, and the last “games”. Put Nintendont in your “apps” folder for now, that is your Gamecube emulator so we will get to that later.
Step 2: Download Homebrew Channel
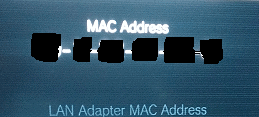
Now you need Homebrew Channel which you can get through Letterbomb. You will need your Mac Address for this which you can find under “Wii settings” in the bottom left corner of your homepage, from there you go to “Console Information”, and while you’re there, also confirm what your Wii version is (should be 4.3U) in the upper right hand corner of the settings area, you will need to know that too.
Now you need to visit the Letterbomb site to input your information.

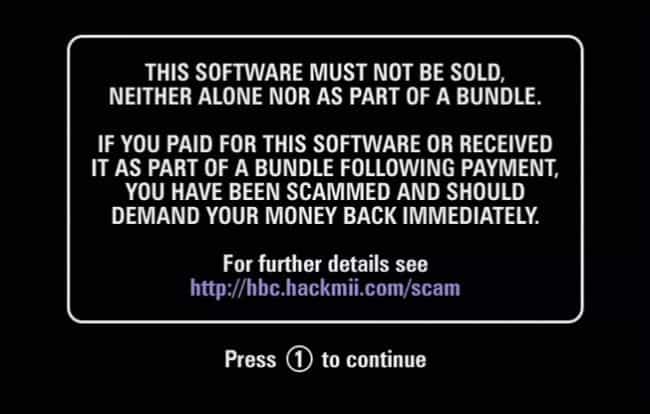
Also go ahead and “bundle the HackMii installer”, you may want to use it later. Enter your “CAPTCHA” and “cut the red wire” when prompted. This should start a “letterbomb.zip” file download. Once downloaded, right-click the file in your downloads and copy it to your SD card and then extract all the files there. Along with your “apps”, “games” and “Nintendont” folders, you should have your zipped letterbomb, a “private” folder, and other files like Apache-2, boot.elf, etc.
Now take your SD card from the PC and put it in the Wii. Click on the mail icon on the homepage on your lower right corner. When it pulls up scroll back a few days and forward, you’re looking for this;
Once you find it, open it.
NOTE: If you don’t see it, put your SD card back in the PC and make sure the letterbomb extracted fully and the extractions are on the main page of the SD card.
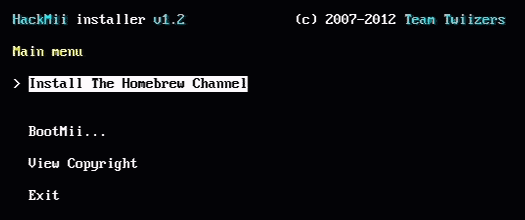
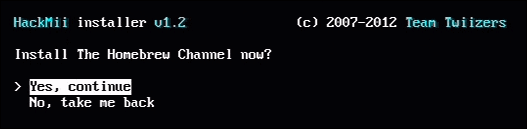
After the letterbomb is opened, you should get this after downloading it to the Wii
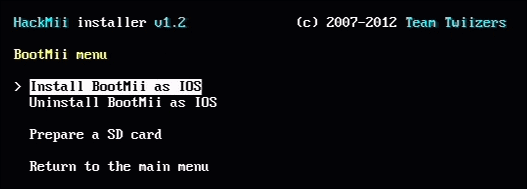
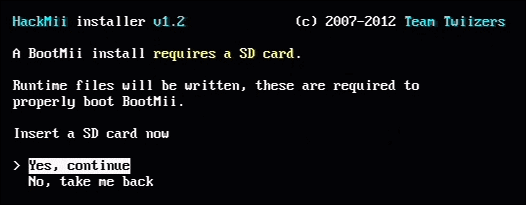
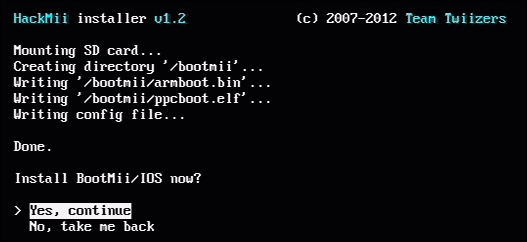
Now you want to install Homebrew channel and Bootmii

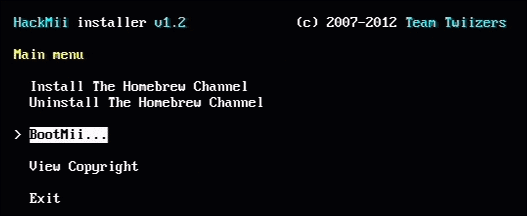

Now you should have Homebrew Channel on your Wii Homepage.
Step 3: Download Homebrew Browser
Next, you will want the Homebrew browser to download all your emulators. I found 2 versions; 3.9 and 0.3 but could only get the 0.3 to work, maybe you will have better luck. Move the SD card back to your PC and download one of these;
Once you have the zipped folder, copy it and put it in your “apps” folder on the SD card and extract it there. Once that is done put it back in the Wii and run Homebrew Channel and you should get a list like this but with just “Homebrew Browser”

Once you open it up, you should get an install page that may ask to update, in which case hit A when prompted;
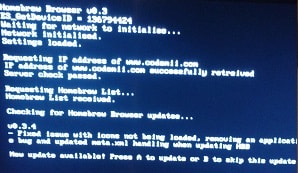
You may get a screen that looks like it froze up, but just wait it out, shouldn’t take long and it looks like this;

From here you can play around and find games, emulators, or media but I just stuck with getting emulators.
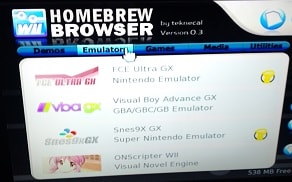
Step 4: Download your basic emulators
Now it is time to download the emulators you want. They have quite a few like Nintendo, Super NES, N64, Sega, Atari, Playstation, and more. Once you have the emulators that you want, pull the SD card and put it back in the PC.
Once you have them inline, you can pull them up from the Homebrew Channel and play;


Step 5: Download your Gamecube emulator
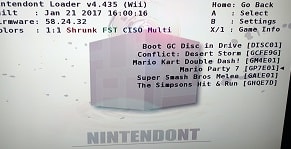
Now, go to your “Nintendont” folder under your apps, download this file; Nintendont-dol and place it in your folder, change the name to boot.dol. You can also download this one, extract it and copy the “boot.dol (loader.dol)” and “meta.xml” files to the Nintendont folder as well.
Now, Nintendont is tricky, you don’t actually put the gamecube roms in there, for them you make a separate folder on the main SD card page and call it “games”. Get the games you want, extract them and place them in the folder. You need to double click on each Gamecube game folder you extract and change their “ISO” name to “game.iso” so one page should show all your Gamecube games and each of those should go to at least 1 file saying “game.iso”. Your directory at that point should look like this;
SD Card> Games> “game name”> game.iso
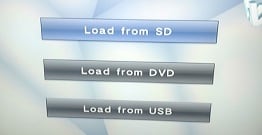
When you upload Nintendont from the Homebrew main page, it should take a few seconds and then take to the loader where you can pick from either SD or USB, whichever you have your games stored in.

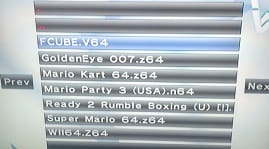
Step 6: Download your ROMS
I found the best place to get roms are;
Just like all the other zipped folders, just extract the roms one by one in the “roms” or “games” folder of the emulator you are going to be using. Only Nintendont requires the file change of “game.iso”
Thats it! Wii-Retro at its finest. Got anything to add or did you run into a snag, feel free to drop a message.
Learning graphic design
Ever wanted to make your own t-shirts? How about wooden plaques or tool holders? Here you can take graphic design a step further and bring them to life, or just do more with your favorite photos, logos, and designs already out there.
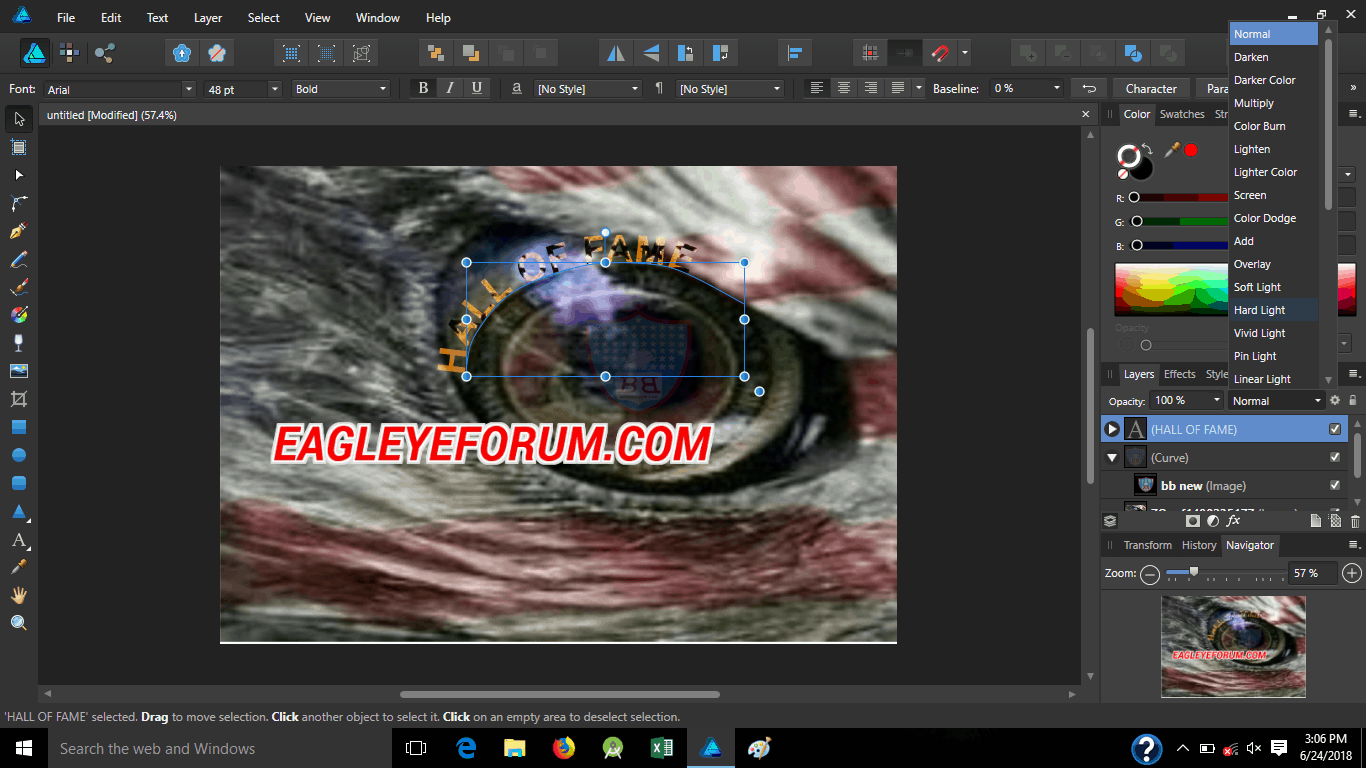
Here is my walk-through on graphic design using Affinity Designer. As mentioned before it can be purchased for a one time fee of $50 and used on multiple computers. It may not have as many features as Photoshop but for the price-tag, it is totally worth it. Here is the layout, we will go to file and start a new image which will prompt a command screen with options on what your preferences are for the new file;
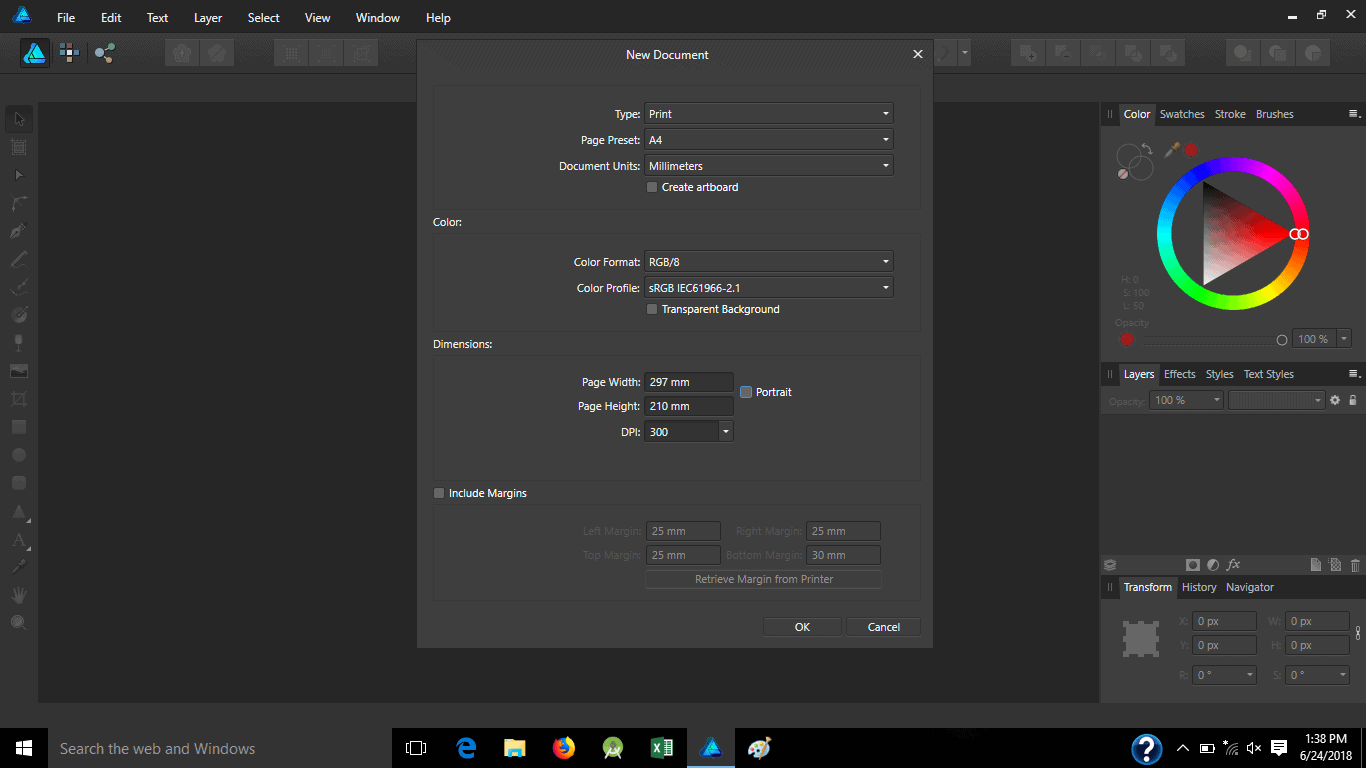
Pick the size, color theme, whether it is landscape or portrait, margins, and even if it has a transparent background or solid. (Transparent background is best because printing with a transparent background gives you the same type but pasting a transparent background on another image leaves the background off)
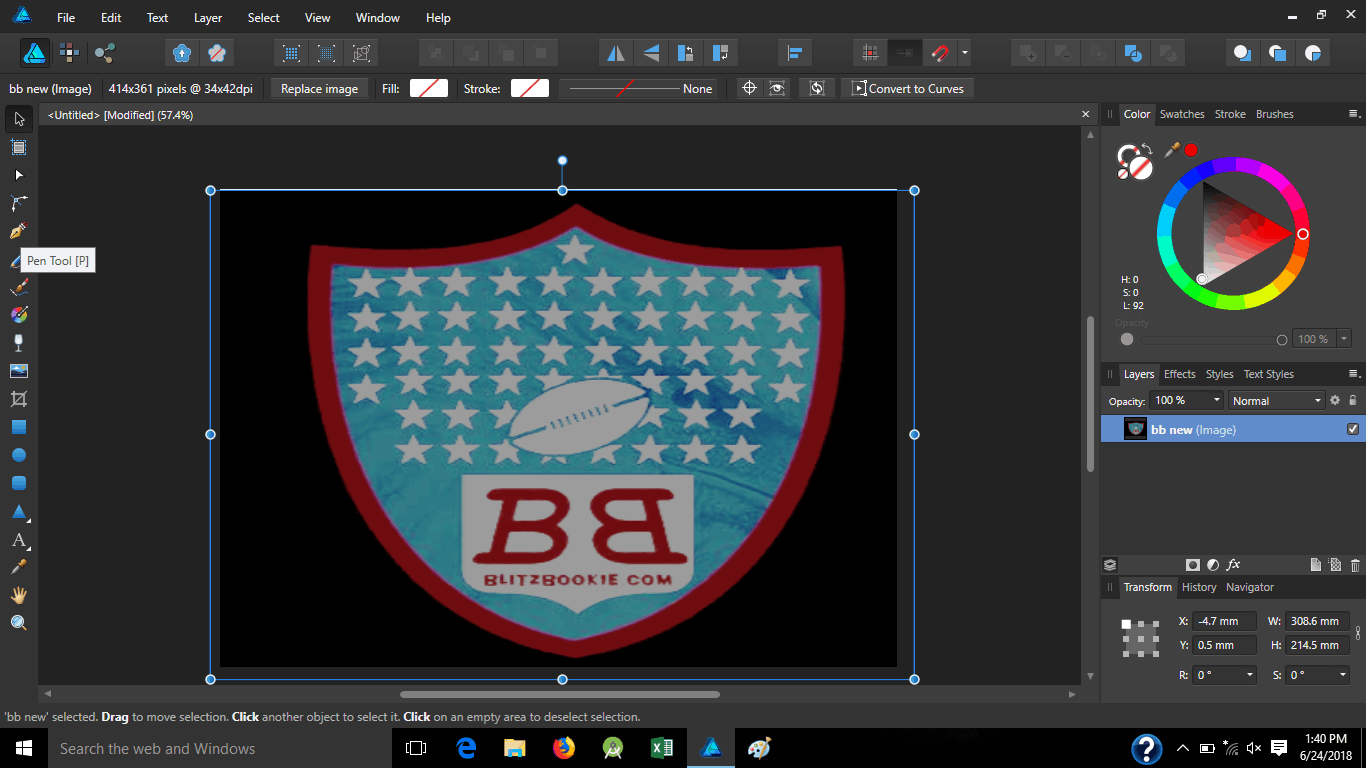
Now we will start with adding an image here, you can open a file with that image or click the picture icon on the left panel located between the “wine glass” and “crop” box. Find your image and insert it
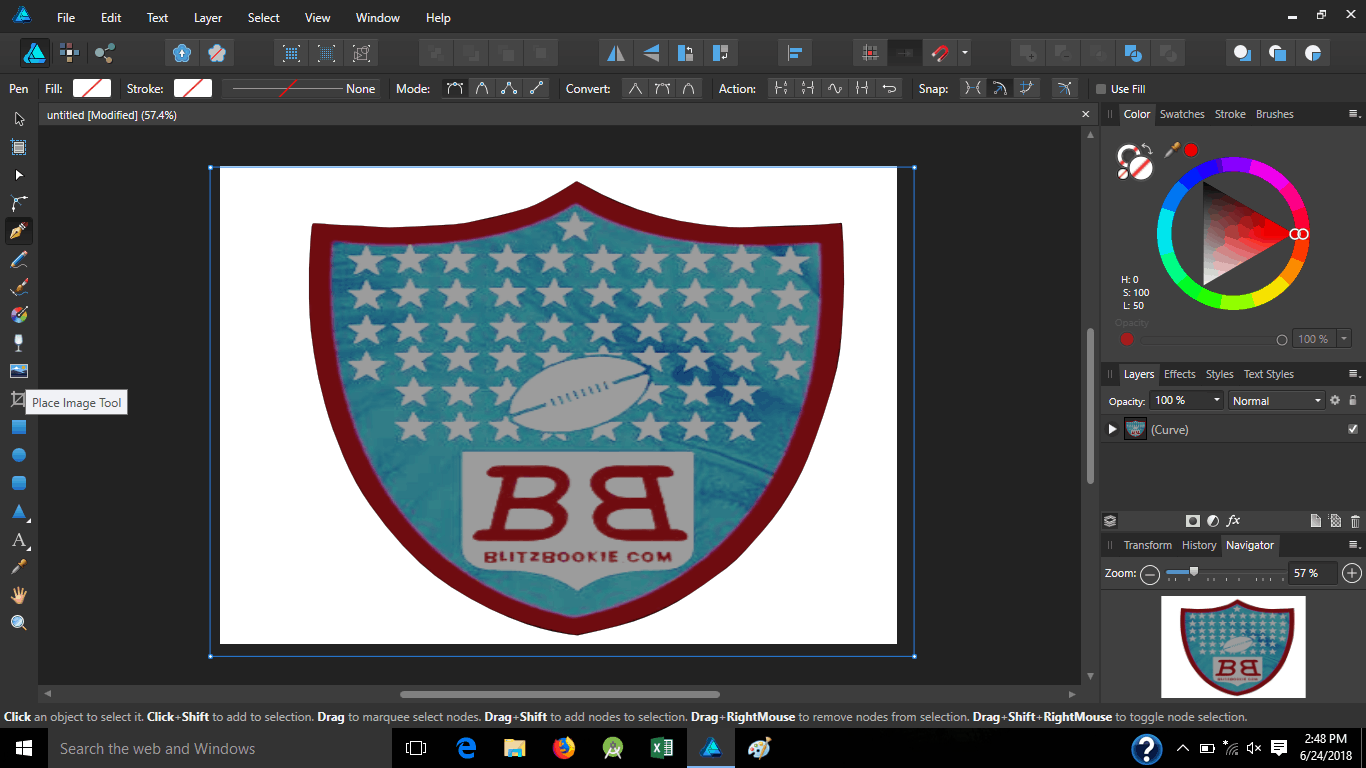
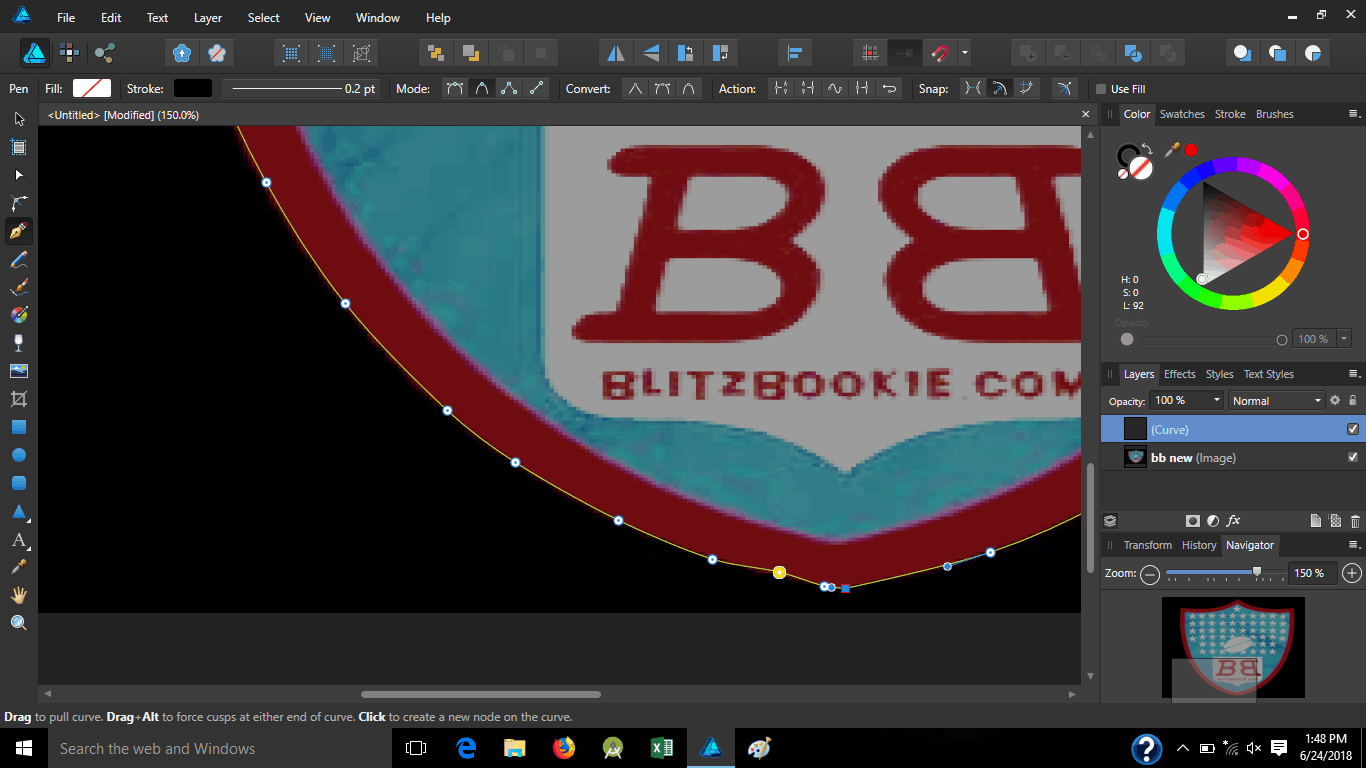
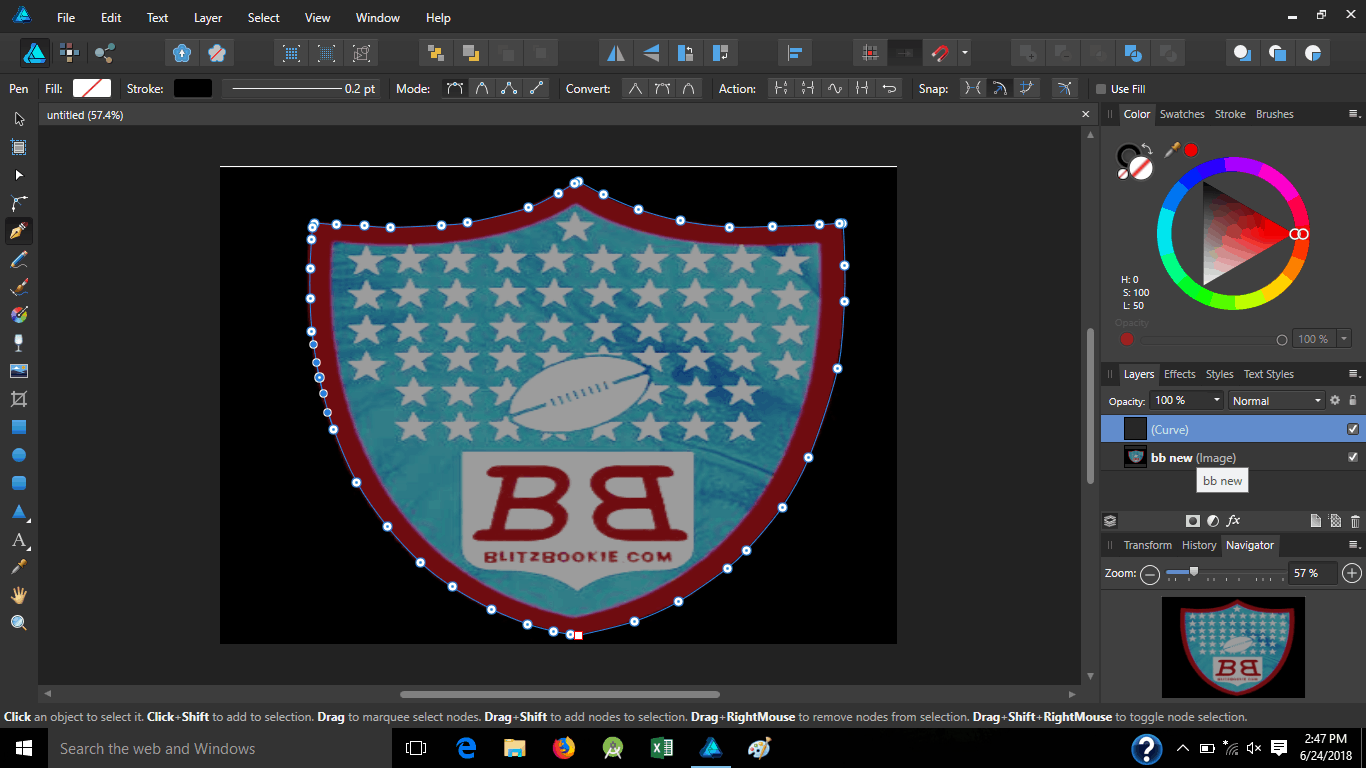
This one is with a normal background since we are going to cut the image out anyways. To do that, click the “pen tool” located 5th from the top on the left panel. It has the yellow tip, just above the pencil, and get ready to draw an outline of the image
Zoom in on the picture for cleaner lines, which you can do at the lower right, navigator panel and make your first mark
Up top, next to “mode”, notice I clicked the 2nd one, it comes with curves so it is better for rounded images. Now start tracing the image around, zoom in more if you have to and go all the way around, trying to straighten it as much as possible;
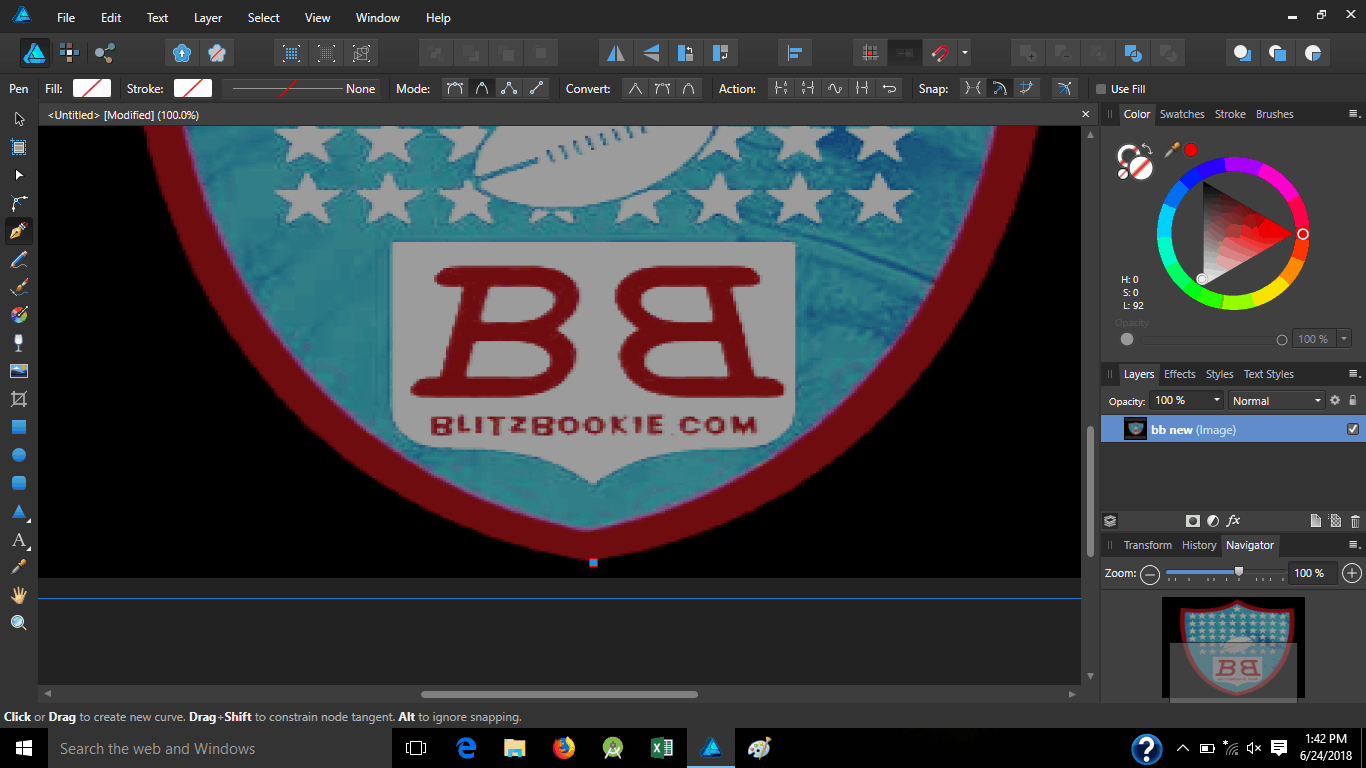
Once completed, scroll back and take a look;
Once you have it set, go to your right “layer” tab, click on the 1st image (here it is “bb new”) and drag it to inside your curve, that will take out the background, then you can insert a new one;
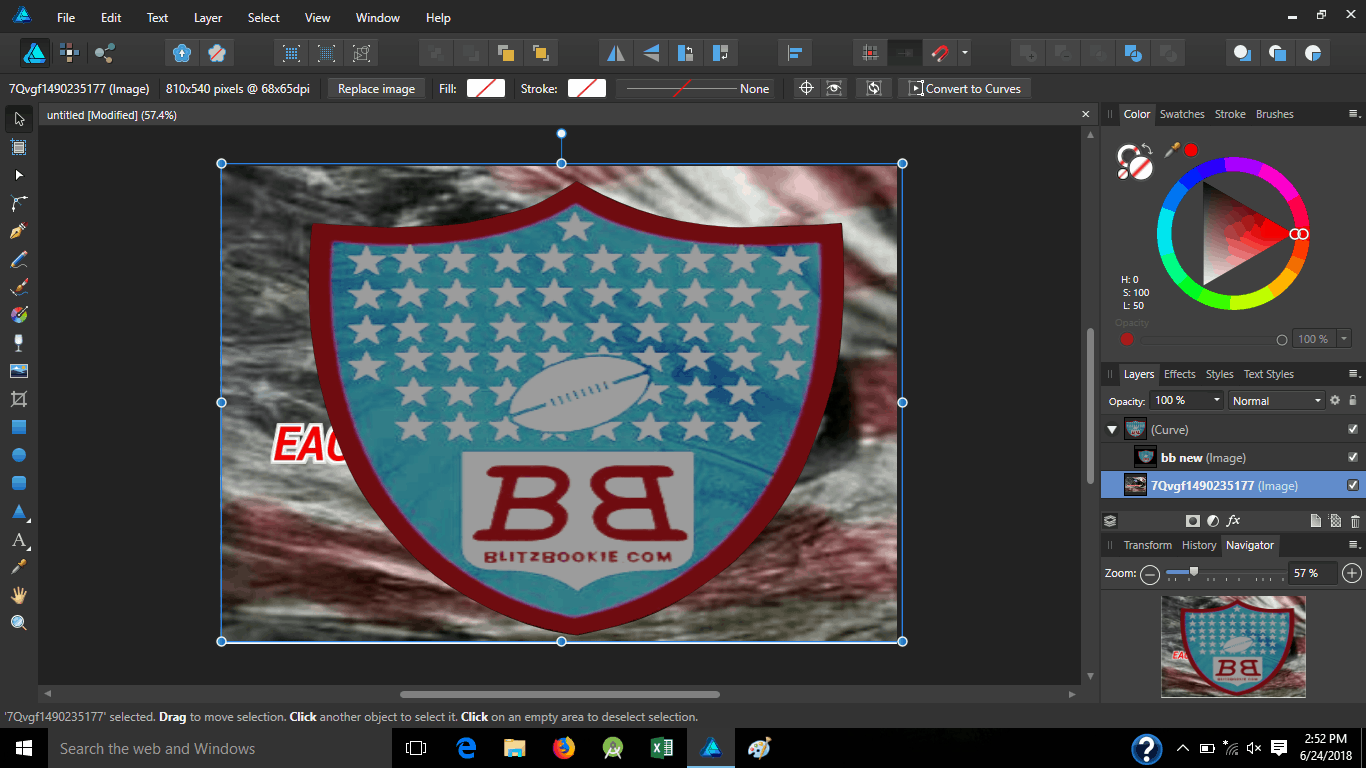
But watch where it lands, you could end up putting it in your 1st image;
In which case “CTRL+Z” could undo it.
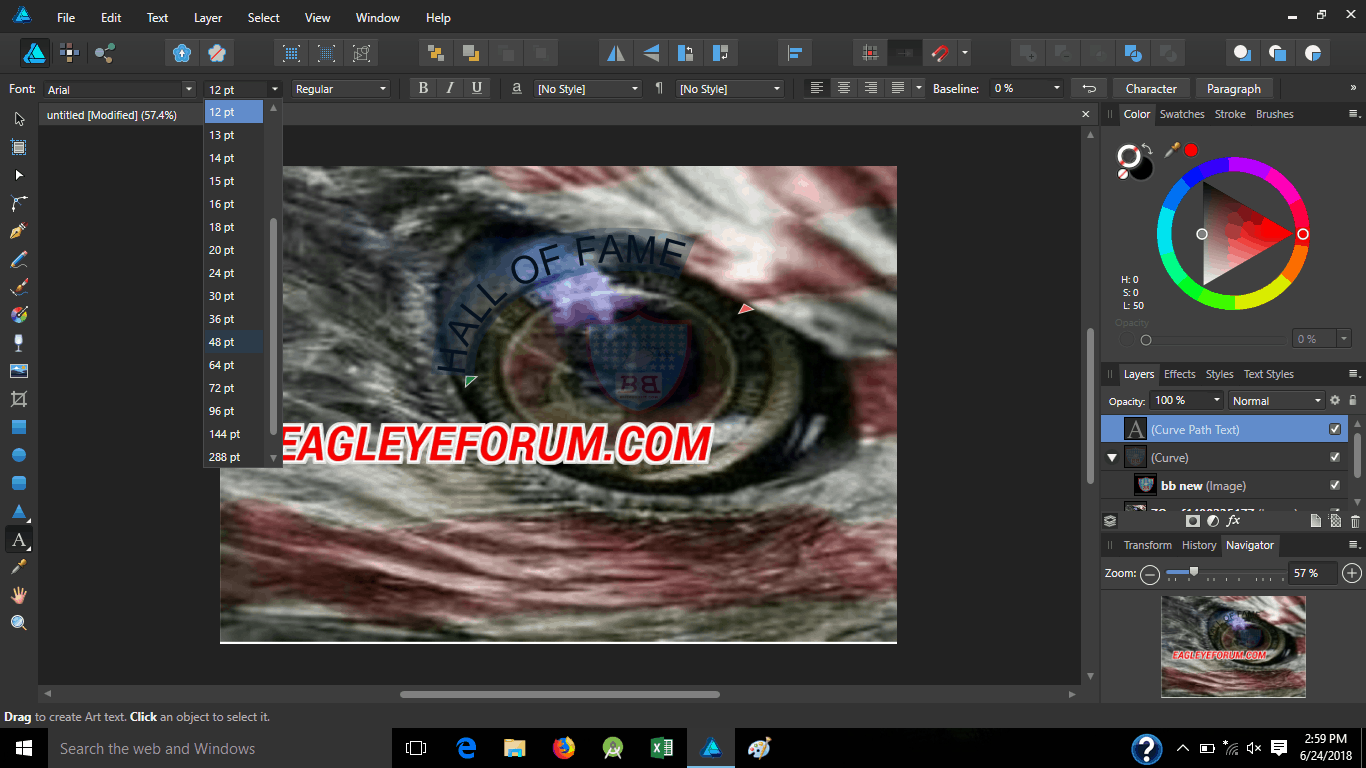
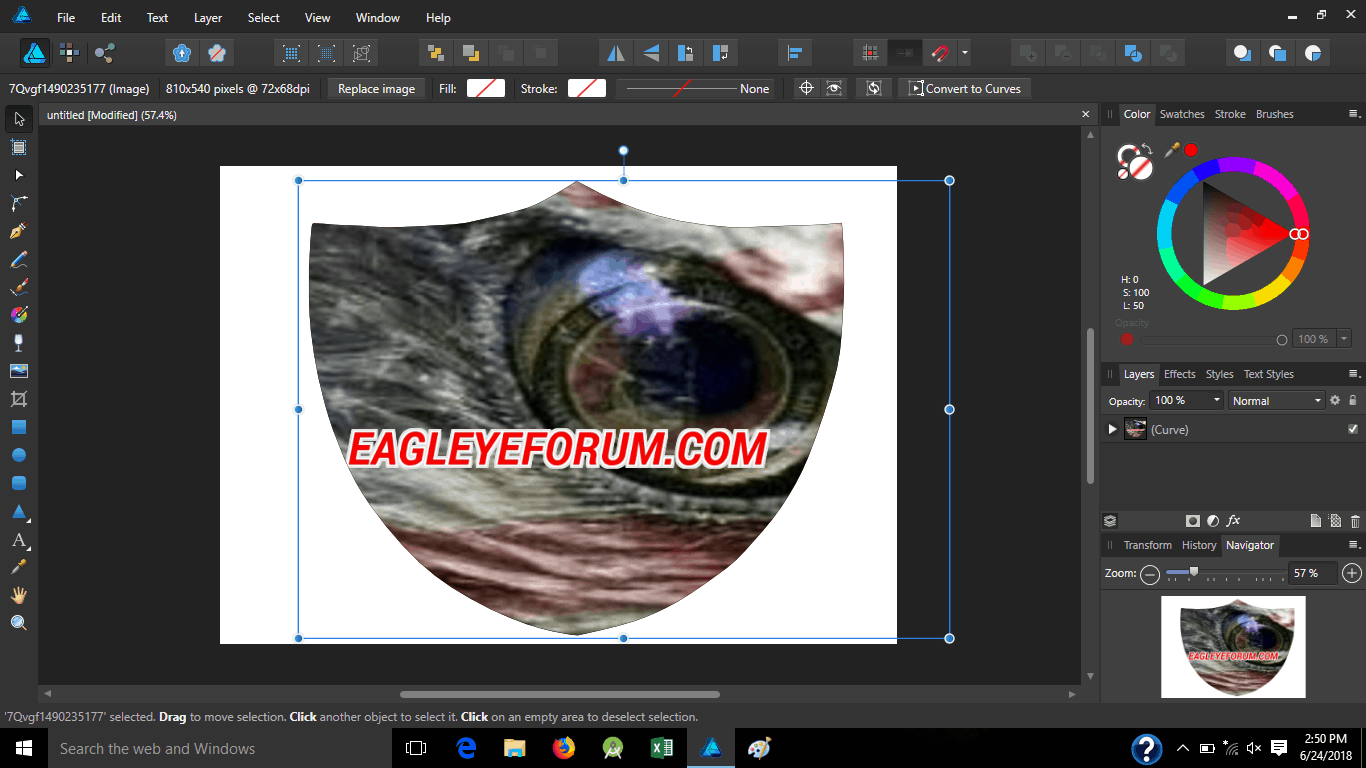
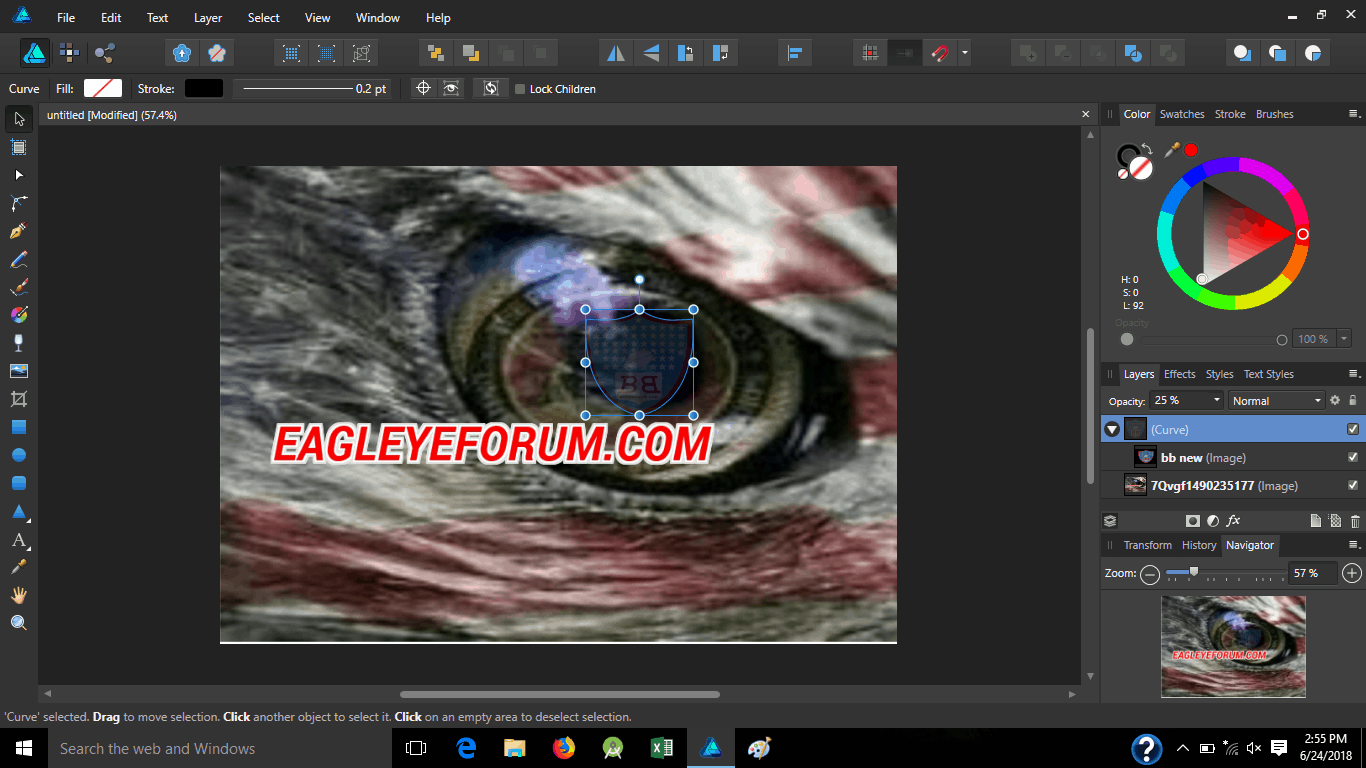
Now we want to bring that image lower so I click on the layer curve with the top pointer in the left panel, and shrink the pic down to fit the eye;
I don’t want it taking away from the eye so I lower the opacity of it, which pretty much makes it see through the lower you go, here I went 25%;
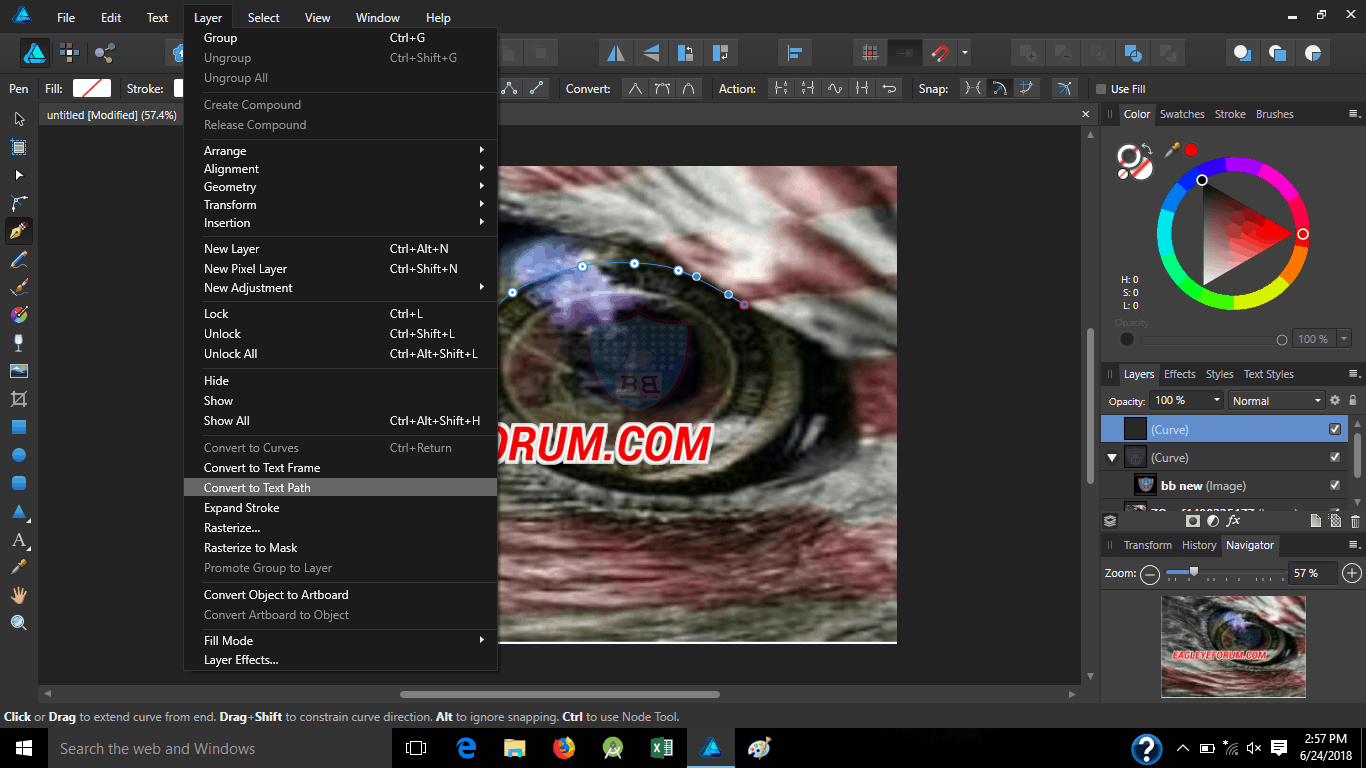
Now I want to add text around the eye so I will got to pen and add the curve, draw a line over the eye, head to “layer” on the menu and scroll down to “text to path”;
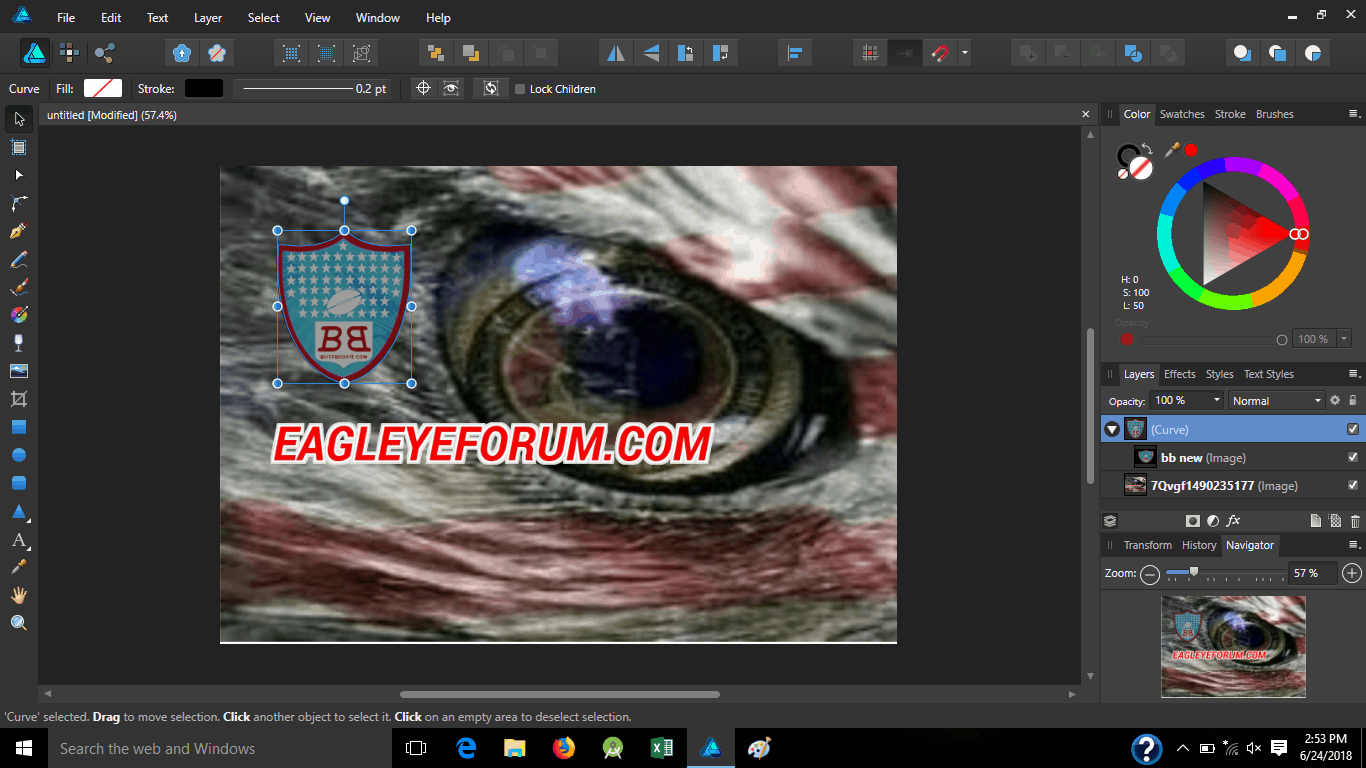
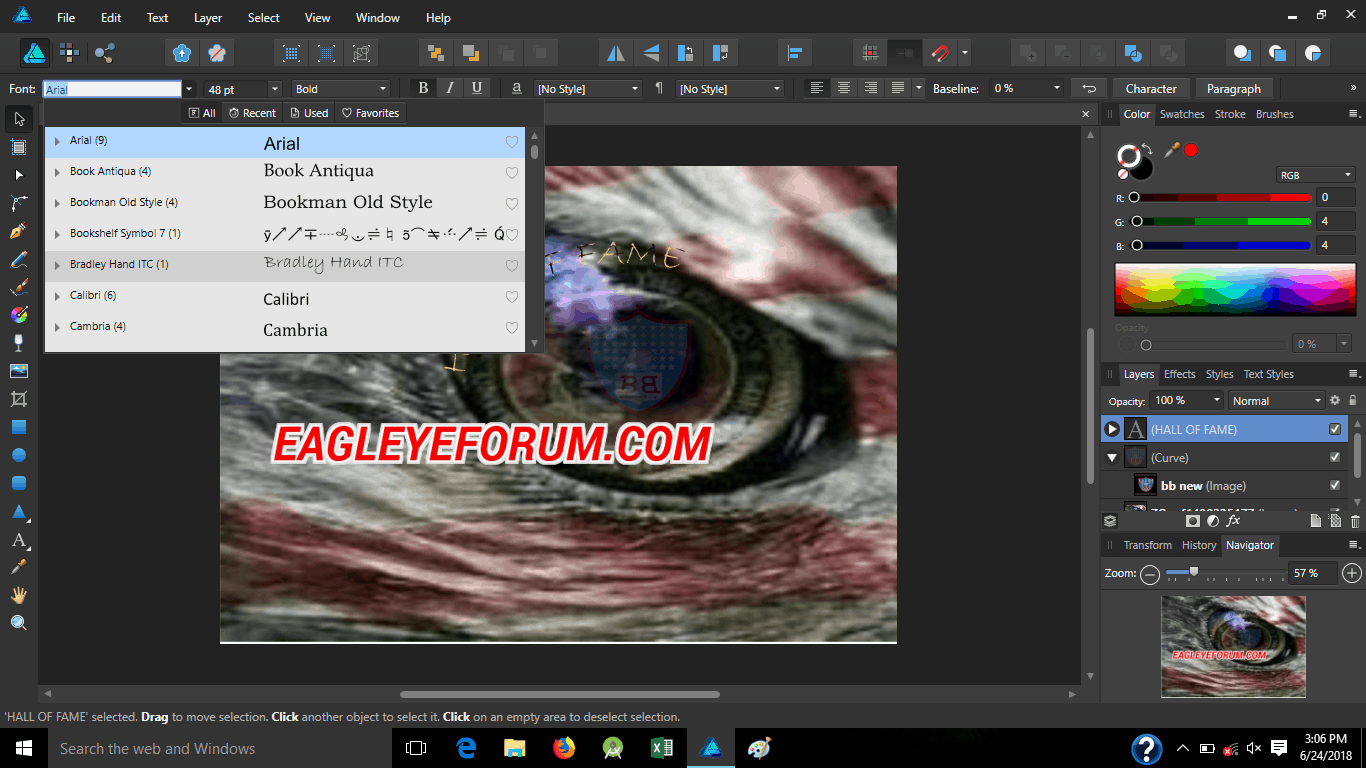
Highlight the text and you can change the size and/or font;
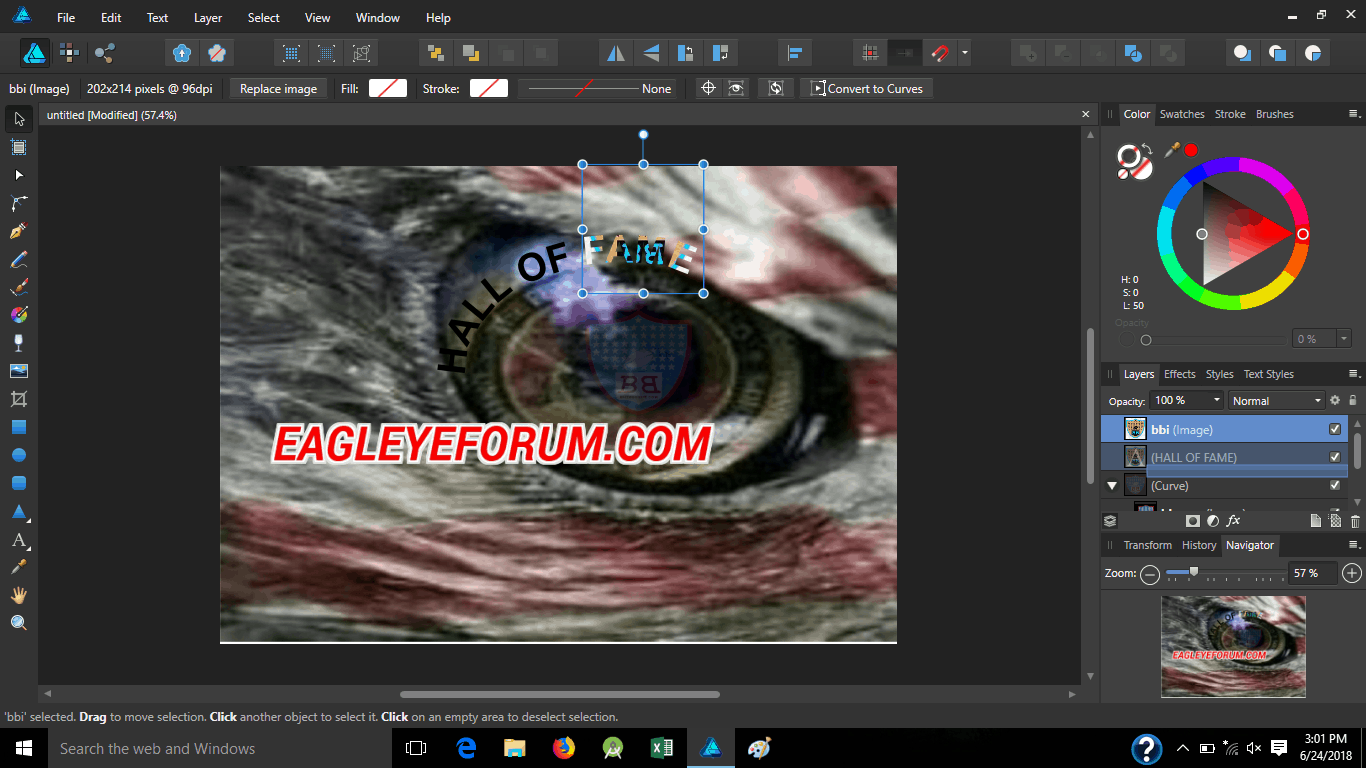
Or even upload an image to it;
You can change colors through “styles”, or the drop-down list by “opacity and spread that image out.
AUTOMOTIVE
In order to keep your vehicle running smooth there are things you will need to either maintain yourself, or have others do it for you. Now, some of you may know a personal mechanic that takes care of your needs for a fair price, while others are forced to take it to the dealer and get charged a hundred (or more) dollars an hour for labor, plus parts, to get the job done. If you know of a local mom and pop automotive shop, that helps save you a little more but even then you’re still paying around fifty to eighty an hour for labor alone. If you really want to save some money and get that feel good accomplishment when its all done, do it yourself.
Now, some things do require special tools or certain equipment and/or just aren’t worth the time and hassle to do it yourself, in which case a shop is where to go, but the majority of things you need to do on a regular basis can be done in your own carport/garage area. Tools to conduct these tasks come fairly cheap and will last long enough to get your money’s worth so they are well worth the investment. I have created a list of some basic tools for the beginner and throughout this section we will go over other special tools necessary for certain tasks.
First, I would highly recommend investing into a Haynes Repair Manual if you want to learn more about the ins and outs of your specific vehicle, outside of what your owner’s manual will show you. I have purchased one for every vehicle I have ever had because of how detailed they are. You can get them at your local auto parts store or order online through Amazon for around $20 pending your vehicle make and model.
Before I go over some routine maintenance you can do at home, lets go over some basic “DOs and DONT’s”;
DO;
- Wear safety glasses when working with power tools or under a vehicle to protect your eyes from falling or flying debris.
- Clean up any oil spills or grease splatters immediately to avoid someone slipping. Cat litter or fine sand is good to soak up oil spills, brake cleaner and paper towels are good for small spills and stains.
- Use every nut, bolt, washer, and wire you take off.
- Make sure the engine is cool before working on it
- Keep chemicals out of reach of children and pets. Anti-freeze especially, as it gives off a sweet smell and pets have been known to get sick after digesting.
DON’T;
- Don’t rely on a jack when under a vehicle, make sure you have a sturdy jack-stand supporting where you are under.
- Don’t push on wrenches when loosening or tightening a bolt to avoid knuckle busters. If you have to push, push with an open palm.
- Don’t use loose wrenches or other tools that may slip and cause injury
- Don’t remove a radiator cap while it is hot.
- Don’t wear loose clothing or have long hair hanging while working on, or around, moving parts.
- Don’t use your battery as a tool holder, a wrench that touches the positive and negative post can complete the circuit and cause damage to your vehicle and or injury to yourself
- Don’t leave tools in the sun because they can get blistering hot quickly
Routine Maintenance schedule;
WEEKLY;
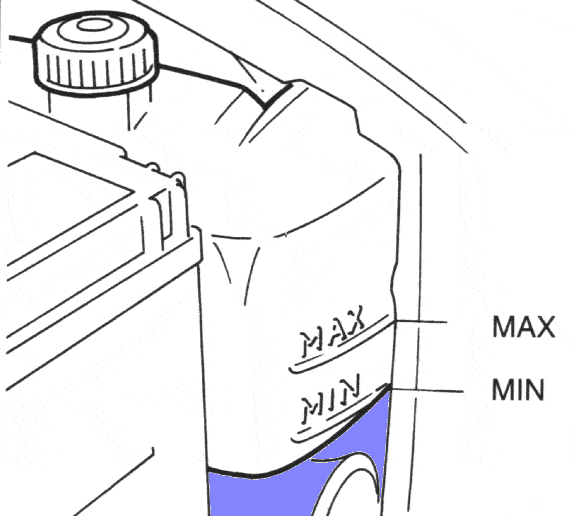
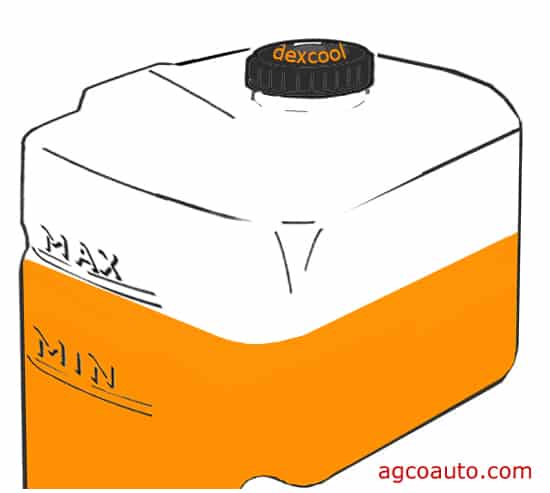
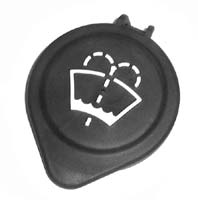
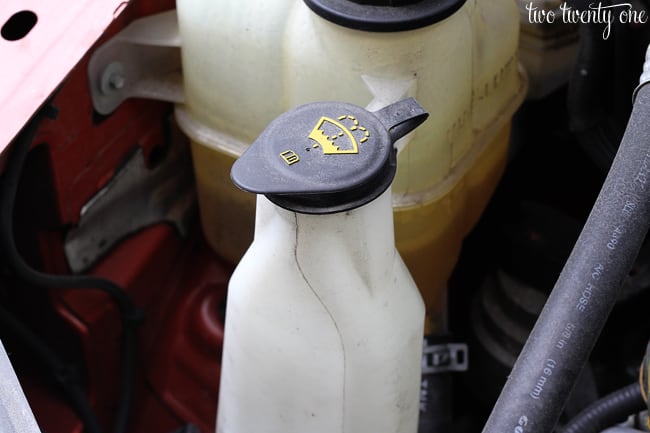
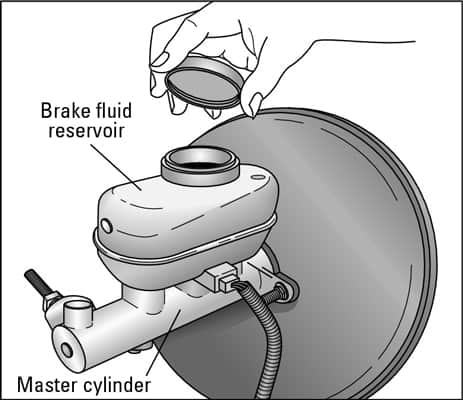
Check fluid levels; oil, coolant, windshield washer (if applicable), brake, and clutch (if applicable)
-
Engine Oil;
The level indicator (dipstick) for the engine oil can usually be found on the passenger side of the vehicle by the spark plugs.
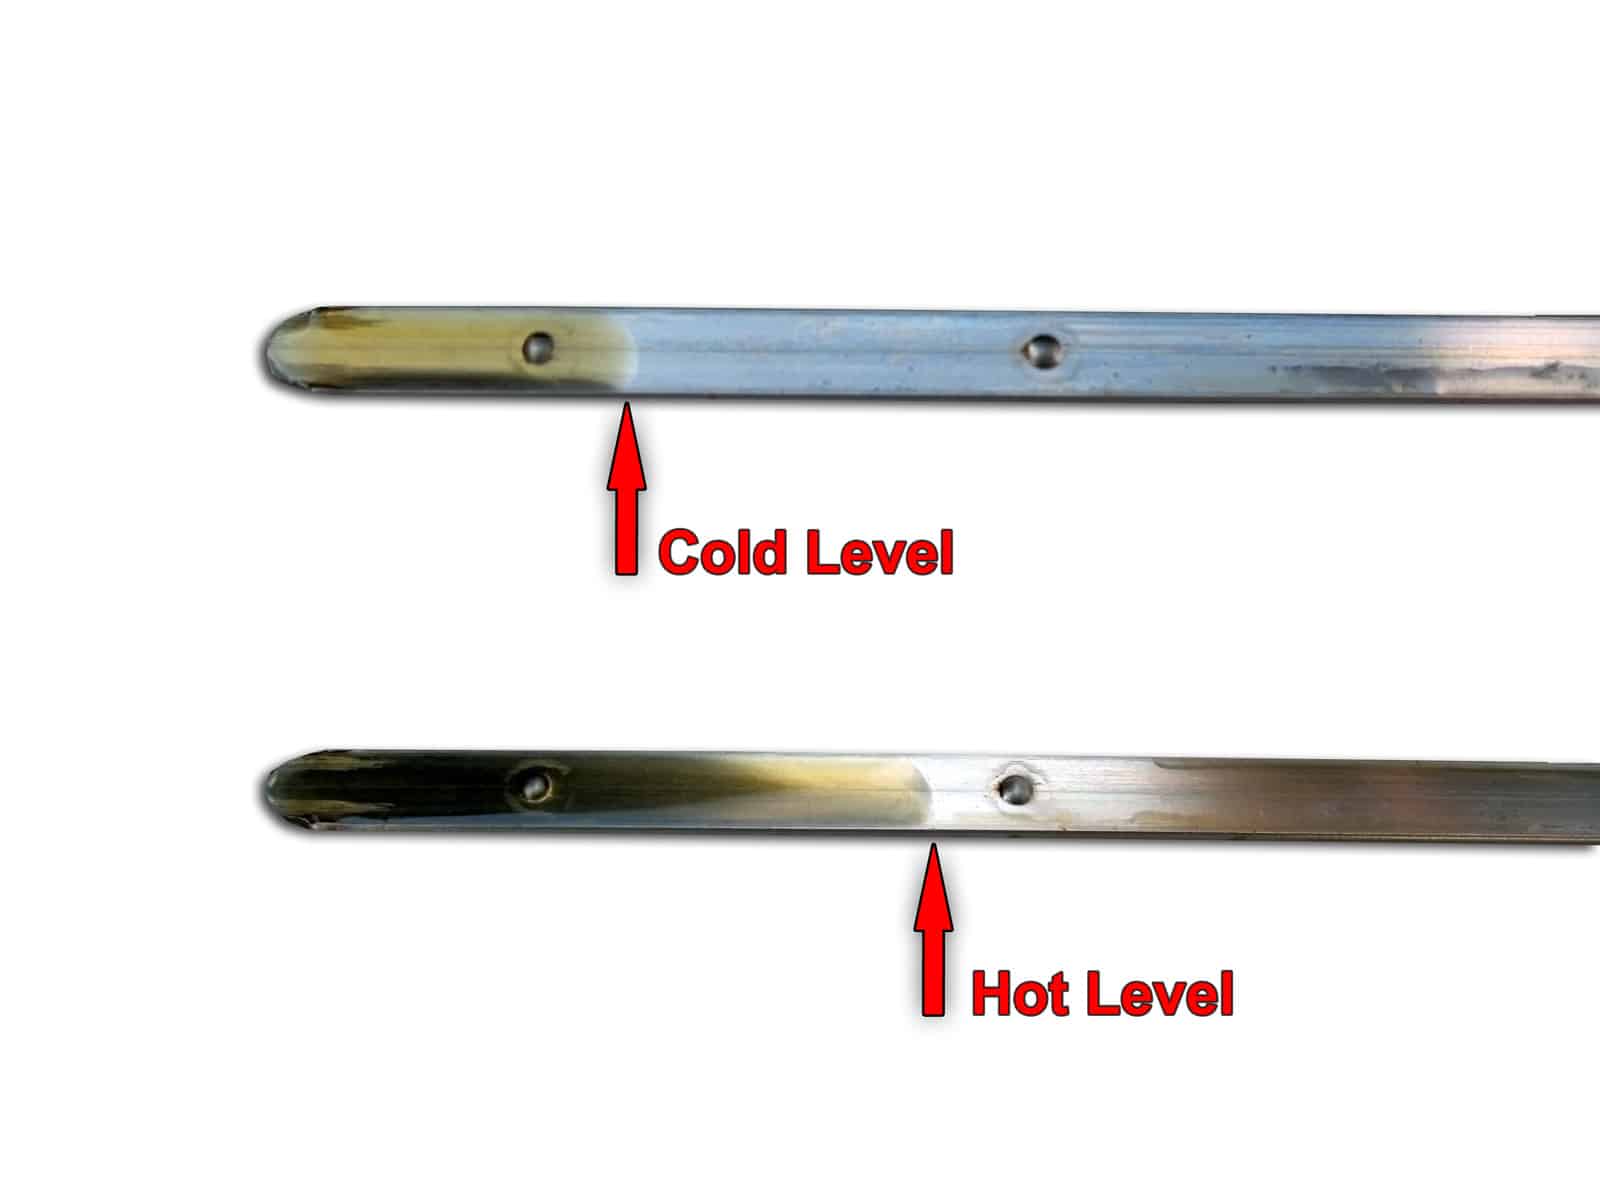
-
Coolant;
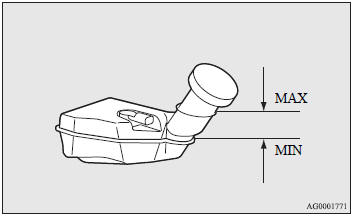
The engine coolant level can be found either by looking at the reservoir that is usually located on the passenger side or by looking in the radiator itself. Make sure the system is cool and depressurized before opening either cap so you don’t get sprayed with scolding hot water.
-
Windshield washer;
Normally located under the hood around the coolant area but have been found
-
Brake fluid;
Located under the hood on the driver side of the vehicle

-
Clutch fluid;
Normally located by your brake reservoir on the driver side under the hood
Inspect tires overall condition and air pressure, check for;
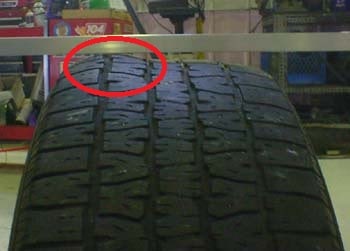 Tire separation; break in steal belts causing a bubble effect on tread
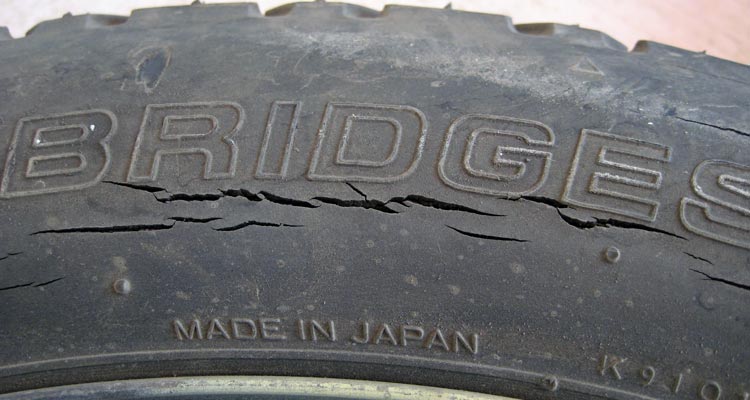 Dry rot; old dry rotted tires from sitting in sun too long
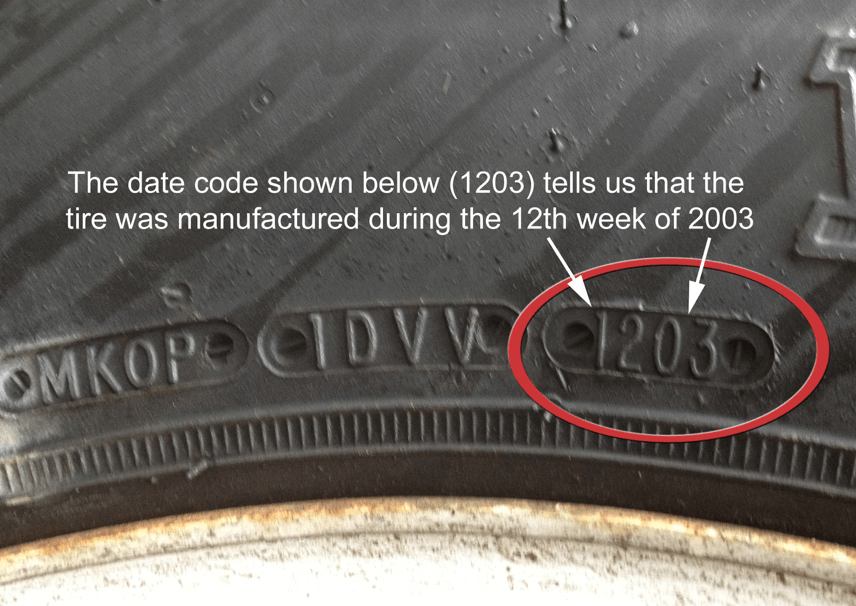 DOT #’s; check the date. Most manufacturers recommend replacement no matter what the tread condition looks like every 10, 8, or even 6 years. Some, if not most, tire shops recommend replacement every 6 years
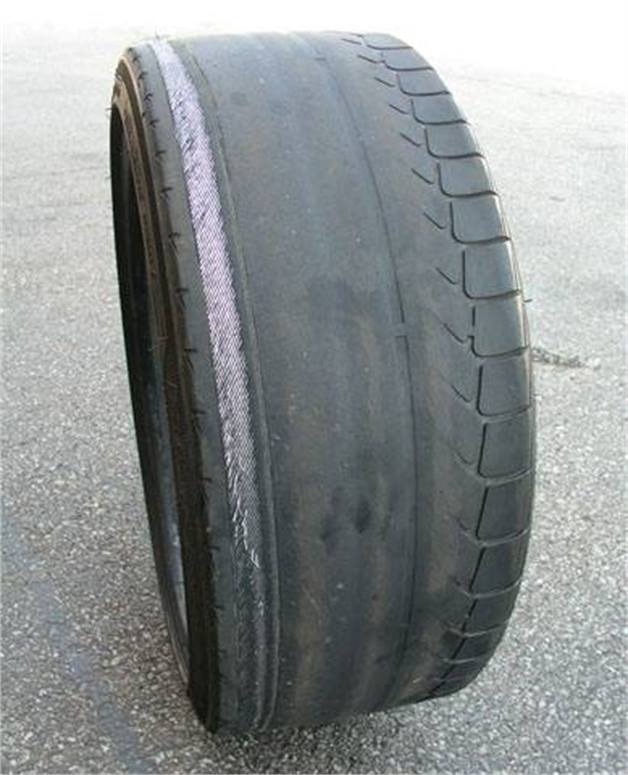 Tread depth, flat spots, steel belts exposed;
- Tread depth should be above 4/32nds
- Check for smooth tires or flat spots from locking up brakes
- Check for steel belt exposure
Replace immediately if your tire looks like this, take your vehicle down to have the suspension/alignment inspected as well
 Impact break; belt separation caused from impacts such as hitting a curb hard
Air Pressures; check your owner’s manual or placard located on your driver side door for appropriate air pressure but a standard rule of thumb is;
- Small car; 25-30 psi
- Medium car/small truck; 35 psi
- Light duty truck with load range C tires; 35 psi standard, 50 psi loaded up
- Light/Medium duty truck with load range D tires; 50 psi standard, 65 psi loaded up
- Medium/heavy duty truck with load range E tires; 65 psi standard, 80 psi loaded up
- Special note; Low profile tires should be set to max air
Tire pressures should be set when they are cold but if they are hot be sure to account for the extra air and set for 3-4 psi more
QUARTERLY (Every 3 months or 3,000 miles)
- Check fluid levels for power steering and transmission
- Change oil filter and oil
BI-ANNUAL; (Every 6 months or 6,000 miles)
- Inspect seat belts
- Inspect windshield wiper blades
- Inspect battery, add DI or Distilled water if necessary (just enough to cover the bottom cells)
- Inspect the drive belt
- Inspect hoses under the hood
- Inspect the cooling system
- Rotate tires; 4-tire and 5-tire (if you have a full size spare) recommended rotations

ANNUAL; (Every 12 months or 15,000 miles)
- Inspect the differential fluid level
- lubricate the chassis
- Inspect the fuel system
- Inspect the brake system
- Inspect the exhaust system
- If 4WD, inspect transfer case level
- Inspect the air filter
Every 30,000 miles or every 2 years
- Change the brake fluid
- Replace the air filter
- Replace spark plugs, if conventional non-platinum, non-indium type
- drain, flush and refill cooling system
- Inspect the steering, suspension and drive-axle boots/bushings
- Change transmission fluid and filter
Every 60,000 miles or 4 years
- Change the transfer case lubricant (if 4×4)
- Change the differential lubricant
- Replace the PCV (Positive Crankcase Ventilation) valve (if applicable)
Every 100,000 miles or 5 years
- Replace spark plug wires (platinum and indium type)
- Inspect and replace spark plug wires if necessary
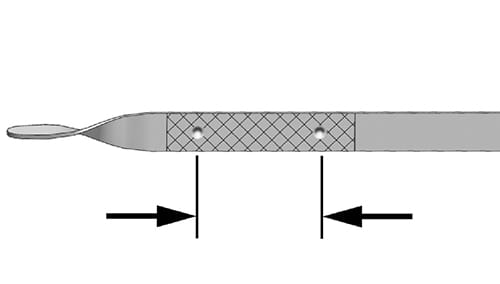
Create your own Radiator Tester
RADIATOR TESTER
Radiator testers can run anywhere between $40-$200 depending on which type you buy, but there is a cheaper alternative, you can go to your local hardware store and make your own for around $20 with cheap materials. Radiator pressure varies from make and model but can range from 4-30 psi (pounds per square inch), be careful to not over pressurize because you can blow your radiator. The standard for most vehicles is between 10-14 psi so use a standard bike pump where you have complete control, and remember, all you are trying to do is find leaks, once you start pumping, start listening, and DO NOT over pressurize your system.
Here is what you need;
(8) hose clamps; 
(3) pieces of 5/16 hose; ![]()
(1) 5/16 “T” shaped barb fitting; 
(1) 5/16-1/2″ adapter; 
(1) piece of 1/2″ hose; 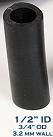
(1) valve stem; ![]()
(1) pressure gauge; 
1st step:
Take the 5/16 “T” shaped barb fitting and attach a piece of 5/16″ hose to each side with a hose clamp. Note; I cut my sizes at 5″, 5″, and 2″ (2″ up top).
2nd step:
Cut the bottom part of the valve stem off (where it starts to widen) if you have a decent saw and clamp to cut it down, otherwise, just use a utility knife and cut it down to bare metal. Once done, insert it into one of the hoses on the sides and attach a hose clamp Note; I wrapped this end with electric tape to avoid cutting my hand on the hose clamp in the future.
3rd step:
Add the 5/16-1/2″ adapter to the top hose, with hose clamp, then add the 1/2″ hose at the end of that with another hose clamp. Note; Hose can be cut to whichever length you prefer, I cut mine around 5″
4th step:
Attach pressure gauge to 1/2″ hose, with hose clamp. Note; You can use any type of gauge and the top hose can be any size as long as it fits the gauge.
End result;
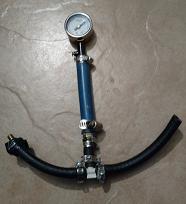
Worked like a charm when finding a leak in an old radiator, leak in freeze plugs and even found a leak by the head gaskets. You can modify this any one you see fit, I’m just throwing out the concept of what you should be looking for.
Final Note and disclaimer; Be sure to use low pressure (10-13psi) when conducting this test, this is just a sample. You can alter it however you see fit.
Basic Safety & Survival skills
There are a bunch of safety and survival tips that people need to know, especially if you’re off on your own on a hike (which is never recommended, always go with a friend). For starters, when finding a camp site you want to stay high and dry, so avoid alleys and paths that can become flooded easily in rain. Try to find somewhere close to a water source, dry wood, or rock walls for shelter and security purposes and avoid danger areas that look like they can be harboring insect nests or trees with rotten branches that can come crashing down on you.
If you have a watch you can navigate easily by using the sky to find your way. The most obvious method to get a general bearing by day is to look at the sun, which rises in the east and sets in the west anywhere in the world. But you can also use an analog watch to find the north-south line in midday if you lose track; hold the watch horizontally and point the hour hand at the sun. Imagine a line running exactly midway between the hour hand and 12 o’clock (1 o’clock if in daylight savings). This is the north-south line. At night you can find the North star by finding the big dipper, draw an imaginary line from the 2 outer edge stars of the dipper, follow them straight to the little dipper, the beginning of the handle, is the North Star. Face it, and you are facing true north.
Here are some tips to help you through, should you ever find yourself in need;
Misc tools you should consider for your survival kit
- Knife to cut down and gather shelter, food, and/or fuel for your fire
- Toothpaste is good for relieving the pain from burns, wounds and some bug bites
- tampons are great for deep wounds since they can absorb and expand, stopping blood loss
- lighter; bic or an old zippo that still has spark can go a long way
- aluminum foil is good to use as a dry surface for a fire
- flashlight and masking tape to dim it, if necessary, to draw less attention to yourself
- guitar cases make great survival bags
- glow sticks, if you’re looking to be found at night
- cotton balls covered in vaseline are good for starting fires
- Char cloth
Tips to create a fire
If you are stuck in the outdoors, you will need to make a fire to provide warmth, light, cook your food or to keep pests and predators away, here are some tips;
- To make a good fire and keep it going you need 3 things; fuel, oxygen and heat
- Dry grass, leaves, pine needles, paper, wood shavings like bark, and small sticks are great for starting fires. You will need larger branches or sticks of wood to keep it going.
- Best way to produce more smoke if you are looking to signal someone is using live and/or wet trees
Tips to keep cool
- Stay in shade and out of wind to keep your sweat in
- Hike at dawn and dusk to avoid the desert elements
- In worst case scenario, urinating on a bandana or shirt and wrapping it around your head can help prevent heatstroke
Tips to keep warm
- Insulate your clothing with newspapers, leaves, dry grass, etc. That extra padding will help you retain body heat
- if possible make a bed about 6″ thick of debris to separate you and the ground
- use rocks around your campfire, rocks store heat so they can still help long after the fire has died and can be used to purify water as well
Tips to stay hydrated
- Extract water from trees and plants by wrapping a plastic bag around healthy leaves in the sun, as the sun causes the evaporation, that water will just collect in the bag.
- Add charcoal to questionable or smelly water when boiling for a more tolerable taste
- boil water you find to kill off pathogens in the water
- try to harvest water from rain, snow, or dew
- You can squeeze water from vines, thistles and some cactus, although most cactus water can make you sick so boil it all to be safe
- Maple trees store water, cut a hole in the bark for a watery syrup flow
Tips to find food
- You can eat plants like cattail, dandelions, and lambsquarter but it is recommended to research what plants are in your area before going out so you can memorize the good ones and make sure the bad don’t kill you
- make a 4-pronged spear easily by cutting a sapling about an inch in diameter, then split the fat end down in 4 equal sections, about 10″ down, jam a stick in the middle and sharpen those 4 prongs with a knife or rock
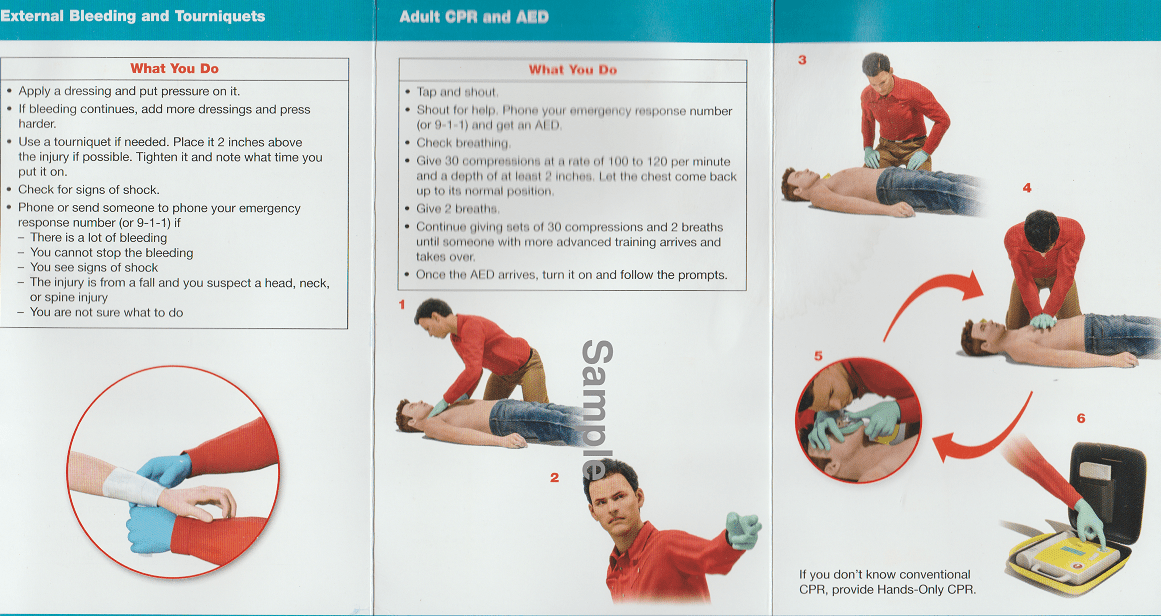
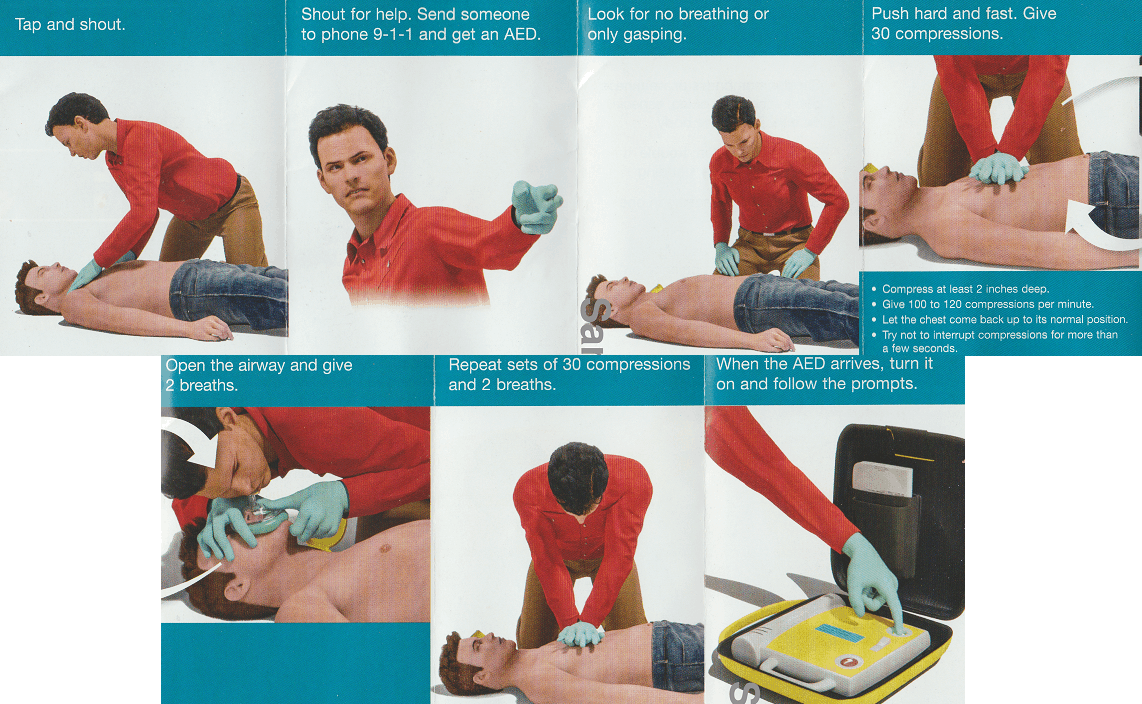
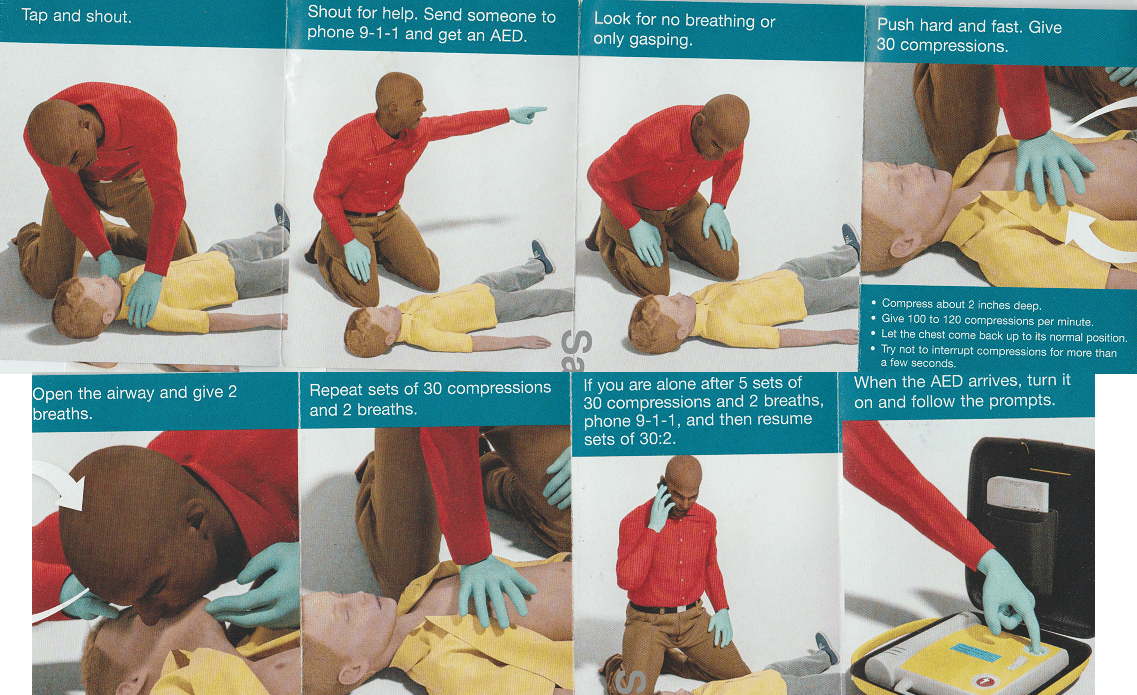
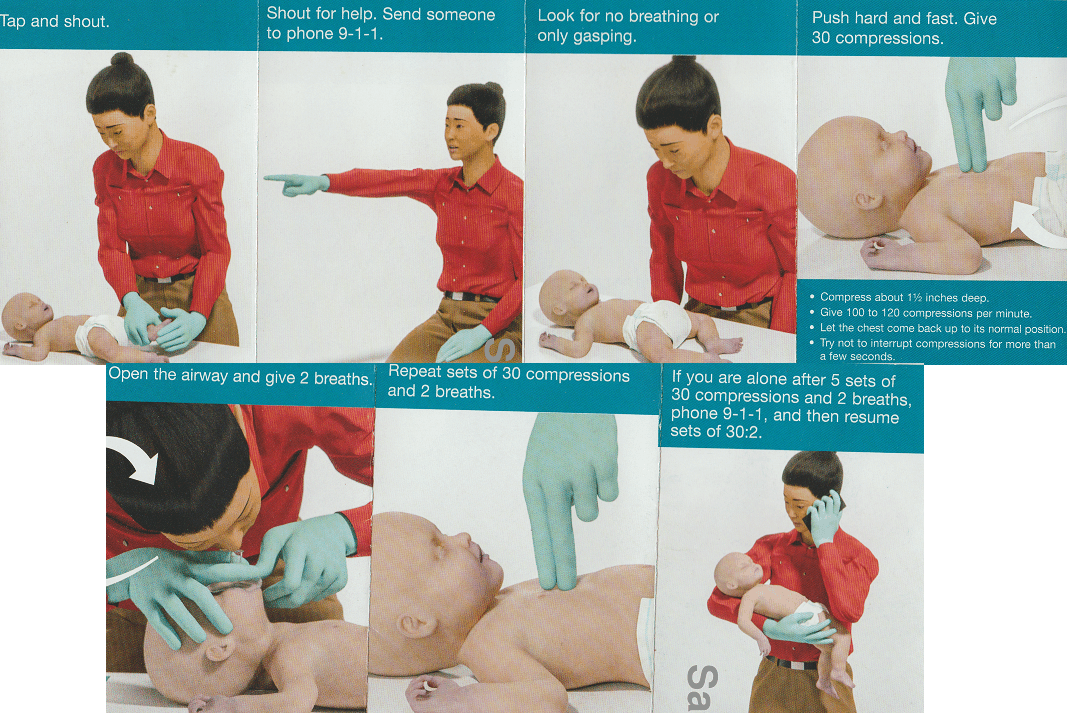
I was able to take a Heartsaver first aid CPR (cardiopulmonary resuscitation) AED (automated external defibrillator) class and learned a lot of valuable information. I have attached photos of the pamphlets I received in hopes it can help someone else out should the need arise.
CPR AED on an adult
It is taught now that if you are going to give mouth to mouth or use an AED you should always start with compressions first, in case there is something blocking the airways
CPR AED on a child
When conducting CPR on a child the same rules apply as an adult except that just one hand should be enough to avoid collapsing their chest.
CPR AED on an infant
When conducting CPR on an infant the only things to remember are use 2 fingers on the chest area so you don’t collapse the chest and your mouth goes over their nose and mouth, not just mouth like adults or children.
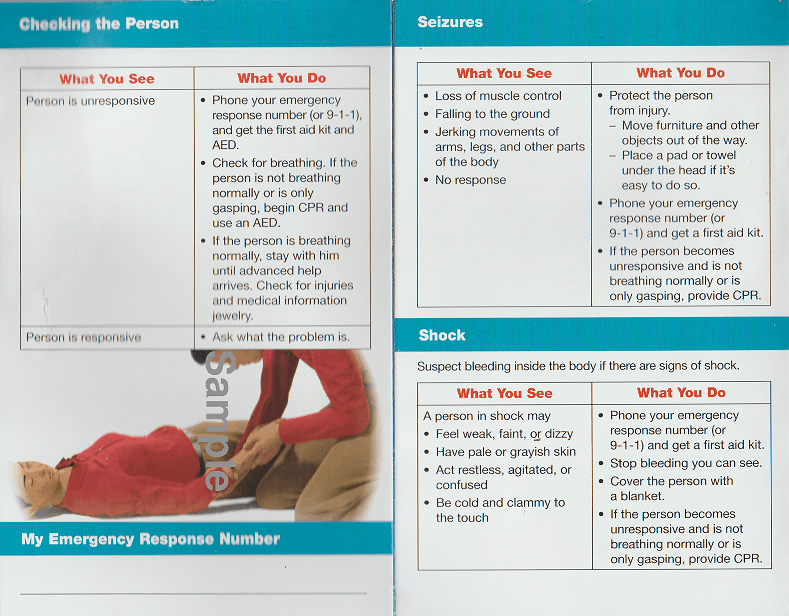
“WHAT YOU SEE, WHAT YOU DO”

Recognize the signs of heart attack & stroke

External bleeding, tourniquets and more CPR
A tournaquet is something you use to alleviate blood loss by tightening down on the area just above the wound to restrict blood flow. If you don’t have the elastic band, you can always use a cloth, like a shirt, and use a stick wrapped in it and turn in a circle to tighten it