
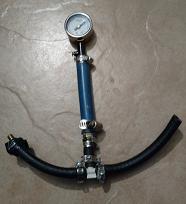
DIY Radiator Tester
Radiator pressure testers typically cost anywhere from $40 to $200 depending on the brand and features. However, if you’re on a budget or just enjoy building your own tools, you can create a functional radiator tester for around $20 using simple hardware store materials.
Important: Radiator systems vary by make and model, with pressure ratings typically between 4 and 30 psi. Most vehicles run between 10 and 14 psi. Exceeding your system’s pressure rating can damage the radiator or cause leaks to worsen—so don’t over-pressurize. You’re only trying to detect leaks, not stress test the system.
Materials Needed:
-
(8) Hose clamps
-
(3) Pieces of 5/16″ hose (cut to: two 5″ and one 2″)
-
(1) 5/16″ “T” barb fitting
-
(1) 5/16″ to 1/2″ hose adapter
-
(1) Piece of 1/2″ hose (around 5″)
-
(1) Valve stem
-
(1) Pressure gauge
Step-by-Step Instructions:
Step 1: Build the “T” Junction
Attach one 5/16″ hose to each side of the “T” fitting using hose clamps. The shorter (2″) hose goes on the top of the “T.”
Tip: This short top hose will connect to the pressure gauge.
Step 2: Install the Valve Stem
Trim the base of the valve stem (where it begins to widen) using a small saw or utility knife, exposing the bare metal. Insert it into one of the side hoses and secure it with a clamp.
Safety Tip: Wrap the clamp in electrical tape to prevent future hand injuries when handling.
Step 3: Add Hose Adapter
Attach the 5/16″ to 1/2″ adapter to the top hose, then connect your 1/2″ hose to the adapter and clamp it in place.
Note: Cut the 1/2″ hose to your desired length—5″ works well for most setups.
Step 4: Attach the Pressure Gauge
Connect your pressure gauge to the end of the 1/2″ hose using a clamp.
Note: Any standard gauge will work as long as it fits snugly into the hose.
Using Your Tester:
Once assembled, this DIY tester can be connected to your radiator just like a store-bought version. Use a standard bike pump with a pressure gauge to gently add air while listening closely for hissing sounds indicating leaks. This setup helped me find:
-
A small radiator leak
-
Failing freeze plugs
-
Even signs of a blown head gasket
Final Notes and Disclaimer:
This tool is meant for low-pressure testing only (10–13 psi max). Always verify your vehicle’s pressure specifications beforehand. This is a sample design—feel free to modify the lengths or fittings based on what works best for your setup.
Use at your own risk, and never leave the system pressurized unattended.